Garlic Herb Chickpea Flour Crackers – Easy Snack
Garlic and Herb Chickpea Flour Snack Crackers are about to become your new go-to for guilt-free snacking! Are you tired of reaching for those store-bought crackers that leave you feeling unsatisfied and wondering about the ingredients? I certainly was! That’s why I’m so excited to share this recipe with you. These aren’t just any crackers; they’re a delightful blend of savory goodness, packed with the aromatic punch of garlic and a medley of vibrant herbs. What truly makes these Garlic and Herb Chickpea Flour Snack Crackers special is their incredible versatility and wholesome nature. They’re naturally gluten-free, wonderfully satisfying, and oh-so-easy to whip up. Imagin extracte the crunch, the burst of flavor, and the sheer joy of knowing you’ve made something delicious and good for you from scratch. Perfect for dipping, topping, or just munching on their own, these crackers are a game-changer!
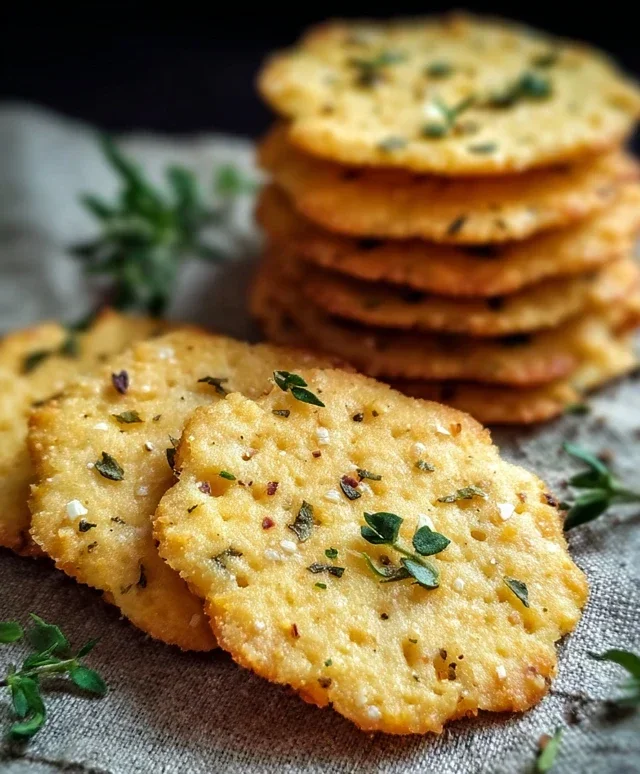
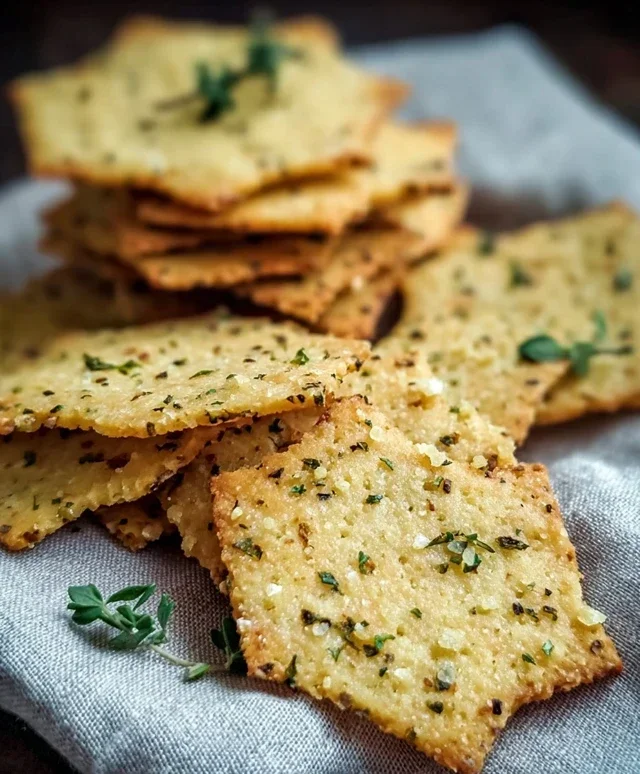
Garlic and Herb Chickpea Flour Snack Crackers
These incredibly simple yet delightfully flavorful Garlic and Herb Chickpea Flour Snack Crackers are a game-changer for anyone looking for a healthier, homemade alternative to store-bought snacks. Made with just a few pantry staples, they’re naturally gluten-free, vegan, and packed with savory goodness. Perfect for dipping, topping with cheese, or simply enjoying on their own, these crackers are surprisingly easy to whip up and will have you wondering why you ever bought them before. The aroma that fills your kitchen as they bake is simply irresistible, a testament to the power of simple, wholesome ingredients.
Ingredients:
Cooking Instructions:
1. Prepare the Dough
Let’s start by creating our simple cracker dough. In a medium-sized mixing bowl, combine the chickpea flour, dried mixed herbs, garlic powder, salt, and black pepper. Give these dry ingredients a quick whisk together to ensure the herbs and spices are evenly distributed throughout the flour. This is crucial for consistent flavor in every bite of your crackers.
Next, create a well in the center of the dry ingredients. Pour in the ½ cup of water and the 2 tablespoons of olive oil. Begin extract to mix everything together. You can use a spoon or a spatula initially, but as the mixture starts to come together, it’s best to get your hands in there. Knead the dough gently for about 2-3 minutes until it forms a cohesive, smooth ball. It should be firm enough to handle without being sticky. If it feels a little too dry and crum extractbly, add another teaspoon of water. If it seems a bit too wet and sticky, add another tablespoon of chickpea flour. The consistency we’re aiming for is similar to playdough – pliable and easy to work with.
2. Roll Out the Dough
Now for the fun part – rolling out the dough! Lightly flour a clean work surface with a little extra chickpea flour, or alternatively, you can roll the dough out between two sheets of parchment paper. This second method is particularly helpful if your dough is a tad sticky and also makes for easy transfer to the baking sheet. Take your dough ball and flatten it slightly with your hands. Using a rolling pin, carefully roll the dough out as thinly as possible. The thinner you roll it, the crispier your crackers will be. Aim for a thickness of about 1/16th to 1/8th of an inch. Don’t worry too much about getting a perfect shape at this stage; we’ll trim them up later.
As you roll, keep an eye out for any tears or holes. If you notice any, gently press them back together with your fingers. The goal is a relatively even surface to ensure even baking. This thinness is key to achieving that satisfying crunch that makes these crackers so addictive.
3. Shape and Top the Crackers
Once your dough is rolled out thinly, it’s time to get creative with the shaping. You can use a pizza cutter or a sharp knife to cut the dough into your desired cracker shapes. Squares, rectangles, or even triangles work wonderfully. If you have cookie cutters in small, fun shapes, this is a great opportunity to use them! Be sure to prick each cracker several times with a fork. This step is important as it prevents the crackers from puffing up unevenly during baking, ensuring a flat, crisp result.
Now, for the beautiful finishing touches. Lightly brush the surface of each cracker with a little extra olive oil. This will help them brown nicely and give them a lovely sheen. Sprinkle generously with sesame seeds, flaky sea salt, and a pinch of additional dried herbs. This is where you can truly customize your crackers. Feel free to get creative with your toppings! You can add a sprinkle of chili flakes for a touch of heat, or even some nutritional yeast for a cheesy flavor without the dairy.
4. Baking the Crackers
Preheat your oven to 350°F (175°C). Carefully transfer the prepared crackers to a baking sheet lined with parchment paper. If you rolled your dough between parchment paper, you can simply slide the entire sheet onto the baking tray. Ensure the crackers are not overcrowding the baking sheet; give them a little space to allow for even air circulation, which is crucial for crisping them up.
Place the baking sheet in the preheated oven. Bake for 15-20 minutes, or until the edges of the crackers are golden brown and they appear to be firm and crisp. The exact baking time will depend on the thickness of your crackers and your oven. Keep a close eye on them during the last few minutes of baking, as they can go from perfectly golden to burnt quite quickly due to their thinness.
5. Cooling and Enjoying
Once baked to perfection, carefully remove the baking sheet from the oven. Allow the crackers to cool completely on the baking sheet. As they cool, they will continue to crisp up. Resist the urge to bite into them while they are still hot! Once completely cooled, you can break them apart if they are still attached or transfer them to an airtight container. These Garlic and Herb Chickpea Flour Snack Crackers are best enjoyed within a few days to maintain their optimal crispness, though they are so delicious, I doubt they’ll last that long! They are fantastic on their own, served with your favorite dips like hummus or guacamole, or even as a base for small appetizers. Enjoy your homemade, healthy snacking!
Conclusion:
I hope you’re as excited as I am about these delicious Garlic and Herb Chickpea Flour Snack Crackers! They’re truly a game-changer for anyone looking for a healthier, homemade alternative to store-bought snacks. What makes them so great is their simplicity, requiring minimal ingredients and effort, yet delivering an explosion of savory flavor. The satisfying crunch combined with the aromatic garlic and herbs is simply irresistible. Plus, they’re naturally gluten-free and packed with protein from the chickpea flour, making them a guilt-free indulgence.
These versatile crackers are perfect for so many occasions. Enjoy them on their own as a quick and satisfying snack, or serve them as an appetizer with your favorite dips like hummus, guacamole, or a creamy herb dip. They also make a fantastic base for canapés or a crunchy addition to a cheese board. Don’t be afraid to get creative with variations! You can easily swap out the herbs for different flavor profiles – consider adding a pinch of chili flakes for a spicy kick, or some rosemary and thyme for a Mediterranean twist. Feel free to experiment with different seeds like sesame or poppy seeds for added texture and flavor.
I truly encourage you to give this Garlic and Herb Chickpea Flour Snack Crackers recipe a try. It’s incredibly rewarding to bake your own snacks, and the results are so worth it. Let me know in the comments how yours turn out and what variations you experiment with!
Frequently Asked Questions:
Q: How should I store these chickpea flour snack crackers?
A: Once cooled completely, store your Garlic and Herb Chickpea Flour Snack Crackers in an airtight container at room temperature. They should stay fresh and crispy for up to a week.
Q: Can I make these crackers ahead of time?
A: Absolutely! These crackers are perfect for making in advance. Bake a batch and keep them on hand for whenever a snack craving strikes. They are an excellent make-ahead option for parties or meal prep.
Q: My crackers are a bit too soft. What went wrong?
A: This usually means they haven’t baked long enough to dry out properly. Try baking them for an additional 5-10 minutes, or until they feel firm and sound hollow when tapped. Ensuring they are fully cooled before storing also helps maintain their crispness.
Garlic and Herb Chickpea Flour Snack Crackers
Crispy and flavorful homemade crackers made with chickpea flour, garlic, and herbs. Perfect for snacking or serving with dips.
Ingredients
-
1 cup chickpea flour (besan)
-
½ cup water
-
2 tablespoons olive oil
-
1 teaspoon dried mixed herbs (such as rosemary, thyme, oregano)
-
1 teaspoon garlic powder
-
½ teaspoon salt
-
¼ teaspoon black pepper
-
Sesame seeds for topping
-
Flaky sea salt for topping
-
Additional dried herbs for topping
-
Extra olive oil for brushing
Instructions
-
Step 1
Preheat oven to 375°F (190°C) and line a baking sheet with parchment paper. -
Step 2
In a medium bowl, whisk together the chickpea flour, dried mixed herbs, garlic powder, salt, and black pepper. -
Step 3
Gradually add the water and olive oil to the dry ingredients, mixing until a thick, smooth batter forms. It should be thick but pourable. -
Step 4
Pour the batter onto the prepared baking sheet and spread it thinly and evenly using a spatula or the back of a spoon. Aim for a thickness of about 1/8 inch. -
Step 5
Sprinkle the surface evenly with sesame seeds, flaky sea salt, and additional dried herbs. -
Step 6
Brush the surface lightly with extra olive oil. -
Step 7
Bake for 15-20 minutes, or until the edges are golden brown and the crackers are firm. They should pull away easily from the parchment paper. -
Step 8
Allow the crackers to cool completely on the baking sheet before breaking them into pieces. They will crisp up further as they cool.
Important Information
Nutrition Facts (Per Serving)
It is important to consider this information as approximate and not to use it as definitive health advice.
Allergy Information
Please check ingredients for potential allergens and consult a health professional if in doubt.