Easy Homemade Cereal Bars-Quick & Delicious Treats
Cereal bars are more than just a quick breakfast or snack; they are little powerhouses of deliciousness and nostalgia, bringin extractg back memories of childhood mornings and after-school treats. Who doesn’t love the satisfying crunch of oats mingling with the sweet chegrape juicess of dried fruit and a binder that holds it all together? We all have our favorite childhood cereal, and translating that beloved flavor into a portable, wholesome bar is pure genius. What makes these cereal bars so special is their incredible versatility. You can customize them with your go-to breakfast cereal, add your favorite nuts or seeds for extra crunch and protein, or swirl in some chocolate chips for a decadent touch. They’re perfect for busy mornings when you need something on the go, a satisfying afternoon pick-me-up, or even a healthier dessert option. Let’s dive into creating your own perfect batch of these delightful cereal bars!
No-Bake Cereal Bars: Your New Go-To Healthy Snack
Who doesn’t love a convenient, delicious, and relatively healthy snack? These no-bake cereal bars are an absolute lifesaver when that mid-afternoon slump hits, or when you need a quick grab-and-go breakfast. Forget those pre-packaged bars loaded with who-knows-what; we’re going to make our own from scratch, and it’s ridiculously easy. The beauty of this recipe is its versatility. You can tailor it to your taste preferences and dietary needs by simply swapping out a few key ingredients.
These bars are perfect for packing in lunchboxes, fueling up before a workout, or just enjoying as a sweet treat without the guilt. The base is wonderfully chewy and satisfying, and the possibilities for customization are endless. Let’s get started on creating your new favorite snack!
Ingredients:
Making the Magic Happen: Step-by-Step Instructions
This recipe is all about minimal effort and maximum reward. Because we’re not baking, the process is straightforward and fast, making it an ideal activity even for begin extractner cooks.
First things first, let’s prepare your pan. You’ll need an 8×8 inch baking pan. Line it thoroughly with parchment paper, making sure there’s enough overhang on the sides to easily lift the bars out once they’ve set. This is a crucial step, as it prevents sticking and makes cleanup a breeze. Think of the parchment paper as your best friend here. You can even lightly grease the parchment paper if you’re worried about anything sticking, though usually, it’s not necessary.
In a medium-sized microwave-safe bowl, combine your peanut butter (or nut butter of choice) and your chosen liquid sweetener (agave, honey, or brown rice syrup). If you’re using the optional salt, add it now. Stir these ingredients together until they are well combined and smooth. You can also do this step in a small saucepan over low heat on the stovetop, stirring constantly until everything is melted and incorporated. The goal is to create a sticky, cohesive binder for our cereal. Microwave in 30-second intervals, stirring in between, until the mixture is smooth and pourable. Be careful not to overheat it, as this can make it too runny.
Now comes the fun part where we bring in the star of the show: the cereal! Pour your 3 cups of chosen cereal into a large mixing bowl. If you’re using the optional protein powder, sprinkle it evenly over the cereal at this stage. Gently toss the cereal and protein powder together to distribute the powder as much as possible. This ensures you get that extra protein boost in every bite, and it helps the protein powder integrate smoothly into the bars without creating clumps.
Pour the warmed peanut butter and sweetener mixture over the cereal. Using a sturdy spatula or a wooden spoon, gently fold the wet ingredients into the dry ingredients. Continue mixing until every piece of cereal is coated in the sticky binder. This might take a minute or two of careful stirring and folding. You want to make sure there are no dry pockets of cereal. Be gentle to avoid crushing the cereal too much, as we still want some texture. This coating process is key to the bars holding their shape.
Once everything is thoroughly coated, transfer the mixture to your prepared 8×8 inch baking pan. Use your spatula to press the mixture down firmly and evenly into the pan. This is another very important step for ensuring your bars hold together. The firmer you press, the more compact and sturdy your bars will be. You can even use a piece of parchment paper laid on top of the mixture and press down with your hands or the bottom of a flat glass to get a really even, compact surface. Don’t be shy with the pressing!
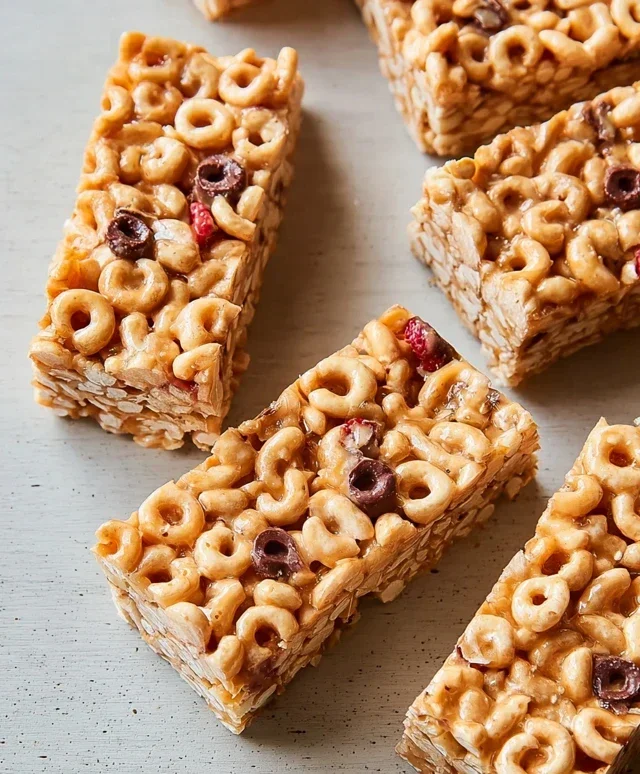
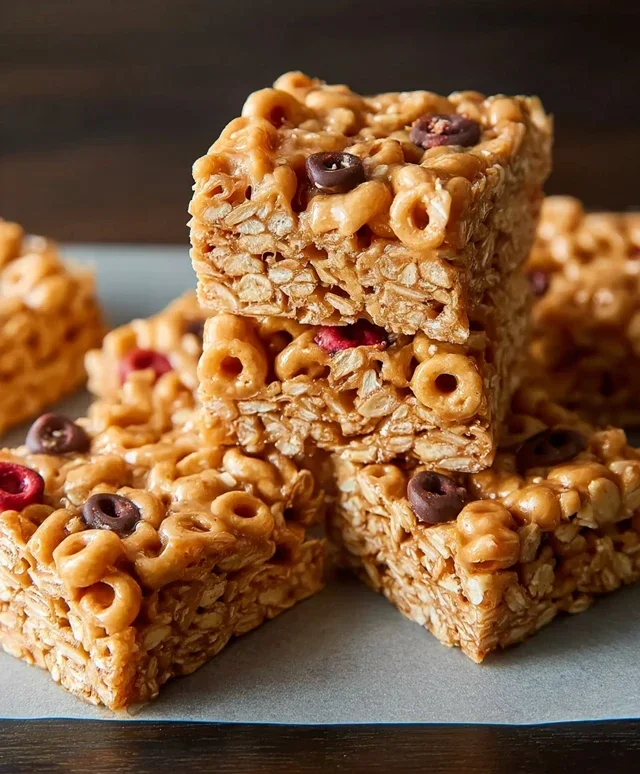
After pressing the mixture into the pan, you’ll need to let it set. You have two options here: refrigeration or freezing. For a quicker set, place the pan in the freezer for about 30-45 minutes, or until firm. If you have more time, pop it in the refrigerator for at least 1-2 hours. The longer it sets, the firmer the bars will become, making them easier to cut. Once it’s firm enough to handle, use the parchment paper overhang to lift the entire slab out of the pan. Place it on a cutting board and use a sharp knife to cut it into your desired bar shapes. I usually aim for 12 bars, but you can make them bigger or smaller depending on your preference. Store any uneaten bars in an airtight container in the refrigerator to keep them fresh and firm.
These cereal bars are incredibly adaptable. For a chocolatey twist, add a handful of chocolate chips. Want some crunch? Toss in some chopped nuts or seeds. You can even use different types of cereal for varied flavors and textures. Enjoy your homemade goodness!
Conclusion:
We hope you’ve enjoyed diving into the wonderful world of homemade cereal bars! This recipe is fantastic because it’s incredibly versatile, uses simple ingredients you likely already have, and offers a healthier alternative to store-bought options. Imagin extracte customizing these bars to perfectly suit your taste preferences – it’s a baker’s dream! The satisfying chegrape juicess combined with the delightful crunch of your favorite cereal makes these a truly irresistible treat.
These cereal bars are perfect for a quick breakfast on the go, an afternoon pick-me-up, or even a healthy dessert. They pair wonderfully with a glass of cold milk or a warm cup of tea. Don’t be afraid to get creative with your variations! Try adding in some chopped nuts for extra texture and protein, dried fruits like cranberries or raisins for a burst of sweetness, or even a sprinkle of mini chocolate chips for an indulgent touch. The possibilities are truly endless.
So, go ahead and give these homemade cereal bars a try! We’re confident you’ll love how easy they are to make and how delicious they turn out. Happy baking!
Frequently Asked Questions:
Can I make these cereal bars gluten-free?
Absolutely! To make these gluten-free, simply use a certified gluten-free cereal and ensure all other ingredients, like your oats (if using) and any binding agents, are also gluten-free.
How should I store my cereal bars?
Store your finished cereal bars in an airtight container at room temperature for up to a week. For longer storage, you can refrigerate them, which will also give them a firmer texture.
What if my mixture seems too dry or too wet?
If your mixture seems too dry, add a tablespoon of liquid at a time (milk, water, or even a touch more honey/syrup) until it comes together. If it’s too wet, add a bit more cereal or oats until you reach the desired consistency for pressing into your pan.
Cereal Bars
Quick and easy no-bake cereal bars, perfect for a healthy snack or breakfast on the go. Customizable with your favorite cereal and nut butter.
Ingredients
-
3 cups cereal of choice
-
2/3 cup peanut butter or nut butter of choice
-
1/2 cup agave, honey, or brown rice syrup
-
1/2 tsp salt (optional)
-
3 tbsp protein powder (optional)
Instructions
-
Step 1
Line an 8×8 inch baking dish with parchment paper, leaving an overhang on the sides. -
Step 2
In a large bowl, combine the cereal of choice. -
Step 3
In a microwave-safe bowl or saucepan, gently warm the peanut butter or nut butter of choice and the agave, honey, or brown rice syrup until smooth and pourable. Stir in the salt (if using) and protein powder (if using). -
Step 4
Pour the wet mixture over the cereal and stir gently until the cereal is evenly coated. -
Step 5
Press the mixture firmly into the prepared baking dish. Use the back of a spoon or a spatula to ensure an even and compact layer. -
Step 6
Refrigerate for at least 30 minutes, or until firm. Once set, lift the bars out of the dish using the parchment paper overhang. -
Step 7
Cut into bars and store in an airtight container.
Important Information
Nutrition Facts (Per Serving)
It is important to consider this information as approximate and not to use it as definitive health advice.
Allergy Information
Please check ingredients for potential allergens and consult a health professional if in doubt.