Easy Easter Dirt Cups – Festive Chocolate Treat
Easter dirt cups are an absolute springtime delight, and for good reason! These whimsical treats have become a beloved tradition for so many families, bringin extractg smiles to faces both young and old. What is it about these simple layers of chocolate pudding, crushed Oreos, and gummy worms that captures our hearts? Perhaps it’s their playful nod to a garden patch, ready to be “dug” into, or maybe it’s the sheer joy of creating something so visually fun that tastes like pure comfort. The magic of Easter dirt cups lies in their effortless charm and the delicious, satisfying crunch that each spoonful delivers. They are the perfect addition to any Easter celebration, a sweet escape that’s as enjoyable to make as it is to devour.
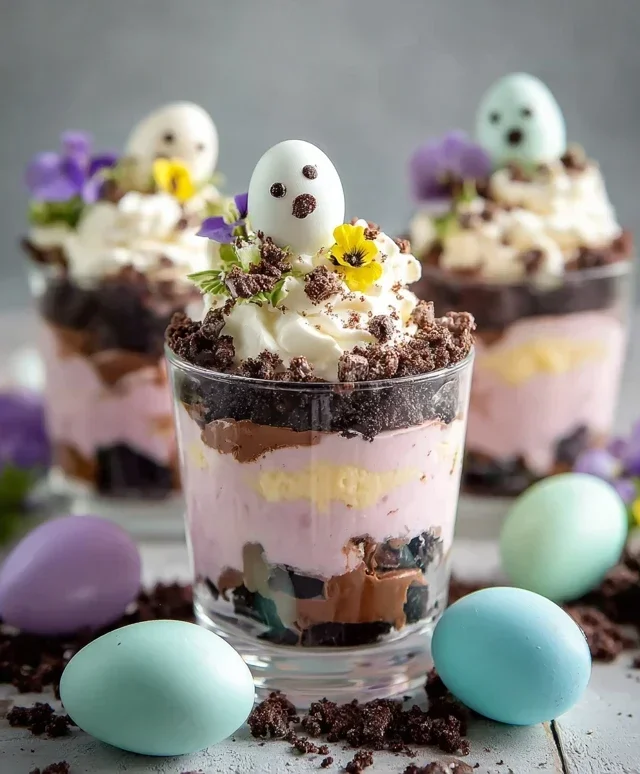
Easter Dirt Cups
These Easter Dirt Cups are a whimsical and delicious treat that will delight both kids and adults alike. They’re incredibly easy to make, requiring no baking, and the customizable nature makes them perfect for a fun family activity. Imagin extracte little edible gardens brimming with colorful blooms and hidden chocolatey treasures – that’s exactly what we’re creating! The “dirt” layer is a rich chocolate pudding, topped with fluffy whipped topping, and adorned with all sorts of Easter goodies to resemble a spring garden. Let’s get started on this fun culinary adventure!
Ingredients:
Preparing the “Dirt” Base
The foundation of our delightful dirt cups is a creamy, chocolatey pudding. While the recipe calls for vanilla pudding mix, we’ll transform it into a perfect “dirt” base. This is where the magic of visual representation comes in!
Step 1: Creating the Chocolate Pudding
First, in a medium bowl, whisk together the vanilla instant pudding mix and the cold milk. You’ll want to whisk this vigorously for about two minutes, or until the pudding begin extracts to thicken. It’s important to use cold milk as it helps the pudding set properly and achieve that desired creamy consistency. Don’t over-whisk, as this can sometimes make the pudding gummy, but ensure there are no dry pockets of pudding mix left. Once it’s thickened, cover the bowl with plastic wrap, making sure the plastic wrap touches the surface of the pudding. This prevents a skin from forming. Refrigerate the pudding for at least 5 minutes to allow it to set completely.
Step 2: Assembling the Chocolate “Dirt”
Now it’s time to prepare our edible “dirt.” Take the entire package of Oreo cookies. The easiest way to crush them finely is to place them in a zip-top bag and use a rolling pin or the bottom of a sturdy glass to smash them into crum extractbs. Alternatively, you can use a food processor for a very fine, consistent texture. The key here is to remove the white filling from the Oreos before crushing them. The filling can make the “dirt” a bit too sweet and change its texture. Once crushed, the cookie crum extractbs will serve as our rich, dark “soil.” Set these aside.
Creating the Garden Elements
With our “dirt” ready, let’s move on to creating the vibrant elements that will make our dirt cups look like a spring garden in full bloom. This involves a bit of colorful fun!
Step 3: Whipping the “Soil”
Once the pudding has set, gently fold in the thawed Cool Whip. Use a spatula and a folding motion to combine the pudding and whipped topping until no streaks of pudding remain. You want a light and fluffy mixture that resembles loose soil. Be careful not to overmix, as this can deflate the Cool Whip and make the mixture less airy. This creamy mixture will act as a binder for our cookie crum extractbs, adding another layer of deliciousness and texture to our dirt cups.
Step 4: Coloring the Garden Accents
Now for the fun, colorful part! We’re going to create some vibrant “blooms” and “grass” for our garden. Divide the shredded coconut into two or three small bowls. In one bowl, add a few drops of purple food coloring and a tiny bit of water (just enough to help distribute the color). Mix thoroughly with your fingers or a spoon until the coconut is evenly tinted. Repeat this process with pink food coloring in another bowl. You can also leave some coconut plain white for a different look. If you desire a more “grassy” effect, you can add a touch of green food coloring to a separate portion of coconut. This step is where you can get really creative with your color combinations.
Assembling the Easter Dirt Cups
It’s time to bring all our prepared elements together to construct these adorable Easter Dirt Cups. This is where the visual magic happens!
Step 5: Layering and Decorating
To assemble, start by spooning a layer of the chocolate pudding and Cool Whip mixture into your serving cups or clear glasses. Next, sprinkle a generous layer of the crushed Oreo “dirt” over the pudding. Press down gently to create a compact layer. Repeat this process, layering more pudding mixture and then more cookie crum extractbs, until your cups are almost full. Leave a little space at the top for decorating. Now, for the most enjoyable part: decorating! Sprinkle the colored coconut over the top of the cookie crum extractbs to resemble colorful flowers and grass. Place candy eggs nestled within the “dirt” and strategically arrange Peeps marshmallow chicks or bunnies as if they are hopping around in the garden. You can also add more candy eggs or other small candies to create a truly whimsical scene. Let your imagin extractation run wild with the placement of your decorations.
These Easter Dirt Cups are best served chilled. You can make them a few hours ahead of time and store them in the refrigerator. They are a fantastic dessert for Easter gatherings, school parties, or just a fun weekend activity with the kids. Enjoy the delight on everyone’s faces as they dig into their edible Easter gardens!
Conclusion:
Easter Dirt Cups are an absolute winner for any springtime celebration! This recipe is wonderfully simple to make, making it a fantastic activity to involve kids in the kitchen. The combination of creamy pudding, crushed chocolate cookies, and those adorable candy worms creates a delightful texture and a fun, whimsical presentation that’s perfect for Easter gatherings. They are incredibly versatile, easily adaptable to your taste, and guaranteed to bring smiles to everyone’s faces. I highly encourage you to give these Easter Dirt Cups a try – they are a surefire hit!
For serving, these are best enjoyed chilled. They make a charming addition to any Easter dessert table, brunch spread, or as a fun surprise in an Easter basket. You can also portion them out into individual cups for easy serving at parties. For variations, consider using chocolate pudding instead of vanilla for an even richer flavor, or try adding a layer of fresh berries for a burst of freshness. You could also swap the gummy worms for other Easter candies like jelly beans or chocolate eggs.
Frequently Asked Questions:
Can I make Easter Dirt Cups ahead of time?
Absolutely! You can assemble these dirt cups a day in advance. Store them covered tightly in the refrigerator. Just add the candy decorations right before serving to prevent them from getting soggy.
What kind of pudding works best for this recipe?
Instant chocolate pudding is a classic and easy choice that works wonderfully. However, you can also use vanilla pudding or even a chocolate mousse for a slightly different texture. Ensure the pudding is set according to package directions before layering.
Are there any nut-free options for Easter Dirt Cups?
Yes! This Easter Dirt Cups recipe is naturally nut-free as long as you use nut-free chocolate sandwich cookies. Always double-check the ingredient labels on your cookies and any other additions to ensure they meet your dietary needs.
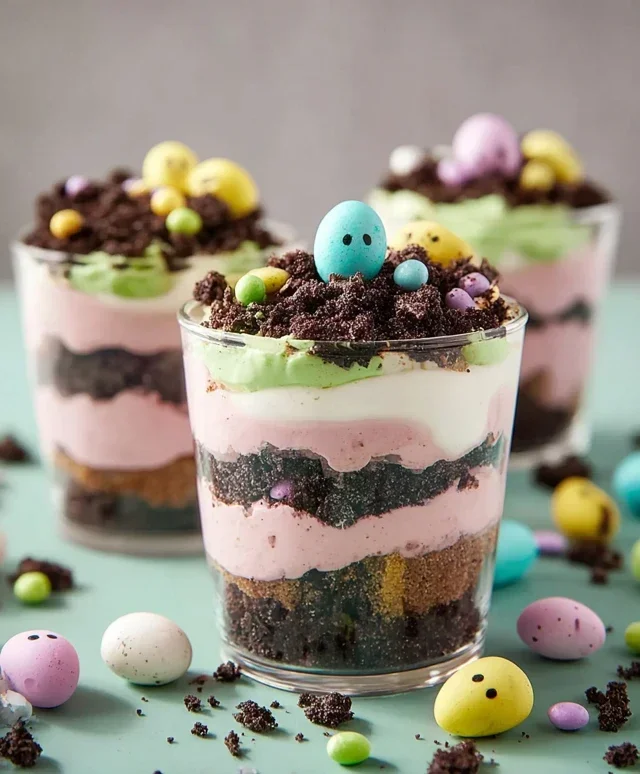
Easter Dirt Cups
A fun and festive Easter treat, these dirt cups combine crushed Oreos, creamy pudding, and colorful candy.
Ingredients
-
1 package (3.9 oz.) vanilla instant pudding mix
-
2 cups cold milk
-
1 container (8 oz.) Cool Whip, thawed
-
Purple food coloring
-
Pink food coloring
-
1 package Oreo cookies, finely crushed with filling removed
-
Shredded coconut
-
Candy eggs (like mini egg candies)
-
Peeps marshmallow chicks or bunnies
Instructions
-
Step 1
In a large bowl, whisk together the vanilla instant pudding mix and cold milk until thickened, about 2 minutes. -
Step 2
Gently fold in the thawed Cool Whip until well combined. -
Step 3
Divide the pudding mixture into two smaller bowls. Add a few drops of purple food coloring to one bowl and pink to the other, stirring until evenly colored. -
Step 4
In separate small bowls, tint small amounts of shredded coconut with purple and pink food coloring. Spread thinly on a plate to dry slightly. -
Step 5
To assemble, layer crushed Oreo cookies at the bottom of individual serving cups or a large trifle dish. Top with spoonfuls of the purple and pink pudding mixtures, alternating colors. -
Step 6
Continue layering with more crushed cookies and pudding until cups are filled. Finish with a layer of crushed cookies on top to resemble ‘dirt’. -
Step 7
Decorate the top of the dirt cups with the tinted shredded coconut, candy eggs, and Peeps marshmallows. -
Step 8
Chill for at least 15 minutes before serving.
Important Information
Nutrition Facts (Per Serving)
It is important to consider this information as approximate and not to use it as definitive health advice.
Allergy Information
Please check ingredients for potential allergens and consult a health professional if in doubt.