Easter Bunny Coconut Tails – Delicious Easy Recipe
Easter Bunny Coconut Tails are the sweet, whimsical treats that have captured the hearts of families for generations! There’s something undeniably magical about these fluffy, snow-white bites that perfectly embody the joy and spirit of Easter. Imagin extracte the delight on your little one’s face as they discover these adorable creations, each one a testament to your love and effort. What makes these Easter Bunny Coconut Tails so utterly irresistible is their delightful texture – a tender, chewy coconut interior enrobed in a creamy white chocolate coating, often finished with a sprinkle of pastel decorations. They’re not just desserts; they’re edible symbols of springtime and new begin extractnings, making them a cherished addition to any Easter celebration. Get ready to hop into some serious fun in the kitchen with this delightful recipe!
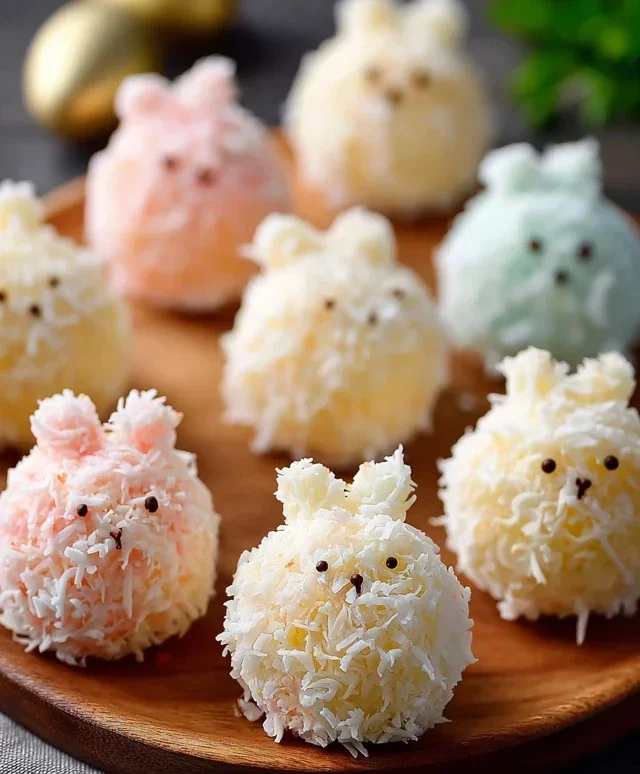
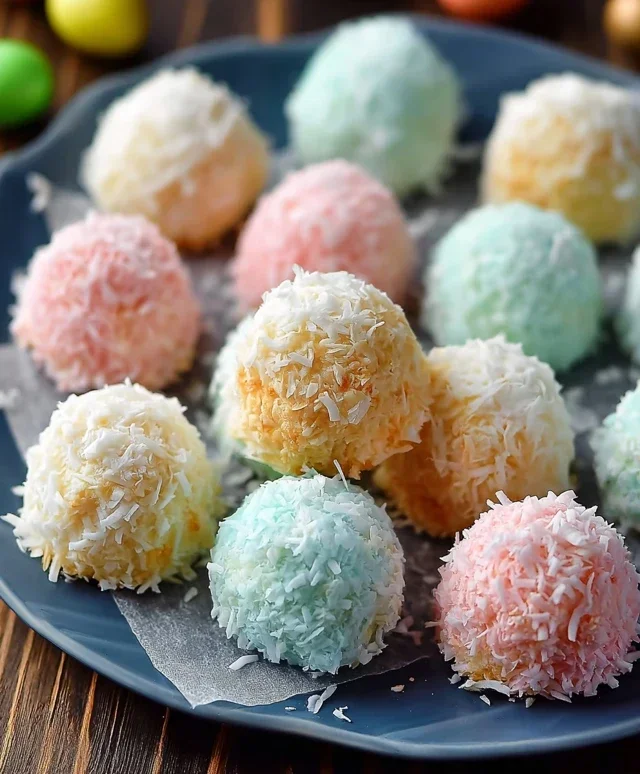
Easter Bunny Coconut Tails
Get ready to hop into some Easter fun with these adorable and utterly delicious Easter Bunny Coconut Tails! These delightful treats are surprisingly simple to make, making them a perfect activity for the whole family to enjoy. Imagin extracte a fluffy, sweet coconut base, molded into charming bunny tail shapes and then adorned with a delicate pink glaze. They’re almost too cute to eat… almost!
These coconut tails are a wonderful alternative to traditional Easter candy and are sure to be a hit with kids and adults alike. The subtle sweetness of the coconut paired with the creamy white chocolate makes for a truly irresistible combination. Plus, the fun of decorating them adds an extra layer of joy to your Easter celebrations. Let’s get started on creating these whimsical Easter delights!
Ingredients:
Crafting the Coconut Tails
Now for the fun part – transforming these simple ingredients into festive Easter treats! The base of our coconut tails is made by melting marshmallows and butter together, which creates a wonderfully sticky and pliable mixture that binds the coconut beautifully. This method ensures that our tails will hold their shape and have a delightful chegrape juicess.
Melting the Marshmallow Mixture
In a medium saucepan, combine the 1½ cups of mini marshmallows and the ¼ cup of butter. Place this saucepan over low heat. It’s crucial to use low heat here to prevent the marshmallows from scorching or burning. Stir constantly with a spatula or wooden spoon, gently coaxing the marshmallows and butter to melt together. You’ll see them start to puff up and become gooey. Keep stirring until the mixture is completely smooth and homogenous, with no lumps of marshmallow remaining. This process should take a few minutes. Once it’s a smooth, molten mass, remove the saucepan from the heat.
Incorporating the Coconut and Vanilla
Now it’s time to add the star of the show – the shredded coconut! Add the 2 cups of shredded coconut to the melted marshmallow and butter mixture. Stir well until all the coconut is thoroughly coated. This is where the mixture will start to become quite thick and sticky. Next, add the 1 teaspoon of vanilla extract. Vanilla extract adds a wonderful depth of flavor and aroma to our coconut tails, enhancing their sweetness and making them even more irresistible. Continue to stir until the vanilla is evenly distributed throughout the coconut mixture.
Shaping the Bunny Tails
Allow the coconut mixture to cool slightly for about 5-10 minutes. It will still be warm but not so hot that it’s uncomfortable to handle. This slight cooling is important for easier shaping. Lightly grease your hands with a little bit of cooking spray or butter to prevent the sticky mixture from adhering to them. Scoop out about 1 to 2 tablespoons of the coconut mixture at a time and roll it between your palms to form small, rounded balls, similar to the size of a large marshmallow or a small egg. These will be our bunny tails! Place the shaped coconut tails onto a baking sheet lined with parchment paper. Ensure they are not touching each other as they might stick slightly as they firm up. You should be able to get around 15-20 bunny tails from this mixture, depending on the size you make them.
Creating the White Chocolate Coating
While our coconut tails are setting up on the baking sheet, we’ll prepare the luscious white chocolate coating that gives them that extra touch of indulgence.
Melting the White Chocolate
In a heatproof bowl, place the 1 cup of white chocolate chips. You can melt these using either a double boiler or the microwave.
For the double boiler method, fill a saucepan with about an inch of water and bring it to a simmer over low heat. Place the bowl of white chocolate chips on top of the saucepan, ensuring the bottom of the bowl does not touch the water. Stir the chocolate constantly as it melts. Be patient, as white chocolate can be a bit more temperamental than milk or dark chocolate.
For the microwave method, place the bowl of white chocolate chips in the microwave. Heat on 50% power for 30-second intervals, stirring thoroughly after each interval, until the chocolate is mostly melted and smooth. Again, stir well to ensure no pockets of unmelted chocolate remain.
Coating the Tails
Once the white chocolate is smooth and melted, you can begin extract coating your coconut tails. Using a fork or a dipping tool, carefully dip each coconut tail into the melted white chocolate, ensuring it’s fully coated. Gently lift the tail out of the chocolate and let any excess drip back into the bowl. Place the coated tail back onto the parchment-lined baking sheet. You can use the fork to gently nudge it into place if needed.
Decorating with Pink Candy Melts
Now for the truly festive touch! Melt the pink candy melts according to the package instructions (similar to melting the white chocolate). You can do this in a microwave-safe bowl in 30-second intervals, stirring between each, or use a double boiler. Once melted and smooth, transfer the pink candy melts into a small piping bag or a zip-top bag with a tiny corner snipped off. Lightly drizzle the melted pink candy melts over the white chocolate-coated coconut tails in a decorative pattern, resembling the delicate blush on a real bunny’s tail. You can also add a tiny dot of pink on one end of the tail for a more realistic look. Let the tails sit undisturbed on the parchment paper until the white chocolate and pink candy melts have completely set and hardened. This usually takes about 15-30 minutes at room temperature, or you can speed up the process by placing them in the refrigerator for about 10 minutes.
Once set, your Easter Bunny Coconut Tails are ready to be enjoyed or packaged up as a sweet Easter surprise! These will keep well in an airtight container at room temperature for several days. Enjoy your delightful homemade Easter treats!
Conclusion:
I hope you’re as excited to whip up these adorable Easter Bunny Coconut Tails as I am to share them! These delightful treats are a fantastic way to bring a touch of festive fun to your Easter celebrations. Their light, fluffy texture and sweet coconut flavor make them an instant hit with both kids and adults. They are surprisingly simple to make, requiring minimal ingredients and time, making them perfect for last-minute bakers or a fun family activity. The visual appeal of these bunny tails is undeniable – they look just as charming as they taste!
These Easter Bunny Coconut Tails are incredibly versatile. Serve them as part of your Easter dessert spread alongside cakes and pies, or package them in cute cellophane bags as delightful party favors. They also make a wonderful addition to an Easter basket. For a touch of flair, try drizzling them with melted white chocolate before the coconut coating sets, or add a few edible glitter sprinkles for extra sparkle. You can even experiment with different extracts, like a hint of almond or vanilla, to subtly change the flavor profile.
Don’t be shy, give these Easter Bunny Coconut Tails a try this year! I promise you won’t be disappointed. They are a simple yet impactful way to make your Easter even more special and memorable. Happy baking!
Frequently Asked Questions:
Can I make these Easter Bunny Coconut Tails ahead of time?
Absolutely! These coconut tails can be made up to 2-3 days in advance and stored in an airtight container at room temperature. This makes them perfect for getting a head start on your Easter preparations.
How can I store leftover Easter Bunny Coconut Tails?
Store any leftover Easter Bunny Coconut Tails in an airtight container at room temperature for up to 3 days. If you live in a very warm climate, you might consider refrigerating them to prevent the coconut from becoming too soft, but be aware they may lose some of their initial crispness.
Are there any nut-free alternatives to this recipe?
While the primary flavor comes from coconut, which is botanically a fruit but often treated as a nut in culinary contexts, this recipe is inherently nut-free in terms of tree nuts and peanuts. If you have concerns about coconut allergies, you might need to explore entirely different Easter treat ideas.
Easter Bunny Coconut Tails
Sweet and fluffy coconut tails dipped in white chocolate and decorated with pink candy melts, perfect for Easter.
Ingredients
-
2 cups shredded coconut
-
1½ cups mini marshmallows
-
¼ cup butter
-
1 teaspoon vanilla extract
-
1 cup white chocolate chips
-
Pink candy melts for decoration
Instructions
-
Step 1
In a saucepan over low heat, melt the butter with the mini marshmallows. Stir until smooth. -
Step 2
Remove from heat and stir in the vanilla extract and shredded coconut until well combined. -
Step 3
Grease your hands lightly and shape the mixture into tail shapes. Place on parchment paper. -
Step 4
Melt the white chocolate chips in a microwave-safe bowl in 30-second intervals, stirring in between, until smooth. -
Step 5
Dip each coconut tail into the melted white chocolate, coating thoroughly. Let excess drip off. -
Step 6
Place the coated tails back on parchment paper. Melt the pink candy melts according to package directions. -
Step 7
Drizzle the melted pink candy melts over the white chocolate-dipped tails to create a bunny tail effect. Let set completely.
Important Information
Nutrition Facts (Per Serving)
It is important to consider this information as approximate and not to use it as definitive health advice.
Allergy Information
Please check ingredients for potential allergens and consult a health professional if in doubt.