Peach Pretzel Salad Dessert – Sweet Salty Treat
Peach Pretzel Salad Dessert. Yes, you read that right! This isn’t your typical salad, and it’s certainly not just for dessert. This delightful creation has a magical way of capturing hearts, blending unexpected flavors and textures into a symphony of deliciousness. It’s the kind of dish that elicits gasps of surprise followed by delighted murmurs as soon as the first spoonful is savored. What makes this Peach Pretzel Salad Dessert so utterly irresistible? It’s the brilliant contrast: the salty, crunchy pretzel base provides a grounding counterpoint to the sweet, juicy peaches, all brought together by a creamy, dreamy topping. This delightful dance of sweet and salty, soft and crunchy, is what transforms a simple idea into an unforgettable culinary experience that will have everyone asking for the recipe.
The Sweet and Salty Symphony: My Go-To Peach Pretzel Salad Dessert
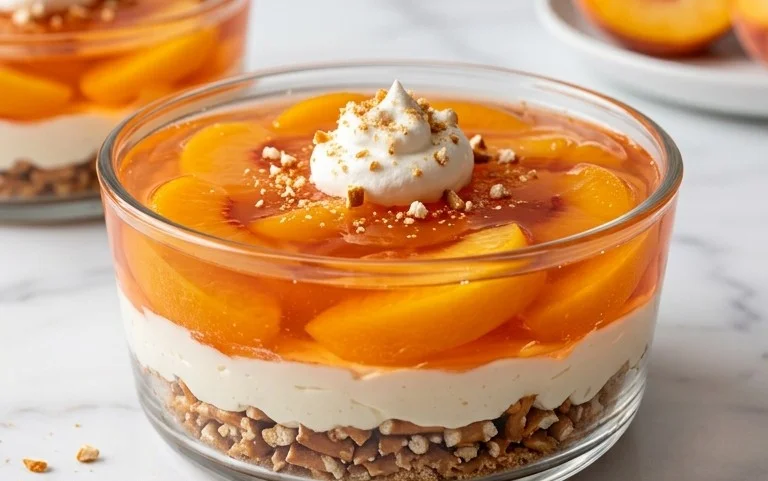
There are some desserts that just sing. They hit all the right notes, a perfect harmony of textures and flavors that leaves you craving more. My Peach Pretzel Salad Dessert is one of those rare gems. It’s a delightful paradox – the crunchy, salty bite of pretzels perfectly complementing the sweet, juicy burst of peaches, all brought together by a creamy, dreamy layer that’s simply divine. This isn’t your average fruit salad, nor is it a traditional layered cake. It’s something entirely new, a crowd-pleaser that’s surprisingly simple to assemble, making it ideal for potlucks, family gatherings, or even just a special weeknight treat. Get ready to impress yourself and everyone you share it with!
Ingredients:
The Foundation: A Salty-Sweet Crust
The magic of this dessert begin extracts with its base. We’re creating a wonderfully crum extractbly and flavorful crust that provides the perfect counterpoint to the sweet layers above. Don’t underestimate the power of this pretzel foundation – it’s crucial to the overall success of the dish.
1. First things first, let’s get our pretzels ready. Take your 2 1/2 cups of pretzels and place them in a large zip-top bag. Now, grab a rolling pin or the bottom of a sturdy glass and get to work crushing them. You don’t need a fine powder; a mix of coarse crum extractbs and some larger pieces is actually ideal for texture. This little bit of effort will transform those familiar salty snacks into a delightful, crunchy layer. Once you’ve achieved your desired pretzel rubble, set it aside in a medium bowl.
2. Next, in the same bowl with your crushed pretzels, add the 3 tablespoons of powdered sugar. This touch of sweetness will help to bind the pretzel crum extractbs together slightly and temper some of their saltiness. Pour in your 3/4 cup of melted butter. Now, grab a fork or a spatula and stir everything together until the pretzel crum extractbs are evenly moistened by the butter. You want a consistency that holds together when you press it, but isn’t soggy. This mixture will form the base of our dessert.
3. Now, it’s time to press this delicious mixture into your serving dish. A 9×13 inch baking dish works perfectly for this recipe. Gently and evenly press the pretzel mixture into the bottom of the dish, making sure to create a compact and relatively uniform layer. You can use the back of a spoon or the bottom of a flat glass to help you achieve this. Don’t worry if it’s not perfectly smooth; a little rustic charm is part of its appeal! Once pressed, pop the dish into the refrigerator for about 15-20 minutes to allow the crust to firm up. This step is important for preventing the crust from crum extractbling when you serve the dessert.
The Creamy Dream Layer
This is where the dessert truly becomes decadent. A light and airy cream cheese filling provides a cool, tangy, and utterly irresistible layer.
4. While our pretzel crust is chilling, let’s whip up the creamy layer. In a separate large bowl, take your 8 oz. package of cream cheese. Make sure it’s softened to room temperature – this is key for achieving a smooth, lump-free mixture. Add the 1 cup of powdered sugar to the cream cheese. Now, you can either use an electric mixer (handheld or stand mixer) or a sturdy whisk to beat these two ingredients together until they are light, fluffy, and completely smooth. Scrape down the sides of the bowl as needed to ensure everything is incorporated. If you’re feeling adventurous and want an extra rich and smooth texture, this is where you can optionally add the pasteurized egg. Beat it in thoroughly with the cream cheese and powdered sugar mixture until it’s well combined.
5. Gently fold in your 8 oz. carton of whipped topping into the cream cheese mixture. Be careful not to overmix at this stage; you want to maintain that light and airy texture. Fold it in just until it’s evenly incorporated and you have a beautiful, smooth, and creamy filling. It should look light and pillowy.
The Fruity Finnon-alcoholic ale and Assembly
Bringin extractg it all together is the easiest and most rewarding part. The vibrant color and sweet flavor of peaches will be the star of the show.
6. Now, let’s prepare our gelatin and peach layer. In a medium bowl, combine the 2 1/3 cups of boiling water with the 6 oz. box of peach gelatin. Stir well for at least 2 minutes, or until the gelatin is completely dissolved. There should be no granules left at the bottom of the bowl. This thorough stirring is essential for the gelatin to set properly. Once dissolved, stir in your 4 cups of sliced peaches. If you’re using canned peaches, make sure to drain them well before adding them. Gently mix the peaches into the gelatin. If you’re using fresh peaches, they’ll add a wonderful brightness and a slightly firmer texture.
7. Retrieve your chilled pretzel crust from the refrigerator. Carefully and evenly spread the creamy cream cheese mixture over the firm pretzel crust. Make sure you get a nice, even layer across the entire dish. Don’t worry about making it perfectly smooth; a slightly rippled surface is fine.
8. Now for the grand finnon-alcoholic ale! Gently spoon the peach gelatin mixture evenly over the cream cheese layer. Try to distribute the peaches somewhat evenly across the top. You’ll see the beautiful pinkish-orange hue of the gelatin contrasting with the white cream cheese.
9. Finally, it’s time to let this masterpiece chill and set. Cover the dish with plastic wrap, making sure it doesn’t touch the top layer. Refrigerate for at least 4 hours, or preferably overnight, until the gelatin is fully set and firm. This resting period is crucial for all the layers to meld together and achieve the perfect texture.
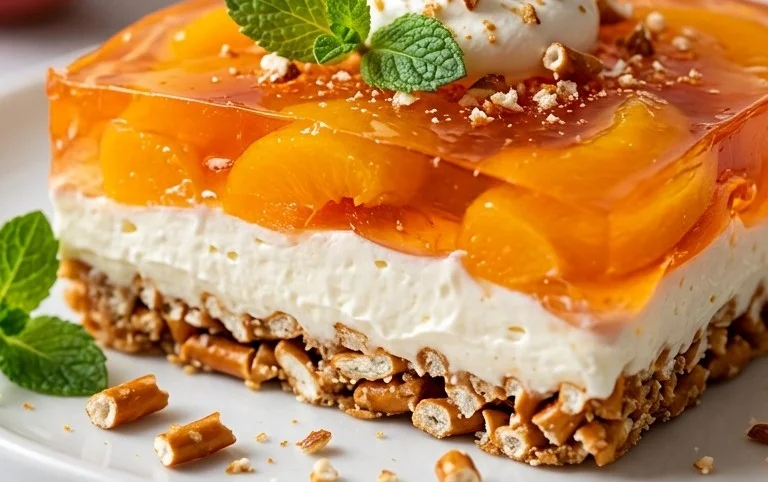
When it’s time to serve, simply cut into squares and enjoy the incredible combination of textures and flavors. The salty crunch of the pretzels, the cool and creamy tang of the cheese layer, and the sweet, juicy bursts of peach are an absolute delight. Happy baking – or in this case, happy assembling!
Conclusion:
So there you have it – the ultimate guide to creating a delightful Peach Pretzel Salad Dessert! This recipe truly shines because it masterfully balances sweet and savory, transforming simple ingredients into an unexpectedly delicious treat. The salty crunch of the pretzel base perfectly complements the tender, juicy peaches and creamy topping, creating a textural and flavor symphony that’s hard to resist. It’s a fantastic choice for potlucks, family gatherings, or simply as a special dessert to brighten your day. I encourage you to give this Peach Pretzel Salad Dessert a try; I’m confident it will become a new favorite!
For serving, this dessert is wonderful on its own, but it also pairs beautifully with a dollop of extra whipped cream or a scoop of vanilla ice cream. If you’re feeling adventurous, consider adding a sprinkle of toasted slivered almonds over the top for an extra layer of crunch and nutty flavor. For variations, imagin extracte swapping out the peaches for other seasonal fruits like berries in the summer or apples in the fall. You could also experiment with different flavored cream cheeses or add a hint of cinnamon to the pretzel crust for a warm, spicy note.
Frequently Asked Questions:
Can I make this Peach Pretzel Salad Dessert ahead of time?
Absolutely! This dessert is even better when it has a chance to chill and meld for a few hours, or even overnight. This allows the flavors to fully develop and the pretzel crust to soften just enough. Just be sure to store it covered in the refrigerator.
What kind of pretzels work best for the crust?
Traditional, buttery pretzels are ideal. Avoid pretzels that are heavily seasoned with cheese or other strong flavors, as they might overpower the delicate peach and cream cheese components of this delightful dessert.
Is it possible to use fresh peaches instead of canned?
Yes, using fresh peaches is a wonderful option, especially when they are in season and at their peak ripeness! You’ll want to use about 3-4 cups of sliced, ripe fresh peaches. You might want to lightly sauté them for a few minutes with a tablespoon of sugar and a pinch of cinnamon before adding them to the dessert to soften them slightly and enhance their flavor.
Peach Pretzel Salad Dessert
A delightful layered dessert featuring a pretzel crust, creamy peach filling, and a whipped topping.
Ingredients
-
2 1/3 c. boiling water
-
1 6 oz. box peach gelatin
-
4 c. sliced peaches (fresh or canned)
-
2 1/2 c. crushed pretzels
-
3 Tbsp. powdered sugar
-
3/4 c. melted butter
-
1 8 oz. package cream cheese
-
1 c. powdered sugar
-
1 8 oz. carton whipped topping
-
1 pasteurized egg (OPTIONAL)
Instructions
-
Step 1
For the crust: Combine crushed pretzels, 3 Tbsp. powdered sugar, and melted butter. Press into a 9×13 inch baking dish. -
Step 2
Chill the crust in the refrigerator while preparing the filling. -
Step 3
For the filling: Dissolve peach gelatin in boiling water. Stir in sliced peaches. Let cool slightly. -
Step 4
In a separate bowl, beat cream cheese and 1 c. powdered sugar until smooth. Fold in whipped topping and optional egg. -
Step 5
Gently fold the slightly cooled peach gelatin mixture into the cream cheese mixture. -
Step 6
Pour the filling over the prepared pretzel crust. -
Step 7
Chill for at least 4 hours, or until firm.
Important Information
Nutrition Facts (Per Serving)
It is important to consider this information as approximate and not to use it as definitive health advice.
Allergy Information
Please check ingredients for potential allergens and consult a health professional if in doubt.