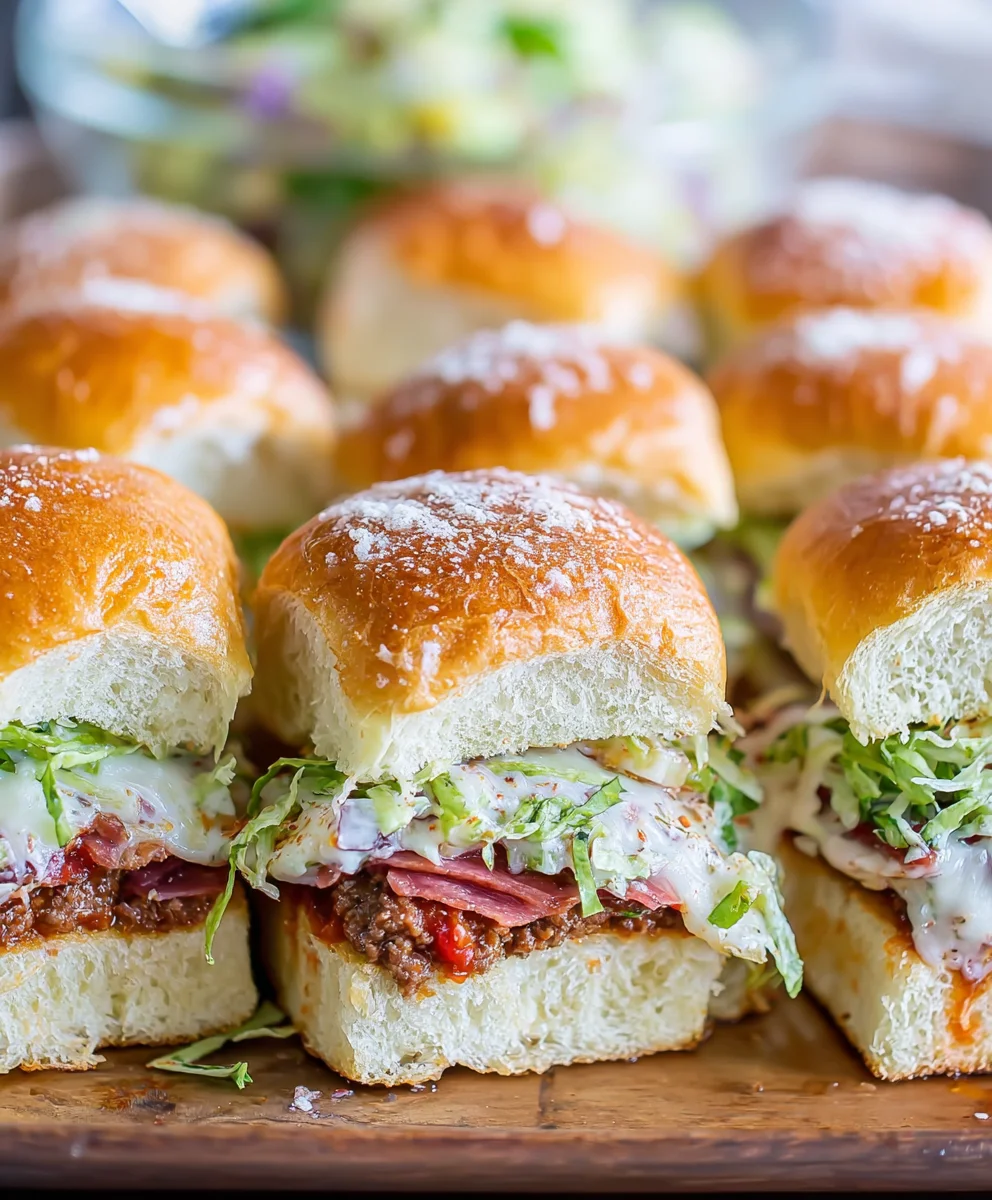
Beef Italian Grinder Sliders – Easy & Delicious Recipe
Italian Grinder Sliders are the ultimate crowd-pleasing appetizer or quick weeknight meal that will have everyone beggin extractg for the recipe. There’s something incredibly satisfying about these mini sandwiches, packed with all the bold, zesty flavors of a classic Italian grinder but conveniently sized for easy eating. People adore them because they deliver an explosion of taste in every bite – savory cured meats, tangy provolone, crisp lettuce, juicy tomatoes, and that quintessential zesty Italian dressing, all nestled within soft, warm slider buns. What truly makes these Italian Grinder Sliders so special is their perfect balance of textures and the comforting, familiar taste that evokes memories of Italian delis and summer gatherings. They’re incredibly adaptable, allowing you to customize your favorite deli meats and cheeses, making each batch uniquely yours.
Ingredients:
- 12 Hawaiian rolls
- 8 ounces thinly sliced beef beef ham
- 4 ounces sliced provolone cheese
- 3 ounces thinly sliced beef beef pepperoni
- 3 ounces thinly sliced beef beef salami
- 2 tablespoons unsalted butter, melted
- 2 tablespoons grated Parmesan cheese
- 1/2 teaspoon garlic powder
- 1/4 teaspoon salt
- 8 ounces shredded iceberg lettuce
- 1/2 cup diced ripe tomato
- 1/2 cup sliced pepperoncini peppers
- 1/4 cup mayonnaise
- 1 tablespoon red grape juice vinegar
- 1 teaspoon dried Italian seasoning
Preparing the Slider Base
Step 1: Assemble the Rolls
The first step to creating these irresistible Italian Grinder Sliders is to prepare your base. Take all 12 Hawaiian rolls and place them on a clean cutting board. Using a long, serrated knife, carefully slice through all of them horizontally, as if you were slicing open a loaf of bread. Be sure to keep the top halves together and the bottom halves together to make assembly much easier. You want to create a clear separation for your delicious fillings. This technique ensures even distribution of toppings and makes for a cohesive slider experience. Set both the top and bottom halves aside on a baking sheet, keeping them aligned.
Building the Flavorful Layers
Step 2: Layer the Meats and Cheeses
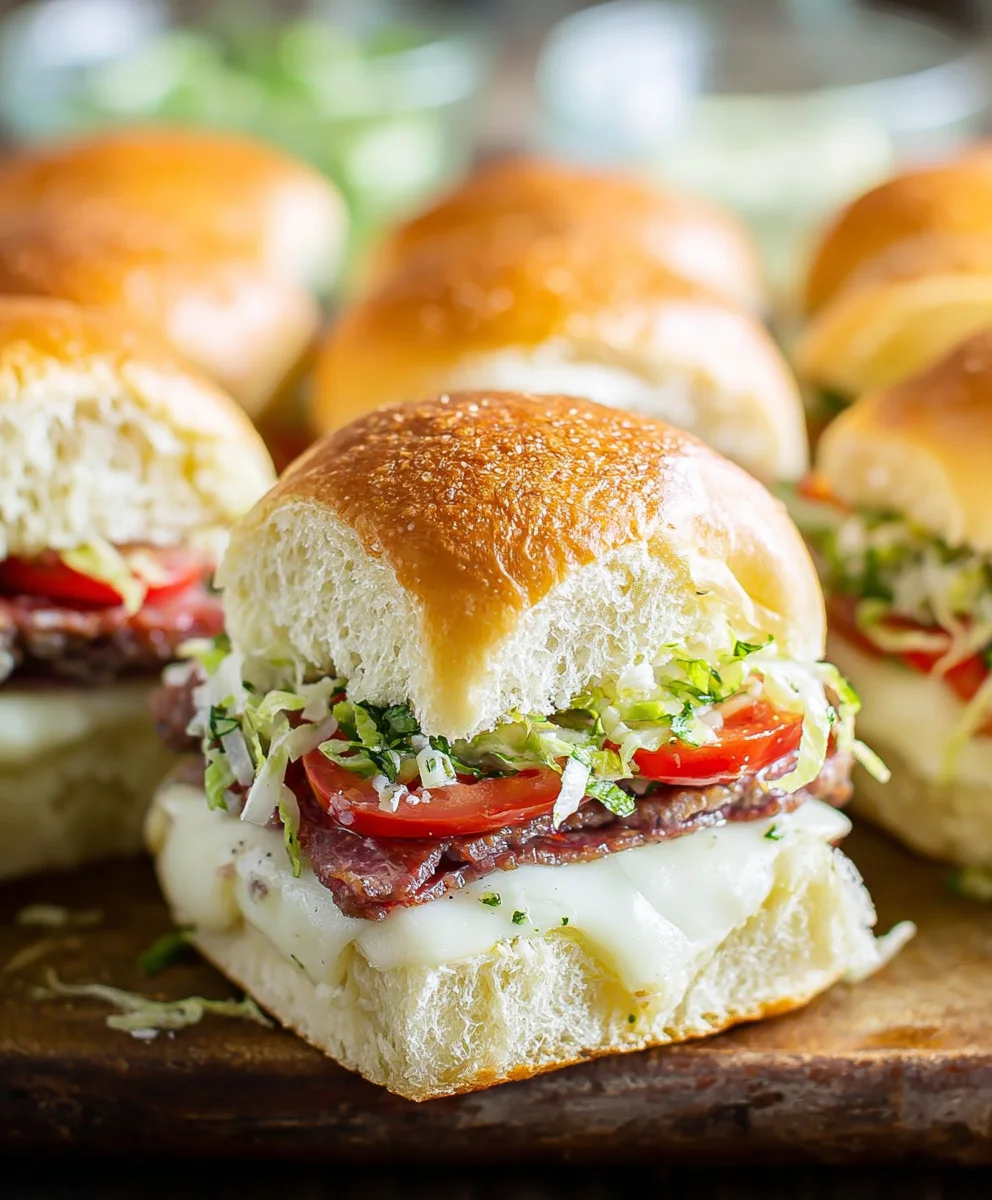
Now it’s time to build the savory foundation of our sliders. On the bottom half of the Hawaiian rolls, we’ll begin extract layering. Start by evenly distributing the 8 ounces of thinly sliced beef hamf ham across the entire surface of the bottom rolls. Don’t be shybeef hamth the ham; this is a key component of the Italian grinder flavor. Next, lay the 4 ounces of sliced provolone cbeef hamse over the ham. Make sure each slider gets a good amount of cheese coverage. On top of the provolone, scatter the 3 ounces of thinly sliced beef pepperonieroni and the 3 ounces of thinly sliced beef salamialami. This combination of cured meats provides a fantastic depth of flavor that is characteristic of classic Italian sandwiches, just in a slider format. The slight overlap of the meats and cheeses will ensure every bite is packed with deliciousness.
Step 3: Prepare the Toasted Topping
To achieve that perfectly golden and slightly crisp topping for our sliders, we’re going to prepare a special butter mixture. In a small bowl, combine the 2 tablespoons of melted butter with the 2 tablespoons of grated Parmesan cheese, 1/2 teaspoon of garlic powder, and 1/4 teaspoon of salt. Stir this mixture well until everything is thoroughly combined. Now, take this mixture and generously brush it over the cut side of the top halves of the Hawaiian rolls. Ensure that every surface is coated with this savory butter mixture. This step is crucial for adding a wonderful garlicky and cheesy aroma and flavor to the top of the sliders, and it also helps them toast up beautifully in the oven.
Baking and Finishing Touches
Step 4: Bake the Sliders
Preheat your oven to 350 degrees Fahrenheit (175 degrees Celsius). Place the baking sheet with the assembled bottom halves (with meats and cheeses) and the buttered top halves into the preheated oven. Bake for approximately 10-15 minutes, or until the cheese is melted and bubbly, and the tops of the rolls are lightly golden brown and toasted. Keep a close eye on them to prevent burning, as Hawaiian rolls can brown quickly. The goal is a warm, melty, and slightly crisp slider that is ready for its final fresh toppings.
Step 5: Create the Creamy Dressing and Add Freshness
While the sliders are in the oven, let’s prepare the vibrant dressing that will bring all the flavors together. In a medium bowl, combine the 1/4 cup of mayonnaise, 1 tablespoon of red grape juice vinegar, and 1 teaspoon of dried Italian seasoning. Whisk these ingredients together until you have a smooth, well-emulsified dressing. This tangy and herbaceous dressing will cut through the richness of the meats and cheese, adding a refreshing counterpoint. Once the sliders are out of the oven and the cheese is perfectly melted, carefully remove the top halves of the rolls. Spread a generous layer of your creamy dressing onto the warm, melted cheese on the bottom halves. Then, evenly distribute the 8 ounces of shredded lettuce, followed by the 1/2 cup of diced tomato, and the 1/2 cup of sliced pepperoncini peppers over the dressing. Finally, place the toasted top halves of the rolls back onto the filled bottom halves. You can serve them immediately as is, or if you prefer them slightly compressed, you can cover the entire baking sheet with foil and place a lighter baking sheet on top for a few minutes to gently press them down before cutting.
Conclusion:
There you have it! Your guide to creating incredibly delicious Italian Grinder Sliders is complete. We’ve walked through every step, from preparing the savory fillings to assembling these bite-sized masterpieces. These sliders are perfect for game days, casual gatherings, or even as a fun and satisfying weeknight meal. Their compact size makes them ideal for sharing, and the explosion of classic Italian flavors in every bite is sure to impress your guests.
To elevate your Italian Grinder Sliders even further, consider serving them with a side of crispy sweet potato fries or a light arugula salad. They also pair wonderfully with a zesty marinara dipping sauce or a creamy garlic aioli. Don’t be afraid to get creative with your toppings! Add sliced jalapeños for a kick, or perhaps some caramelized onions for an extra layer of sweetness. The possibilities are truly endless, and the joy of making these sliders is discovering your own perfect combination.
So go ahead, gather your ingredients, and get ready to experience the delightful taste of homemade Italian Grinder Sliders. We encourage you to try this recipe and share the joy with your loved ones. Happy cooking!
Frequently Asked Questions:
Can I make the filling for Italian Grinder Sliders ahead of time?
Absolutely! You can prepare the meat and vegetable filling for your Italian Grinder Sliders up to 2 days in advance. Store it in an airtight container in the refrigerator. This makes assembly even quicker on the day you plan to serve them.
What kind of bread works best for Italian Grinder Sliders?
While slider buns are the most common choice, you can also use dinner rolls, mini brioche buns, or even cut a baguette into slider-sized portions. The key is to find something that holds up well to the fillings without becoming soggy. Toasting the cut sides of the bread can also add a lovely texture.
Are there any vegetarian options for Italian Grinder Sliders?
Certainly! For a vegetarian take on Italian Grinder Sliders, you can substitute the meat with a mixture of sautéed mushrooms, bell peppers, onions, and zucchini, seasoned with Italian herbs. A plant-based Italian sausage crum extractble would also work wonderfully.
Beef Italian Grinder Sliders – Easy & Delicious Recipe
Easy and delicious beef Italian grinder sliders made with Hawaiian rolls, a variety of beef deli meats, provolone cheese, and a tangy dressing.
Ingredients
-
12 Hawaiian rolls
-
8 ounces thinly sliced beef ham
-
4 ounces sliced provolone cheese
-
3 ounces thinly sliced beef pepperoni
-
3 ounces thinly sliced beef salami
-
2 tablespoons unsalted butter, melted
-
2 tablespoons grated Parmesan cheese
-
1/2 teaspoon garlic powder
-
1/4 teaspoon salt
-
8 ounces shredded iceberg lettuce
-
1/2 cup diced ripe tomato
-
1/2 cup sliced pepperoncini peppers
-
1/4 cup mayonnaise
-
1 tablespoon red grape juice vinegar
-
1 teaspoon dried Italian seasoning
Instructions
-
Step 1
Slice all 12 Hawaiian rolls horizontally using a serrated knife, keeping the top and bottom halves together. Place the bottom halves on a baking sheet and the top halves aside. -
Step 2
On the bottom halves of the rolls, evenly distribute the thinly sliced beef ham, followed by the sliced provolone cheese. Then, scatter the thinly sliced beef pepperoni and beef salami over the cheese. -
Step 3
In a small bowl, combine melted butter, grated Parmesan cheese, garlic powder, and salt. Stir well and generously brush this mixture over the cut side of the top halves of the Hawaiian rolls. -
Step 4
Preheat oven to 350°F (175°C). Bake the sliders for 10-15 minutes, or until cheese is melted and bubbly and the tops are lightly golden brown. -
Step 5
While sliders bake, whisk together mayonnaise, red grape juice vinegar, and dried Italian seasoning in a medium bowl to create the dressing. -
Step 6
Remove sliders from oven. Spread the creamy dressing onto the melted cheese. Top with shredded lettuce, diced tomato, and sliced pepperoncini peppers. Place the toasted top halves back on.
Important Information
Nutrition Facts (Per Serving)
It is important to consider this information as approximate and not to use it as definitive health advice.
Allergy Information
Please check ingredients for potential allergens and consult a health professional if in doubt.