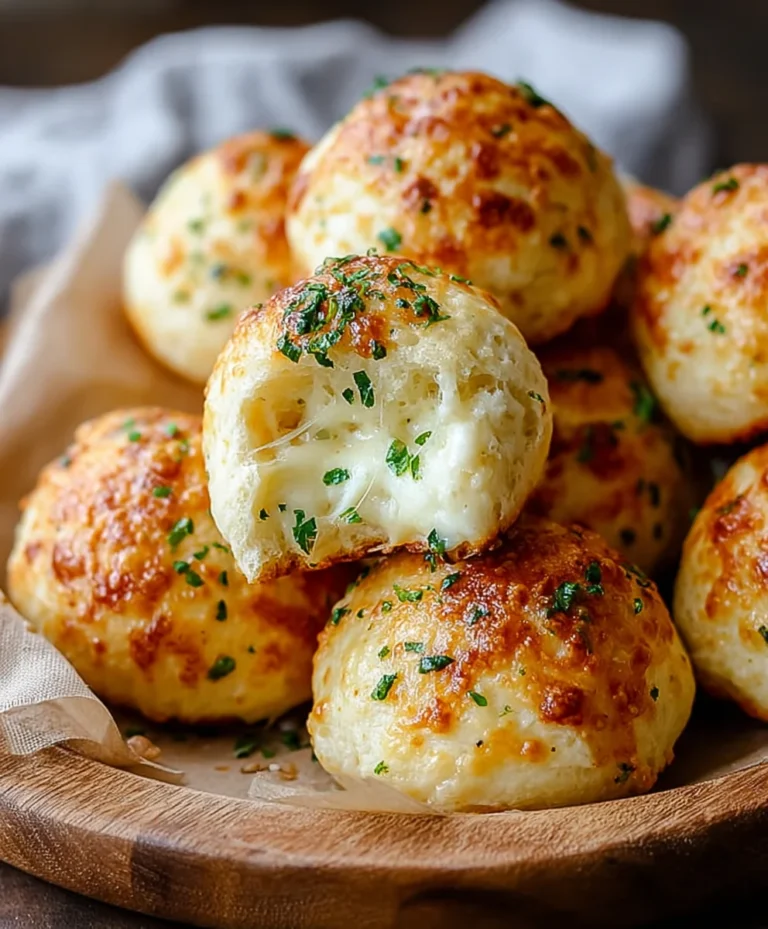
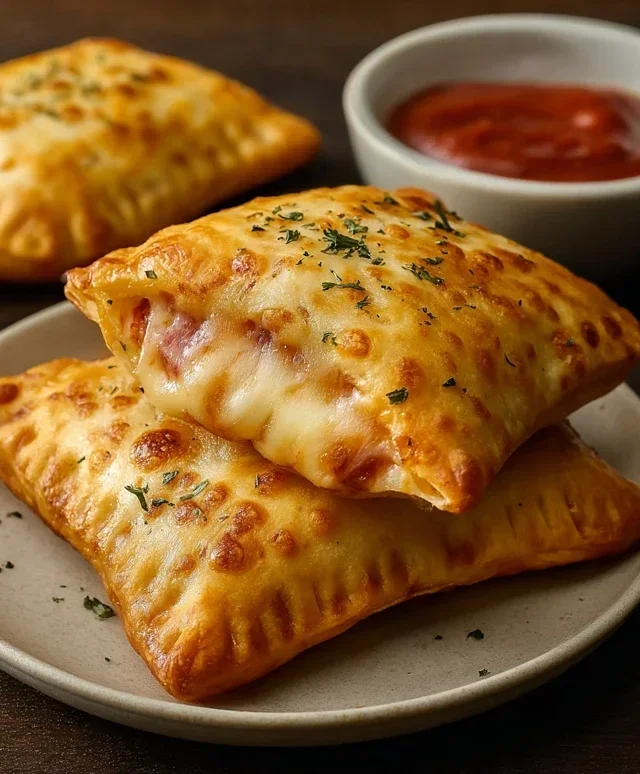
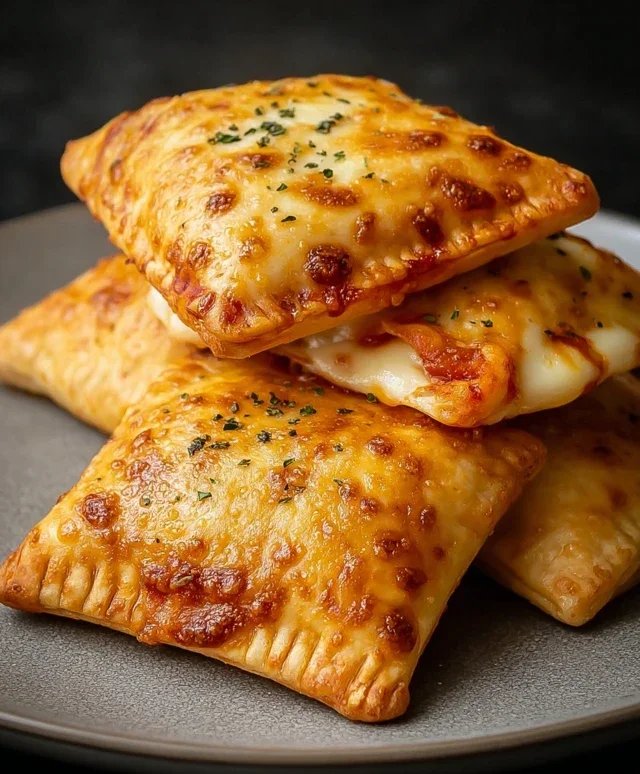
Easy Cheesy Pizza Pockets – Quick Snack Recipe
Cheesy Pizza Pockets are more than just a snack; they’re a nostalgic hug in edible form. Remember those days of childhood excitement, the anticnon-alcoholic ipation of a warm, gooey pocket bursting with your favorite pizza flavors? We’re bringin extractg that magic back to your kitchen with a recipe that’s surprisingly simple yet incredibly satisfying. These aren’t your average frozen convenience food. Our Cheesy Pizza Pockets are crafted with love, featuring a pillowy, homemade dough that perfectly encases a molten core of deliciousness. What makes them truly special is the customizable nature of the filling. Whether you’re a beef pepperoni purist, a veggie enthusiast, or a lover of all things mushroom, you can tailor these pockets to your exact cravings. Get ready to rediscover the simple joy of a perfect, portable pizza experience that’s guaranteed to bring smiles all around.
Cheesy Pizza Pockets
There’s something undeniably comforting about pizza. The gooey cheese, the savory sauce, the satisfying crust – it’s a universally loved combination. But sometimes, a whole pizza is just too much, or perhaps you’re looking for a fun, portable, and individual-sized pizza experience. That’s where these Cheesy Pizza Pockets come in! They are incredibly easy to make, perfect for a quick lunch, a fun after-school snack, or even a casual dinner. Imagin extracte warm, golden pockets bursting with melted mozzarella and your favorite pizza toppings. It’s a bite-sized slice of heaven, and best of all, you can customize them to your heart’s content. Let’s get cooking!
Ingredients:
Getting Started: Preparing Your Pockets
The beauty of these pizza pockets lies in their simplicity, especially when using pre-made dough. This cuts down on prep time significantly, making them a fantastic option for busy days. I love using refrigerated pizza dough because it’s so versatile, but crescent rolls work wonderfully too if you prefer a flakier texture. Whichever you choose, the key is to have everything prepped and ready before you start assembling. This ensures a smooth and efficient process, leading to perfectly formed pockets.
First things first, let’s preheat your oven. I find that a temperature of 400 degrees Fahrenheit (200 degrees Celsius) is ideal for getting a nice golden-brown crust on the outside while ensuring the inside cooks through and the cheese melts beautifully. While the oven is heating up, get your baking sheet ready. You can line it with parchment paper or a silicone baking mat for easy cleanup, which is always a win in my book! If you don’t have either, a light greasing with cooking spray or a bit of oil will do the trick.
Next, let’s prepare our filling. In a small bowl, combine your marinara sauce, shredded mozzarella cheese, Italian herbs, and the powdered garlic. Give it a good stir until all the ingredients are well incorporated. The Italian herbs will add that classic pizza aroma and flavor, while the garlic powder provides a subtle, savory kick without being overpowering. Now, let’s talk about toppings. I’ve listed beef beef pepperoni as a classic choice, but feel free to get creative! Finely diced cooked sausage, sautéed mushrooms, or small pieces of bell peppers all make delicious additions. Just make sure whatever toppings you choose are already cooked and cooled if necessary, and cut into small, manageable pieces. This will ensure they cook evenly inside the pockets and don’t release too much moisture.
Assembling Your Delicious Pizza Pockets
Now for the fun part: assembling your pizza pockets! Open your can of pizza dough or crescent rolls. If you’re using pizza dough, you’ll want to unroll it and gently press it out into a rectangle. Then, divide the dough into roughly equal portions. The size of your portions will determine the size of your pockets, so aim for something that feels comfortable to handle and eat. I usually get about 6-8 pockets out of a standard can of pizza dough. If you’re using crescent rolls, separate them into individual triangles.
For each portion of dough, spoon about one to two tablespoons of your prepared marinara and cheese mixture onto one half of the dough. Be careful not to overfill, as this can make it difficult to seal the pockets and could lead to leaks during baking. Distribute your chosen toppings evenly over the sauce and cheese. Now, carefully fold the other half of the dough over the filling, creating a pocket. Press the edges firmly together to seal. You can use the tines of a fork to crimp the edges, which not only helps to create a secure seal but also gives your pizza pockets a nice, rustic look. This is an important step to prevent any of that delicious filling from escaping while baking.
Baking to Perfection
Once your pizza pockets are all assembled and senon-alcoholic aled, it’s time to get them ready for the oven. Arrange them on your prepared baking sheet, making sure there’s a little space between each one so they bake evenly and don’t stick together. Now for the finishing touch that gives them that irresistible golden sheen: brushing the tops with melted butter or olive oil. This is a crucial step for achieving that perfect crispy, golden-brown crust that we all love about baked goods. It also adds a lovely subtle flavor.
For the final flourish, sprinkle a little grated Parmesan cheese over the tops of the brushed pockets. This adds an extra layer of cheesy, savory goodness that melts and browns beautifully in the oven.
Place the baking sheet into your preheated oven. The baking time will vary slightly depending on your oven and the size of your pockets, but generally, you’ll want to bake them for about 15-20 minutes. Keep an eye on them! You’re looking for the dough to be puffed up and a beautiful golden-brown color all over, and you want to see that cheese oozing out just a little from the seams. If the tops are browning too quickly before the dough is cooked through, you can loosely tent them with aluminum foil for the last few minutes of baking.
When they come out of the oven, resist the urge to dive in immediately! They will be incredibly hot, and that molten cheese can cause serious burns. Let them cool on the baking sheet for about 5-10 minutes. This allows the filling to set up slightly, making them easier and safer to handle. Serve them warm and enjoy your homemade, cheesy pizza pockets! They are fantastic on their own, or you can serve them with extra marinara sauce for dipping. Enjoy this simple, delicious, and utterly satisfying treat!
Conclusion:
I hope you’re as excited as I am to try these incredibly simple yet utterly delicious Cheesy Pizza Pockets! They truly are a fantastic recipe because they deliver all the craveable pizza flavor you love in a perfectly portioned, handheld package. They’re incredibly versatile, making them a perfect option for quick weeknight dinners, fun lunchbox surprises, or even a casual gathering with friends. Don’t be afraid to get creative with your fillings! Serve them piping hot with your favorite marinara sauce for dipping, or alongside a fresh green salad for a complete meal. If you’re feeling adventurous, consider adding finely chopped bell peppers, sautéed mushrooms, or even a sprinkle of red pepper flakes for a little heat.
I can’t wait for you to experience the joy of making and devouring these delightful cheesy pizza pockets. They’re a guaranteed crowd-pleaser, and the ease of preparation means you can enjoy them more often than you think! Give them a go, and let me know what delicious variations you come up with!
Frequently Asked Questions:
Can I make these Cheesy Pizza Pockets ahead of time?
Absolutely! You can assemble the pockets and store them in the refrigerator for up to 24 hours before baking. Just make sure they are well-senon-alcoholic aled to prevent the dough from drying out. You might need to add a minute or two to the baking time if they are cold from the fridge.
What’s the best way to reheat leftover pizza pockets?
For the crispiest results, I recommend reheating them in a preheated oven at around 350°F (175°C) for 8-10 minutes, or until warmed through and the cheese is melty again. You can also use an air fryer for similar results. Microwaving is an option, but they might become a bit soft.
Can I use different types of cheese?
Definitely! While mozzarella is classic, feel free to experiment. A blend of cheddar and Monterey Jack adds a nice sharpness, or you could even try a bit of provolone for a tangier flavor. Just ensure you have enough melt to create that gooey goodness!
Cheesy Pizza Pockets
Delicious and easy homemade pizza pockets filled with marinara, mozzarella, and your favorite toppings.
Ingredients
-
1/2 cup marinara sauce
-
1 cup mozzarella cheese, shredded
-
1 can of pizza dough or crescent rolls, refrigerated
-
1/2 cup beef pepperoni
-
A quarter teaspoon of Italian herbs
-
A light sprinkle of powdered garlic
-
Melted butter or olive oil, to brush on top
-
Some grated Parmesan for finishing
Instructions
-
Step 1
Preheat your oven to 400°F (200°C). Line a baking sheet with parchment paper. -
Step 2
Unroll the pizza dough or crescent rolls. If using pizza dough, roll it out and cut into squares. If using crescent rolls, pinch the seams together to form a rectangle. -
Step 3
Spread a thin layer of marinara sauce over one half of each dough square/rectangle, leaving a small border. Sprinkle with Italian herbs and powdered garlic. -
Step 4
Top the sauce with shredded mozzarella cheese, beef pepperoni, and any other desired toppings. Fold the other half of the dough over the filling and crimp the edges with a fork to seal. -
Step 5
Brush the tops of the pizza pockets with melted butter or olive oil and sprinkle with grated Parmesan cheese. -
Step 6
Bake for 10-12 minutes, or until golden brown and puffed up.
Important Information
Nutrition Facts (Per Serving)
It is important to consider this information as approximate and not to use it as definitive health advice.
Allergy Information
Please check ingredients for potential allergens and consult a health professional if in doubt.