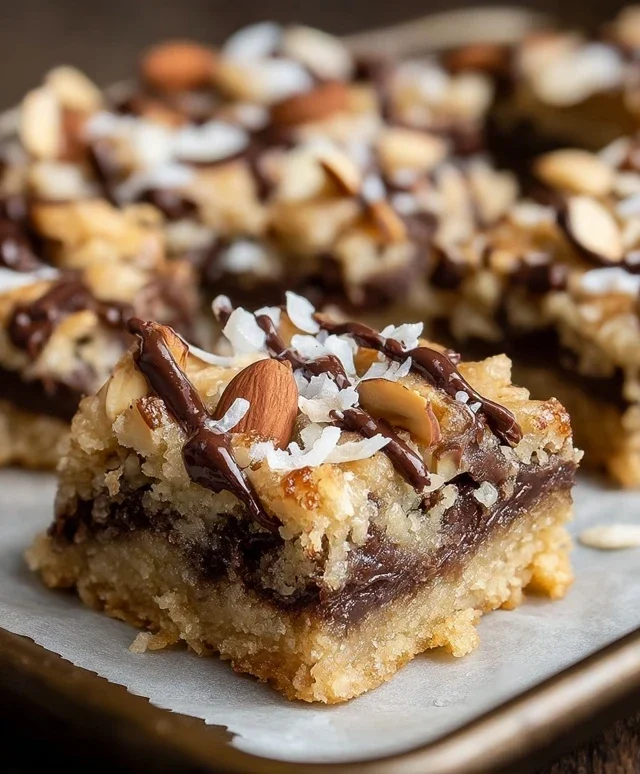
Almond Joy Cookie Bars – Easy Coconut Chocolate Treat
Almond Joy Cookie Bars are a delightful explosion of tropical sweetness and nutty crunch, and if you’ve ever dreamt of pure, unadulterated dessert bliss, then you’ve found your jackpot. These aren’t just any cookie bars; they’re a decadent homage to a beloved candy bar, transformed into a bake-snon-alcoholic ale-worthy treat that’s surprisingly easy to make. Imagin extracte the irresistible combination of chewy coconut, toasted almonds, and rich chocolate, all layered into a portable, shareable bar that’s perfect for any occasion. What makes these Almond Joy Cookie Bars so utterly special is their ability to capture the essence of that classic flavor profile while delivering a satisfying, buttery cookie base. They’re a guaranteed crowd-pleaser, bringin extractg smiles and satisfied sighs with every single bite.
Get ready to elevate your dessert game with these irresistible
Almond Joy Cookie Bars!
Almond Joy Cookie Bars
There are some flavor combinations that are simply iconic. Peanut butter and chocolate? Classic. Salted caramel? Divine. And then there’s the delightful trio of chocolate, coconut, and almonds – the foundation of the beloved Almond Joy candy bar. While I adore a good Almond Joy straight from the wrapper, I’ve always dreamed of transforming that perfect mix of textures and tastes into something even more shareable and decadent. Enter these Almond Joy Cookie Bars! Imagin extracte a chewy, soft-baked cookie base, studded with melty chocolate chips, then generously topped with sweet, toasted coconut and crunchy almond slivers. It’s a bite of pure bliss that’s surprisingly easy to make and utterly irresistible. These bars are perfect for potlucks, bake snon-alcoholic ales, or just an afternoon treat with a glass of milk. They deliver all the flavor you love from an Almond Joy, but in a delightful bar form that’s perfect for slicing and sharing.
Ingredients:
Preparing the Dough
First things first, let’s get our oven preheating to 350 degrees Fahrenheit (175 degrees Celsius). This ensures that as soon as our glorious dough is ready, it can start baking to perfection. While the oven heats, prepare your baking pan. A 9×9 inch square baking pan is ideal for these bars. I like to line mine with parchment paper, leaving an overhang on two sides. This creates little “handles” that make removing the baked bars from the pan a breeze – no more struggling to pry them out! Just smooth the parchment along the bottom and up the sides.
In a medium-sized bowl, we’re going to whisk together our dry ingredients. This includes the all-purpose flour, baking soda, baking powder, and sea salt. Whisking these together thoroughly ensures that the leavening agents and salt are evenly distributed throughout the dough, which is crucial for a consistent texture and rise. Set this bowl aside for now.
Now, for the heart of our cookie bars: the creaming process. In a large mixing bowl, beat the softened butter with both the granulated sugar and the packed light brown sugar. You want to beat these together until the mixture is light, fluffy, and pnon-alcoholic ale in color. This step is really important because it incorporates air into the butter and sugar, which contributes to the cookie bars’ tender texture and helps them spread just the right amount. A stand mixer with a paddle attachment makes this super easy, but a hand mixer or even a sturdy whisk and some elbow grease will do the trick.
Once the butter and sugars are nicely creamed, it’s time to add the wet ingredients. Crack in your large egg and add the vanilla extract. Beat again until everything is well combined and smooth. Don’t overmix at this stage; just mix until the egg is fully incorporated.
Combining and Adding the Goodies
Now we’ll gradually add our dry ingredients to the wet mixture. Add about half of the flour mixture to the butter and sugar mixture and mix on low speed until just combined. Then, add the remaining flour mixture and continue mixing until there are no visible streaks of flour. Be careful not to overmix here, as overmixing can lead to tough cookie bars. We want tender and chewy, not tough!
This is where the magic starts to happen and we get to fold in those delicious Almond Joy elements. Gently fold in the chocolate chips, flaked coconut, and almond slivers. I like to reserve a small handful of each to sprinkle on top before baking for an extra decorative and textural boost. Make sure these are evenly distributed throughout the dough. The goal is to have pockets of chocolate, chewy coconut, and crunchy almonds in every bite.
Baking and Cooling
Now it’s time to get our dough into that prepared baking pan. Spread the dough evenly into the lined 9×9 inch pan. Use a spatula or the back of a spoon to press it down and smooth out the top. If you reserved some chocolate chips, coconut, or almonds, sprinkle them evenly over the top of the dough now. This not only makes the bars look extra appealing but also ensures those flavors are front and center.
Place the pan in your preheated oven and bake for approximately 25 to 30 minutes. The baking time can vary depending on your oven, so keep an eye on them. You’re looking for the edges to be lightly golden brown and the center to appear set, not overly wet. A toothpick inserted into the center should come out with a few moist crum extractbs attached, but not wet batter. This indicates they are perfectly baked and will continue to set up as they cool.
Once baked, carefully remove the pan from the oven. This is perhaps the most crucial cooling step for bar cookies. Let the bars cool completely in the pan on a wire rack. This allows them to firm up properly. If you try to cut them while they’re still warm, they’ll likely fall apart. Patience is a virtue here! Once they’ve cooled to room temperature, you can use the parchment paper overhangs to lift the entire slab out of the pan onto a cutting board.
Cutting and Enjoying
With your cooled slab of deliciousness ready, it’s time to cut them into bars. Use a sharp knife for clean cuts. I usually aim for 16 bars (4 rows by 4 rows), but you can adjust the size based on your preference. These bars are best enjoyed at room temperature. They store beautifully in an airtight container at room temperature for up to 3-4 days, or you can refrigerate them for longer storage. Get ready to enjoy a taste of pure, unadulterated joy with every single bite!

Conclusion:
So there you have it – the ultimate guide to creating incredibly delicious Almond Joy Cookie Bars! I truly believe this recipe is a winner because it perfectly captures the essence of the beloved candy bar in an easy-to-make, shareable bar format. The combination of chewy, buttery cookie base, creamy chocolate, toasted almonds, and sweet coconut is simply irresistible. These bars are perfect for potlucks, bake snon-alcoholic ales, or just a decadent treat for yourself. Feel free to get creative with serving them – they’re fantastic on their own, but also amazing with a scoop of vanilla ice cream or a drizzle of extra chocolate. If you’re feeling adventurous, consider adding a sprinkle of flaky sea salt on top for a delightful sweet and salty contrast, or even swapping out some of the chocolate chips for dark chocolate for a richer flavor profile.
I sincerely hope you’ll give these Almond Joy Cookie Bars a try. They are surprisingly simple to whip up and the payoff in terms of flavor and satisfaction is immense. You won’t regret adding them to your baking repertoire!
Frequently Asked Questions:
Can I make these Almond Joy Cookie Bars ahead of time?
Absolutely! These bars are even better when they’ve had a chance to set for a few hours or overnight. They store wonderfully in an airtight container at room temperature for up to 3-4 days, making them ideal for making ahead for parties or gatherings.
What kind of coconut should I use?
I recommend using sweetened shredded coconut for the best texture and flavor that mimics the candy bar. If you prefer a less sweet option, you could try unsweetened coconut, but you might want to adjust the overall sweetness of the cookie base slightly.
Are there any nut-free variations for these bars?
While the almonds are a key component of the classic Almond Joy flavor, you can create a delicious nut-free version by simply omitting the almonds and increasing the amount of coconut slightly, or by adding some toasted pumpkin seeds or sunflower seeds for crunch if seeds are acceptable.
Almond Joy Cookie Bars
Chewy cookie bars packed with the classic flavors of Almond Joy: chocolate, coconut, and almonds.
Ingredients
-
1 1/2 cups all-purpose flour
-
1/2 teaspoon baking soda
-
1/4 teaspoon baking powder
-
1/2 teaspoon sea salt
-
1/2 cup butter, softened
-
1/2 cup granulated sugar
-
1/2 cup light brown sugar, packed
-
1 large egg
-
1 1/2 teaspoon vanilla extract
-
1 cup chocolate chips
-
1/2 cup flaked coconut
-
1/2 cup almond slivers
Instructions
-
Step 1
Preheat oven to 350°F (175°C). Line an 8×8 inch baking pan with parchment paper, leaving an overhang for easy removal. -
Step 2
In a medium bowl, whisk together the flour, baking soda, baking powder, and sea salt. -
Step 3
In a large bowl, cream together the softened butter, granulated sugar, and packed light brown sugar until light and fluffy. -
Step 4
Beat in the egg and vanilla extract until well combined. -
Step 5
Gradually add the dry ingredients to the wet ingredients, mixing until just combined. Stir in the chocolate chips, flaked coconut, and almond slivers. -
Step 6
Press the dough evenly into the prepared baking pan. -
Step 7
Bake for 25-30 minutes, or until golden brown and edges are set. Let cool completely in the pan before cutting into bars.
Important Information
Nutrition Facts (Per Serving)
It is important to consider this information as approximate and not to use it as definitive health advice.
Allergy Information
Please check ingredients for potential allergens and consult a health professional if in doubt.