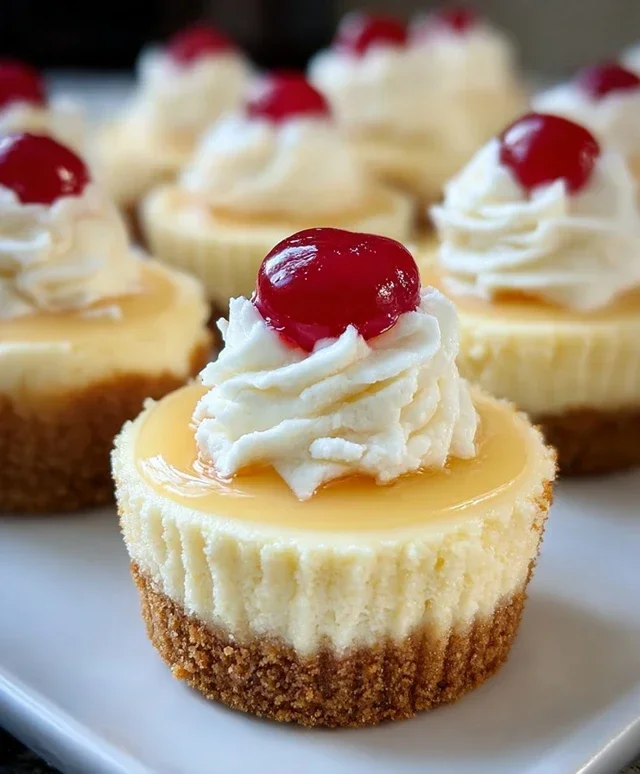
Super Easy Mini Cheesecakes Vanilla Wafer Crust
Super Easy Mini Cheesecakes with Vanilla Wafer Crust are about to become your new go-to dessert! Forget complicated water baths and hours spent in the kitchen. We’re talking about achieving that creamy, dreamy cheesecake goodness with an unbelievably simple approach. Who doesn’t love cheesecake? It’s the ultimate comfort food, the perfect celebratory treat, and always a crowd-pleaser. But let’s be honest, traditional cheesecakes can be intimidating. That’s where these delightful mini versions shine. They capture all the rich, tangy flavor you crave, encased in a sweet, buttery vanilla wafer crust, all without the fuss. You’ll be amazed at how quickly you can whip up a batch of these irresistible Super Easy Mini Cheesecakes with Vanilla Wafer Crust, making them ideal for last-minute gatherings or simply satisfying your own sweet tooth without a grand production.

Super Easy Mini Cheesecakes with Vanilla Wafer Crust
Who doesn’t love cheesecake? The rich, creamy filling and the buttery, crum extractbly crust are a match made in dessert heaven. But let’s be honest, making a full-sized cheesecake can be a bit intimidating. It often involves water baths, careful temperature control, and a good dose of patience. That’s where these super easy mini cheesecakes come in! They deliver all the decadent flavor of a classic cheesecake in a perfectly portioned, bite-sized package, and they are ridiculously simple to make. The secret? A no-fuss vanilla wafer crust and a filling that comes together in minutes. Plus, with a sweet swirl of cherry pie filling on top, they look as good as they taste. These are perfect for parties, holidays, or just when you’re craving a little something special without the fuss.
Ingredients:
Getting Started: Preparing Your Mini Cheesecake Canvas
The first step to creating these delightful mini cheesecakes is to prepare your crust. For this recipe, we’re using the simplicity and classic flavor of vanilla wafers. You’ll need about 15 of these sweet little cookies. The easiest way to turn them into crum extractbs is to place them in a food processor and pulse until they form fine crum extractbs. If you don’t have a food processor, don’t worry! You can also put the wafers in a sturdy zip-top bag, seal it well, and then crush them with a rolling pin or the bottom of a heavy pan. The goal is a fine, powdery consistency, similar to sand. Once you have your crum extractbs, you’ll want to combine them with just a touch of melted butter to help them bind. A tablespoon or two should be enough to moisten the crum extractbs so they hold together when pressed into your muffin tin. If the mixture seems too dry, add a little more butter, a teaspoon at a time, until it clumps together nicely when squeezed.
Crafting the Creamy Cheesecake Filling
Now, let’s move on to the star of the show: the cheesecake filling. This is where the magic truly happens, and it’s incredibly straightforward. Make sure your cream cheese is truly softened. This is crucial for a smooth, lump-free filling. If it’s still a bit firm, you can gently warm it in the microwave for 10-second intervals, stirring in between, until it’s easily yielding to the touch. In a large bowl, beat the softened cream cheese until it’s completely smooth and creamy. This step is important to avoid any lumpy bits in your final cheesecakes. Next, gradually add the granulated sugar, beating until it’s well incorporated and the mixture is light and fluffy. This combination of cream cheese and sugar forms the sweet, rich base of our cheesecake.
Now it’s time to add the eggs and vanilla. Ensure your eggs are at room temperature. Cold eggs can sometimes cause the cream cheese mixture to curdle or become grainy. Adding them one at a time, beating well after each addition, will help maintain a smooth consistency. Finally, stir in the vanilla bean paste or vanilla extract. Vanilla bean paste will give you those lovely little flecks of vanilla bean and a more intense flavor, but good old vanilla extract works perfectly too. Beat on low speed until just combined. Overmixing at this stage can incorporate too much air, which can lead to cracking in your cheesecakes. We want a smooth, luscious, and decadent filling.
Assembling and Baking Your Mini Masterpieces
With your crust crum extractbs and cheesecake filling ready, it’s time to bring it all together. Preheat your oven to 325 degrees Fahrenheit (160 degrees Celsius). This moderate temperature is key for baking cheesecakes gently, helping to prevent cracks and ensuring an even cook. You’ll need a standard muffin tin for this recipe. Line your muffin tin with paper liners. This makes it incredibly easy to remove the finished mini cheesecakes and also helps keep the crust in place.
To create the crust for each mini cheesecake, spoon about a tablespoon of the vanilla wafer crum extractb mixture into the bottom of each liner. Gently press the crum extractbs down with the back of your spoon or your fingers to form a compact layer. This will be the base of your cheesecake. Once your crusts are pressed, carefully spoon the cream cheese filling over the crum extractbs, filling each liner about two-thirds to three-quarters of the way full. Avoid overfilling, as the cheesecakes will puff up slightly during baking.
The Cherry on Top: Finishing Touches
Now for the fun, colorful flourish! Open your can of cherry pie filling. You don’t need to drain it. Spoon about a tablespoon of the cherry pie filling over the top of each cheesecake. You can swirl it gently with a toothpick or the tip of your spoon to create a beautiful marbled effect, or you can just dollop it on for a rustic look. This addition not only adds a burst of fruity sweetness but also a gorgeous visual appeal.
Bake the mini cheesecakes in the preheated oven for approximately 18-22 minutes, or until the edges are set and the centers are just slightly jiggly. They should not be completely firm; a slight wobble is a good sign they’re done. Overbaking can lead to dry cheesecakes, so keep an eye on them. Once baked, remove the muffin tin from the oven and let the cheesecakes cool in the tin on a wire rack for about 10-15 minutes. This gradual cooling process helps prevent cracking. After the initial cooling in the tin, carefully lift the mini cheesecakes out of the muffin tin using the liners and place them directly on the wire rack to cool completely. For the best texture and flavor, it’s highly recommended to chill your mini cheesecakes in the refrigerator for at least 2-3 hours, or preferably overnight, before serving. This allows the flavors to meld and the texture to fully set. Enjoy these delightful, easy-to-make treats!
Conclusion:
And there you have it! The super easy mini cheesecakes with vanilla wafer crust are officially in your baking repertoire. What makes these so fantastic is their undeniable simplicity without sacrificing that rich, creamy cheesecake flavor we all love. The crisp, buttery vanilla wafer crust is the perfect foundation, and the fact that they’re made in muffin tins means no fussy springform pans and incredibly easy portion control. These are genuinely perfect for any occasion, from a last-minute dessert emergency to a sophisticated gathering.
I love serving these chilled, perhaps with a dollop of whipped cream and a fresh berry or two. For a more decadent touch, a drizzle of chocolate sauce or caramel is always a winner. Don’t be afraid to get creative with variations! A swirl of fruit puree into the batter before baking, a sprinkle of cinnamon in the crust, or even a hint of lemon zest can elevate these mini wonders even further. I truly encourage you to give this super easy mini cheesecake recipe a try – you’ll be amazed at how quickly they disappear!
Frequently Asked Questions:
Can I make these ahead of time?
Absolutely! These mini cheesecakes can be made a day or two in advance and stored in the refrigerator. They actually firm up beautifully in the fridge, making them an ideal make-ahead dessert.
What if I don’t have vanilla wafers?
No problem! You can easily substitute with grabeef ham crackers or even digestive biscuits for the crust. Just crush them finely and mix with melted butter, similar to the vanilla wafer base.
Can I freeze these mini cheesecakes?
Yes, freezing is an option! Once fully cooled, place them on a baking sheet in the freezer until solid, then transfer them to an airtight container or freezer bag. Thaw them overnight in the refrigerator for the best texture.
Super Easy Mini Cheesecakes with Vanilla Wafer Crust
Effortless mini cheesecakes featuring a classic vanilla wafer crust and a rich, creamy filling, topped with sweet cherry pie filling. Perfect for a simple yet impressive dessert.
Ingredients
-
15 vanilla wafer cookies
-
16 ounces full-fat cream cheese, softened
-
¾ cup granulated sugar
-
2 large eggs, at room temperature
-
1 teaspoon vanilla bean paste or vanilla extract
-
1 can cherry pie filling
Instructions
-
Step 1
Preheat oven to 350°F (175°C). Line a 12-cup muffin tin with paper liners. -
Step 2
Crush the vanilla wafer cookies into fine crumbs. You can do this by placing them in a zip-top bag and crushing with a rolling pin, or using a food processor. Divide the crumbs evenly among the prepared muffin cups, pressing them down to form a crust. -
Step 3
In a medium bowl, beat the softened cream cheese with the granulated sugar until smooth and creamy. Ensure there are no lumps. -
Step 4
Beat in the eggs one at a time, mixing until just combined after each addition. Stir in the vanilla bean paste or vanilla extract. -
Step 5
Pour the cream cheese mixture evenly over the vanilla wafer crusts in each muffin cup. -
Step 6
Bake for 18-20 minutes, or until the edges are set and the centers are slightly jiggly. -
Step 7
Let the cheesecakes cool in the muffin tin for 10 minutes, then carefully remove them and let them cool completely on a wire rack. -
Step 8
Once cooled, top each mini cheesecake with a spoonful of cherry pie filling before serving.
Important Information
Nutrition Facts (Per Serving)
It is important to consider this information as approximate and not to use it as definitive health advice.
Allergy Information
Please check ingredients for potential allergens and consult a health professional if in doubt.