Perfect Ramen Eggs Ajitama Easy Recipe
Ramen eggs, or ajitama, are one of those magical culinary creations that transform a simple bowl of noodles into an unforgettable experience. Have you ever savored a ramen dish and found yourself utterly captivated by that perfectly cooked, marinated egg? That’s the power of a well-made ramen egg. They’re more than just an accompaniment; they’re a star player, boasting a rich, jammy yolk that bursts with savory, umami-packed flavor, all encased in a tender, slightly firm white infused with a delightful blend of soy sauce, non-alcoholic mirin, and other aromatics. What makes these ramen eggs so special is their ability to elevate any dish they grace, adding a depth of flavor and a luxurious texture that’s simply irresistible. They’re surprisingly easy to make at home, offering a taste of authentic ramen shop perfection right in your own kitchen.
Ramen Eggs (Ajitama)
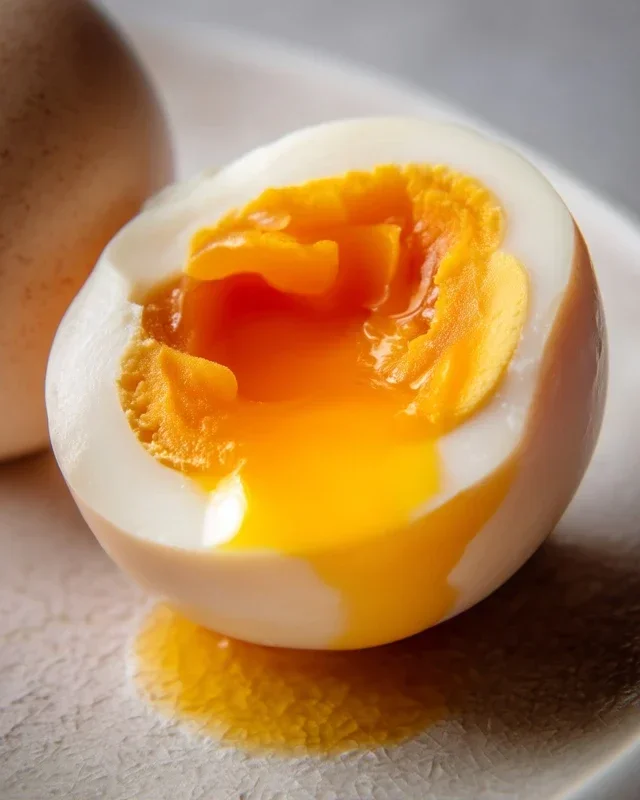
There’s something truly magical about a perfectly cooked ramen egg, also known as Ajitama. That soft, jammy yolk, infused with a savory and slightly sweet marinade, is the crowning glory of any bowl of ramen. Forget store-bought; making your own Ajitama is surprisingly simple and incredibly rewarding. The process is all about achieving that ideal custardy yolk and then letting it soak up a flavorful bath that transforms a humble boiled egg into a gourmet treat. These eggs aren’t just for ramen either; they’re fantastic on salads, in bento boxes, or just as a delicious snack. Let’s dive into how to make these irresistible marinated eggs.
Ingredients:
*Note on eggs: For the best results and easiest peeling, I highly recommend using eggs that are a few days old rather than absolutely fresh. Fresher eggs tend to stick to the shell more stubbornly.
Cooking Instructions:
The journey to perfect Ajitama involves two main stages: boiling the eggs to achieve that coveted soft-yolk texture, and then marinating them to infuse them with flavor. Let’s break it down step-by-step.
Part 1: Perfecting the Soft-Boiled Eggs
This is arguably the most crucial step. The goal is a perfectly set white with a liquid, jammy yolk.
1. Prepare Your Boiling Station: I like to bring a pot of water to a rolling boil first. This ensures an even cooking temperature from the moment the eggs go in. For this recipe, I’m using a medium-sized pot that can comfortably hold all six eggs without them bumping into each other too much. If you’re worried about shell cracking, you can add a splash of vinegar (about a tablespoon) to the boiling water. The acidity of the vinegar helps the egg whites coagulate more quickly, which can seal any small cracks that might form. Gently place the eggs into the boiling water using a slotted spoon or a spider strainer. This is a gentler method than dropping them in, which can cause them to crack.
2. The Crucial Boiling Time: Once the eggs are submerged, set a timer for exactly 6 minutes and 30 seconds for a truly jammy yolk. If you prefer a slightly firmer, but still gooey yolk, you can go up to 7 minutes. For a fully cooked yolk, you’d be looking at 9-10 minutes, but that’s not the Ajitama goal. Maintain a gentle, rolling boil throughout this time. If the water is boiling too vigorously, it can agitate the eggs and potentially crack them. Lower the heat slightly if needed to keep it at a steady simmer.
3. The Ice Bath: The Immediate Chill: As soon as your timer goes off, immediately remove the eggs from the boiling water using your slotted spoon or spider strainer. The next, and equally important, step is to plunge them directly into an ice bath. This is crucial for two reasons: first, it instantly stops the cooking process, preventing the yolks from continuing to solidify. Second, the rapid cooling helps to make the eggs easier to peel. I usually fill a bowl with ice and cold water and let the eggs sit there for at least 5-10 minutes, or until they are completely cooled down to the touch. Don’t skip this step; it’s a game-changer for both texture and peeling.
Part 2: Crafting the Flavorful Marinade and Marinating
Now that our eggs are perfectly cooked and cooled, it’s time to prepare the marinade that will give them their signature Ajitama flavor.
4. Whisk Together the Marinade: In a small saucepan or heatproof bowl, combine the soy sauce, water, non-non-non-alcoholic alternativeic non-alcoholic mirin, and granulated sugar. Stir everything together until the sugar is completely dissolved. You can gently heat this mixture over low heat just until the sugar dissolves, but it’s not strictly necessary. Some people prefer to whisk it cold. If you do heat it, let it cool down completely before adding the eggs. A lukewarm or cold marinade is best to avoid cooking the eggs further. The combination of soy sauce for saltiness and umami, water to dilute slightly, non-alcoholic mirin for sweetness and a hint of complexity, and sugar to balance everything out creates a perfectly harmonious flavor profile.
5. Marinate and Chill: Once your eggs have been peeled (carefully! the whites will be delicate), place them into a resealable bag or a small container. Pour the cooled marinade over the eggs, ensuring they are fully submerged. If you’re using a bag, gently squeeze out as much air as possible before sealing it. This ensures maximum contact between the marinade and the eggs. Now comes the waiting game. Refrigerate the marinated eggs for at least 4 hours, but for the best flavor, I highly recommend marinating them for 12 to 24 hours. The longer they soak, the deeper the flavor will penetrate the egg white and subtly infuse the yolk. Flip the bag or container occasionally to ensure even marination.
Once marinated, your Ajitama are ready to be enjoyed! Slice them in half lengthwise to reveal that beautiful, molten yolk, and crown your ramen bowls. They will keep in the refrigerator for up to 3-4 days. Enjoy the fruits of your labor!

Conclusion:
There you have it – a foolproof guide to creating perfect Ramen Eggs (Ajitama)! This recipe is truly fantastic because it transforms a simple boiled egg into a flavor bomb, boasting a wonderfully jammy yolk and a savory, marinated exterior. The magic lies in the simple yet potent marinade, which infuses the egg with incredible depth. These versatile gems are more than just a ramen topping; they’re a delightful addition to salads, rice bowls, or even enjoyed as a standalone snack. Don’t be intimidated – making your own Ajitama is surprisingly straightforward and incredibly rewarding.
I wholeheartedly encourage you to give this Ramen Egg recipe a try. Experiment with different marinating times to find your ideal yolk consistency and explore the suggested variations to truly make them your own. You’ll be amazed at how these humble eggs can elevate your meals!
Frequently Asked Questions:
How long should I marinate the Ramen Eggs?
For a classic jammy yolk and well-infused flavor, marinate the eggs for at least 4 hours, but ideally for 8-24 hours. Longer marination will result in a deeper flavor penetration and a slightly firmer yolk. For a less intense flavor, you can marinate for a shorter period, but avoid going much less than 4 hours for optimal results.
Can I use different liquids in the marinade?
Absolutely! While soy sauce, non-alcoholic mirin, and non-alcoholic sake form the traditional base, feel free to get creative. Some popular variations include adding a splash of rice vinegar for tang, a teaspoon of sugar for sweetness, or a pinch of chili flakes for a hint of spice. You can also experiment with dashi for an extra umami boost.
Ramen Eggs (Ajitama)
Perfectly seasoned, soft-boiled eggs infused with a savory marinade, ideal for ramen or as a snack.
Ingredients
-
6 large eggs
-
½ cup soy sauce (light sodium)
-
¼ cup water
-
¼ cup non-alcoholic mirin
-
2 tablespoons granulated sugar
-
1 tablespoon rice vinegar
Instructions
-
Step 1
Bring a pot of water to a rolling boil. Gently lower the eggs into the boiling water using a slotted spoon. If using vinegar, add it to the boiling water now. -
Step 2
Boil the eggs for exactly 6 minutes and 30 seconds for a jammy yolk. Immediately transfer the eggs to an ice bath to stop the cooking process. -
Step 3
While the eggs are chilling, prepare the marinade by whisking together the soy sauce, water, non-alcoholic mirin, granulated sugar, and rice vinegar in a bowl or container. -
Step 4
Once the eggs are completely cooled, carefully peel them. Try to peel them under cool running water to minimize cracking. -
Step 5
Place the peeled eggs in the marinade, ensuring they are fully submerged. Marinate in the refrigerator for at least 4 hours, or preferably overnight for deeper flavor. -
Step 6
Remove the eggs from the marinade, slice in half, and serve.
Important Information
Nutrition Facts (Per Serving)
It is important to consider this information as approximate and not to use it as definitive health advice.
Allergy Information
Please check ingredients for potential allergens and consult a health professional if in doubt.