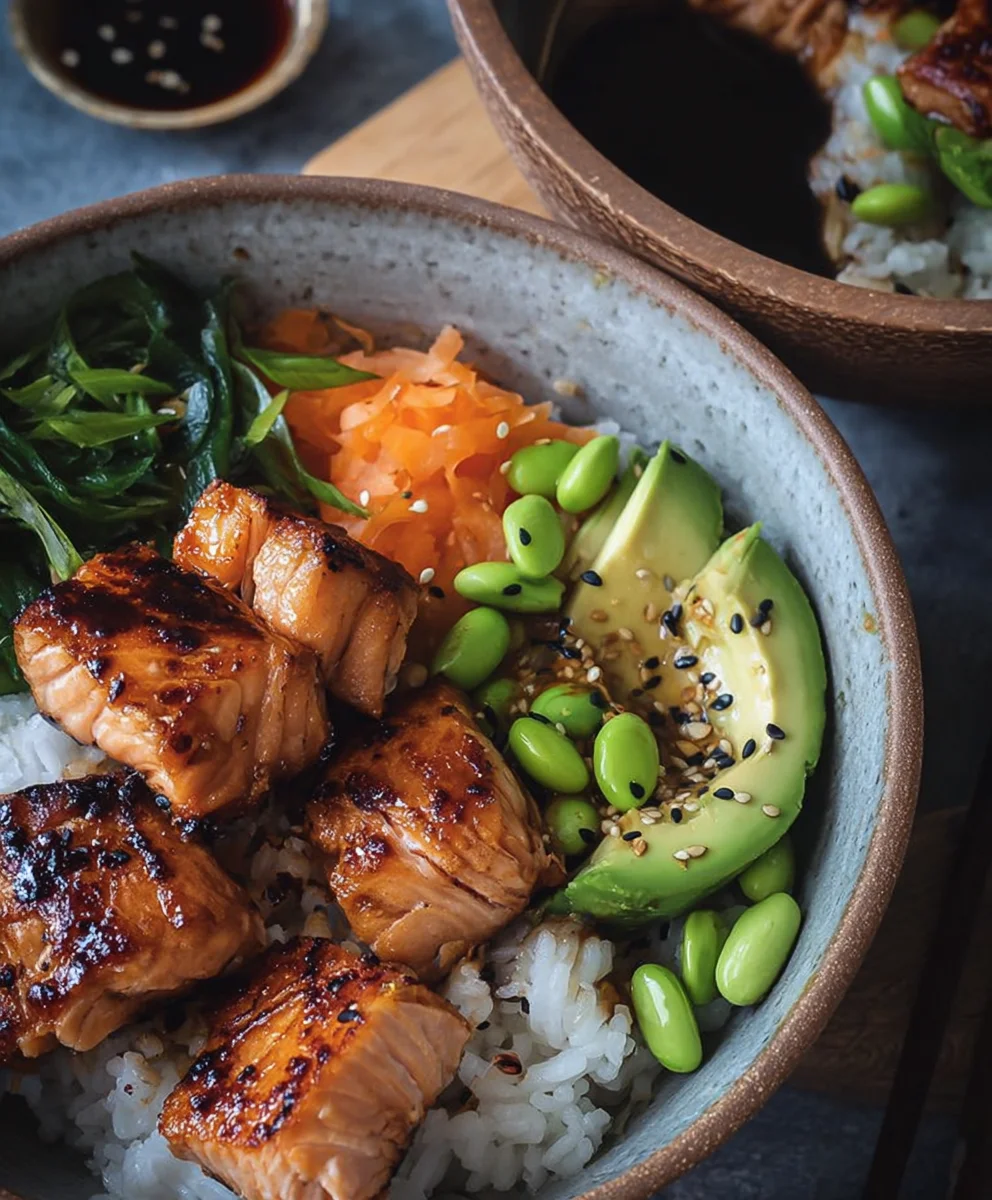
Gluten Free Teriyaki Salmon Sushi Bowl Recipe
Teriyaki Salmon Sushi Bowl (GF) isn’t just a meal; it’s an experience. Imagin extracte perfectly flaky, pan-seared salmon glazed in a sweet and savory teriyaki sauce, nestled atop a bed of fluffy seasoned sushi rice. This vibrant dish captures the essence of your favorite sushi rolls, deconstructed into a convenient and utterly delicious bowl. What’s not to love? It’s a symphony of textures and flavors – the tender salmon, the slightly sticky rice, the crisp freshness of vegetables, and that irresistible umami-rich teriyaki glaze all coming together in perfect harmony. People adore this Teriyaki Salmon Sushi Bowl (GF) because it offers all the satisfaction of sushi without the fuss of rolling, and the gluten-free aspect makes it accessible for so many to enjoy. It’s a weeknight winner that feels like a gourmet treat, making it truly special.
Ingredients:
- 180g (6.5oz) sushi rice
- 3 tbsp rice vinegar
- 1 tsp caster sugar
- 0.5 tsp fine salt
- 30ml (1fl oz) maple syrup
- 1 tsp sesame oil
- 2 tsp gluten free tamari soy sauce
- 0.5 tsp garlic granules
- 1 tsp non-non-non-alcoholic alternativeic non-alcoholic mirin
- 2 salmon fillets
- 2 tbsp sesame seeds
- 4 spring onions
- 150g (5oz) edamame beans
- Half a ripe avocado
Preparing the Sushi Rice
Step 1: Rinse and Cook the Rice
The foundation of any great sushi bowl is perfectly cooked rice. Begin extract by thoroughly rinsing your sushi rice under cold running water. Continue rinsing until the water runs clear, which indicates that excess starch has been removed, preventing sticky, clumpy rice. Transfer the rinsed rice to a medium saucepan. Add 250ml of cold water. Bring the water to a boil over medium-high heat, then immediately reduce the heat to the lowest setting, cover the pan tightly with a lid, and let it simmer for 15 minutes. Crucially, do not lift the lid during this cooking time as this will release steam and affect the cooking process. Once the 15 minutes are up, remove the pan from the heat and let it stand, still covered, for another 10 minutes. This steaming process allows the rice to absorb any remaining moisture and become perfectly tender.
Step 2: Season the Rice
While the rice is steaming, prepare the sushi vinegar. In a small bowl, whisk together the rice vinegar, caster sugar, and fine salt until the sugar and salt are completely dissolved. You can gently warm this mixture in a small saucepan over low heat if needed, but be careful not to boil it. Once the rice has rested, transfer it to a large, shallow bowl or a hangiri (a traditional Japanese wooden sushi rice tub). Gently spread the rice out. Gradually pour the seasoned vinegar mixture over the hot rice while fanning the rice vigorously with a piece of cardboard or a fan. This process helps to cool the rice quickly and evenly, giving it a beautiful sheen and preventing it from becoming mushy. Continue fanning and gently folding the rice with a rice paddle or spatula until it is no longer steaming and has cooled to room temperature.
Making the Teriyaki Glaze and Preparing Salmon
Step 3: Create the Teriyaki Glaze
This teriyaki glaze is what gives our salmon its irresistible flavour and glossy finish. In a small saucepan, combine the maple syrup, sesame oil, gluten-free tamari soy sauce, garlic non-alcoholic alternatives, and non-non-alcoholic mirinolicolic mirin. Stir everything together well. Place the saucepan over medium heat and bring the mixture to a gentle simmer. Let it simmer for about 2-3 minutes, stirring occasionally, until it thickens slightly. You’re looking for a syrupy consistency that will coat the back of a spoon. Be careful not to let it burn. Once it has reached the desired consistency, remove it from the heat and set it aside. This glaze will be used to coat the salmon.
Step 4: Prepare and Cook the Salmon
Pat your salmon fillets dry with paper towels. This helps to ensure a better sear. Season the salmon lightly with salt and pepper if desired (the tamari will add saltiness, so taste your glaze first). Heat a non-stick skillet or a cast-iron pan over medium-high heat. Add a teaspoon of oil (you can use a neutral oil like vegetable or canola if you don’t have extra sesame oil). Once the pan is hot, carefully place the salmon fillets skin-side down (if they have skin). Sear for about 3-4 minutes until the skin is crispy. Flip the salmon and cook for another 2-3 minutes, depending on the thickness of the fillets and your desired level of doneness. During the last minute of cooking, brush the tops of the salmon fillets generously with the prepared teriyaki glaze. Let the glaze caramelize slightly on the salmon. Once cooked, remove the salmon from the pan and let it rest for a couple of minutes before flaking it into bite-sized pieces.
Assembling Your Sushi Bowl
Step 5: Prepare the Toppings and Assemble
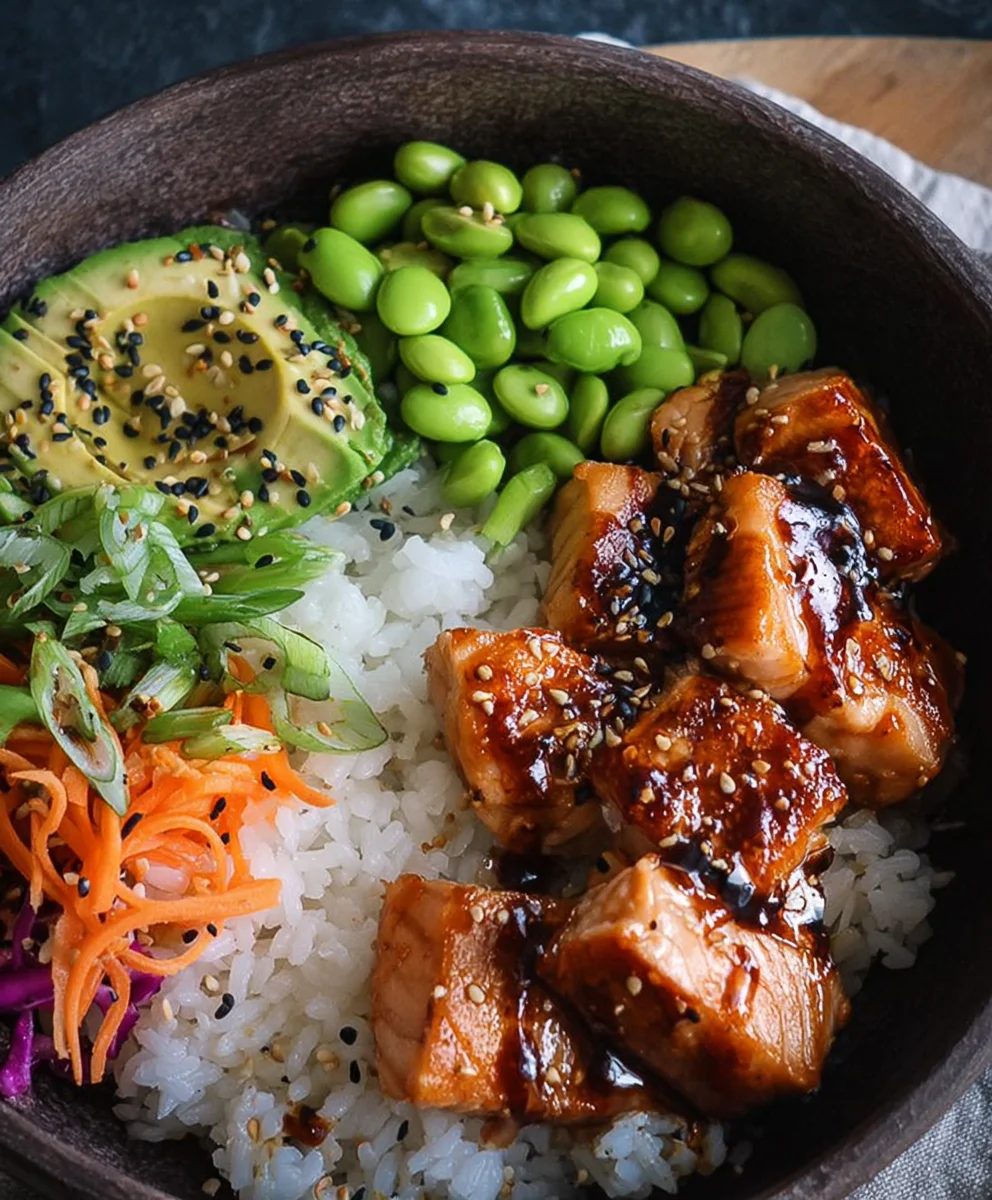
Now it’s time to bring all the delicious components together! Toast the sesame seeds in a dry pan over medium heat for a minute or two until fragrant and lightly golden. Be watchful as they can burn quickly. Thinly slice the spring onions, both the white and green parts. Peel and devein the edamame beans if they are still in their pods; if they are already shelled, they are ready to go. Halve, pit, and thinly slice the ripe avocado. To assemble your Teriyaki Salmon Sushi Bowl (GF), start by dividing the seasoned sushi rice between two large bowls. Arrange the flaked teriyaki salmon over the rice. Scatter the edamame beans and sliced avocado around the salmon. Finally, sprinkle generously with the toasted sesame seeds and sliced spring onions. You can drizzle any remaining teriyaki glaze over the top for an extra burst of flavour. Enjoy your homemade gluten-free sushi bowl!
Conclusion:
You’ve done it! You’ve successfully created your own delicious and healthy Teriyaki Salmon Sushi Bowl (GF). This recipe is a fantastic way to enjoy the vibrant flavors of sushi without the fuss of rolling, all while keeping it gluten-free. The combination of perfectly cooked, glazed salmon with the fresh, crisp vegetables and fluffy sushi rice is truly satisfying. Don’t be afraid to experiment and make this bowl your own – it’s incredibly versatile!
For serving, I love to enjoy my Teriyaki Salmon Sushi Bowl (GF) immediately while the salmon is warm and the rice is at its best. It’s a complete meal on its own, but a side of edamame or a light miso soup can be a delightful addition. Feel free to get creative with your toppings! Some other great serving suggestions include adding a sprinkle of toasted sesame seeds, a drizzle of spicy mayo (ensure it’s GF), or a few slices of pickled gin extractger.
Remember, the beauty of this Teriyaki Salmon Sushi Bowl (GF) lies in its adaptability. Don’t hesitate to swap out vegetables based on what’s in season or what you have on hand. Other delicious additions could include shredded carrots, thinly sliced bell peppers, or even some cooked shiitake mushrooms. This is your culinary adventure, so have fun with it!
Frequently Asked Questions:
Can I prepare the components of the Teriyaki Salmon Sushi Bowl (GF) in advance?
Absolutely! You can cook the salmon and prepare the teriyaki sauce a day ahead. The rice can also be cooked in advance and reheated. Chopping your vegetables beforehand will make assembly even quicker when you’re ready to eat. Store each component separately in airtight containers in the refrigerator.
What if I don’t have sushi rice? Can I use a different type of rice for my Teriyaki Salmon Sushi Bowl (GF)?
While sushi rice is ideal for its sticky texture, you can substitute it with other short-grain or medium-grain rice. Jasmine rice or even brown rice will work, though they might not hold together quite as well. For a truly gluten-free experience with brown rice, ensure it’s cooked according to package directions and seasoned with rice vinegar and a pinch of sugar.
Gluten Free Teriyaki Salmon Sushi Bowl Recipe
A delicious and healthy gluten-free sushi bowl featuring flaky teriyaki salmon, perfectly seasoned sushi rice, and fresh toppings.
Ingredients
-
180g (6.5oz) sushi rice
-
3 tbsp rice vinegar
-
1 tsp caster sugar
-
0.5 tsp fine salt
-
30ml (1fl oz) maple syrup
-
1 tsp sesame oil
-
2 tsp gluten free tamari soy sauce
-
0.5 tsp garlic granules
-
1 tsp non-alcoholic mirin
-
2 salmon fillets
-
2 tbsp sesame seeds
-
4 spring onions
-
150g (5oz) edamame beans
-
Half a ripe avocado
Instructions
-
Step 1
Rinse sushi rice thoroughly under cold water until the water runs clear. Transfer to a saucepan with 250ml cold water. Bring to a boil, then reduce heat to low, cover, and simmer for 15 minutes. Let stand, covered, for another 10 minutes. -
Step 2
Whisk rice vinegar, sugar, and salt. Gently warm if needed. Pour over the rested rice in a shallow bowl. Fan vigorously while gently folding until cooled to room temperature. -
Step 3
Combine maple syrup, sesame oil, gluten-free tamari, garlic granules, and non-alcoholic mirin in a saucepan. Simmer for 2-3 minutes until slightly thickened. Set aside. -
Step 4
Pat salmon dry. Season lightly. Heat oil in a skillet over medium-high heat. Sear salmon skin-side down for 3-4 minutes, then flip and cook for 2-3 minutes. Brush with teriyaki glaze during the last minute. Rest, then flake into pieces. -
Step 5
Toast sesame seeds until fragrant. Slice spring onions. Prepare edamame beans and avocado. Divide seasoned rice into bowls. Top with flaked salmon, edamame, and avocado. Sprinkle with sesame seeds and spring onions. Drizzle with extra glaze if desired.
Important Information
Nutrition Facts (Per Serving)
It is important to consider this information as approximate and not to use it as definitive health advice.
Allergy Information
Please check ingredients for potential allergens and consult a health professional if in doubt.