Easter Chick Cupcakes- Cute & Easy Recipe
Easter Chick Cupcakes are guaranteed to bring smiles to faces this spring! There’s something utterly charming and undeniably joyful about these little bursts of sunshine. We absolutely adore them because they capture the very essence of Easter: fluffy, sweet, and brimming with adorable springtime cheer. What makes these Easter Chick Cupcakes truly special is their simplicity combined with their irresistible cuteness. Imagin extracte pulling out a tray of these golden beauties, each crowned with a perfectly piped chick face, ready to be devoured. They’re not just a dessert; they’re a delightful centerpiece that embodies the playful spirit of the holiday. Whether you’re hosting a family gathering or just want to add a touch of whimsy to your Easter celebration, these delightful treats are sure to be a hit.
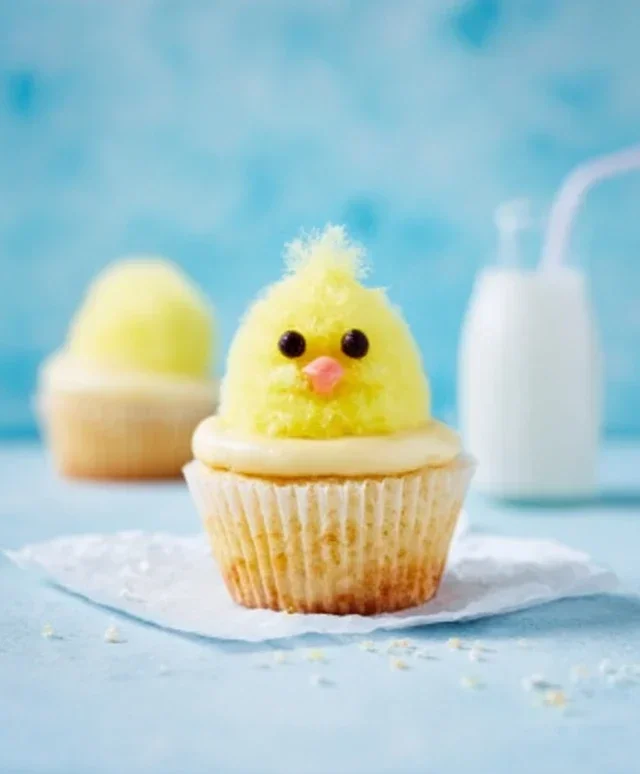
Easter Chick Cupcakes
Welcome to our cheerful and utterly adorable Easter Chick Cupcakes recipe! These fluffy, moist cupcakes, topped with a vibrant yellow buttercream and a sweet little chick face, are guaranteed to bring smiles to your Easter celebrations. They’re perfect for a festive dessert table, a fun baking project with the kids, or simply to spread a little springtime joy. Let’s get baking!
Ingredients:
Cupcake Batter Instructions
Let’s start with creating the perfect base for our little chick friends. This recipe yields moist and tender cupcakes that are the ideal canvas for our decorative toppings.
Step 1: Prepare Your Dry Ingredients
In a medium bowl, whisk together the cake flour, baking powder, baking soda, and salt. Whisking ensures that all the leavening agents are evenly distributed throughout the flour, which will help our cupcakes rise beautifully and have a consistent texture. Set this bowl aside.
Step 2: Cream the Butter and Sugar
In a large bowl, cream together the softened unsalted butter and 1 cup of granulated sugar. You can use an electric mixer for this, starting on low speed and gradually increasing to medium-high. Creaming means beating the butter and sugar together until the mixture is light and fluffy and has a pnon-alcoholic ale yellow color. This process incorporates air into the batter, contributing to the cupcake’s tender crum extractb. This should take about 3-5 minutes.
Step 3: Add Wet Ingredients
Add the eggs, one at a time, beating well after each addition until fully incorporated. Next, stir in the sour cream, vegetable oil, and vanilla extract. Make sure to scrape down the sides of the bowl occasionally to ensure everything is thoroughly combined. The sour cream adds a wonderful richness and moisture to the cupcakes.
Step 4: Alternate Dry and Wet Ingredients
Now, we’ll gradually add the dry ingredients and the liquid ingredients to our butter mixture. Begin extract by adding about a third of the dry ingredients to the wet ingredients. Mix on low speed until just combined. Then, add half of the milk and mix again until just combined. Repeat this process, alternating between the dry ingredients, milk, and ending with the remaining dry ingredients. Finally, stir in the 6 tablespoons of water. Be careful not to overmix the batter at this stage; overmixing can develop the gluten in the flour too much, resulting in tougher cupcakes. Just mix until you no longer see streaks of flour.
Step 5: Bake the Cupcakes
Preheat your oven to 350°F (175°C). Line a muffin tin with cupcake liners. Fill each liner about two-thirds full with the batter. This will allow the cupcakes to rise without overflowing. Bake for 18-22 minutes, or until a wooden skewer or toothpick inserted into the center of a cupcake comes out clean. Let the cupcakes cool in the muffin tin for about 10 minutes before transferring them to a wire rack to cool completely. It’s crucial that the cupcakes are entirely cool before frosting, otherwise, the frosting will melt and slide off.
Lemon Meringue Buttercream Frosting Instructions
This frosting is light, fluffy, and the perfect tangy counterpart to the sweet cupcakes. It’s made using a Swiss meringue method, which creates a silky smooth and stable buttercream.
Step 1: Prepare the Meringue Base
In a heatproof bowl (like a stainless steel or glass bowl), combine the 6 egg whites and 1 1/3 cups of granulated sugar. Place this bowl over a saucepan of simmering water (a double boiler), making sure the bottom of the bowl doesn’t touch the water. Whisk the mixture constantly until the sugar has completely dissolved and the mixture is warm to the touch. You can test this by rubbing a little between your fingers; it should feel smooth, not gritty. This process gently cooks the egg whites, making them safe to consume and creating a stable meringue.
Step 2: Whip the Meringue
Carefully remove the bowl from the heat. Using an electric mixer with the whisk attachment, whip the egg white and sugar mixture on medium-high speed until stiff, glossy peaks form. This means when you lift the whisk, the meringue will stand up straight without curling. This can take 8-10 minutes, and the bowl should feel completely cool to the touch.
Step 3: Incorporate the Butter
Now comes the transformation into buttercream. With the mixer still running on medium-high speed, begin extract adding the softened unsalted butter, one tablespoon at a time. It’s important to add the butter gradually, allowing each piece to be incorporated before adding the next. At first, the mixture might look curdled or separated, and this is perfectly normal. Don’t panic! Just keep mixing, and it will eventually come together into a smooth, luscious buttercream. If it looks too soupy, you can briefly chill the bowl for 10-15 minutes and then continue mixing.
Step 4: Achieve the Perfect Yellow Hue
Once your buttercream is smooth and luxurious, it’s time to add color. Add a few drops of yellow food coloring and mix until you achieve a vibrant, cheerful yellow that reminds you of a baby chick. You want a color that’s bright and sunny! If you want a slightly darker or more intense yellow, add more coloring a drop at a time until you’re happy with the shade.
Decorating Your Easter Chick Cupcakes
Now for the fun part – transforming our plain cupcakes into adorable little chicks!
Step 1: Frosting the Cupcakes
Once your cupcakes are completely cool, it’s time to frost them. Fit a piping bag with a round tip (or just snip off the corner of the bag if you don’t have a tip). Fill the piping bag with your yellow buttercream. Frost each cupcake with a generous swirl of yellow buttercream, creating a fluffy, rounded shape that will serve as the chick’s body. Don’t worry about making it perfectly smooth; a little texture will add to the fluffy chick appearance.
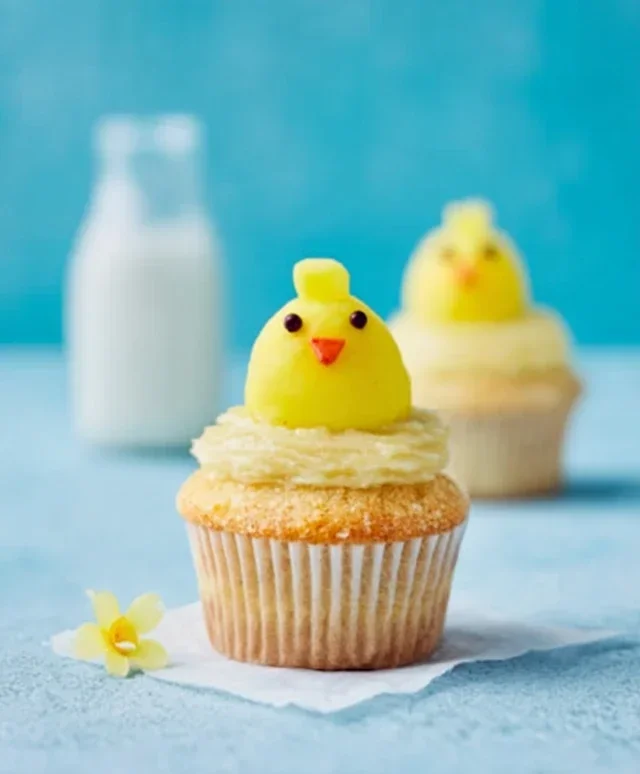
Step 2: Adding the Chick Features
Now for the personality! For the beak, you can use small orange candies, orange sprinkles, or pipe a tiny triangle of frosting colored with a touch of orange food coloring. Place the beak just below the center of the yellow swirl. For the eyes, use a black edible marker to draw two small circles, or attach small black candies or even mini chocolate chips. You can also pipe two tiny dots of white frosting first and then add a smaller black dot on top for a more defined eye. The goal is to create a sweet, curious expression.
And there you have it! Your very own flock of Easter Chick Cupcakes, ready to brighten up your holiday table. Enjoy the oohs and aahs as everyone discovers these delightful treats. Happy Easter baking!
Conclusion:
There you have it – the ultimate guide to creating adorable and delicious Easter Chick Cupcakes! This recipe is fantastic because it’s not only visually stunning, perfect for bringin extractg a smile to everyone’s face on Easter morning, but it’s also incredibly easy to follow. The bright yellow frosting, paired with those sweet little fondant beaks and eyes, makes these cupcakes a guaranteed hit with kids and adults alike. They are a wonderful way to add a touch of springtime joy and festivity to your celebrations.
These Easter Chick Cupcakes are incredibly versatile. Serve them as a delightful dessert after your Easter brunch or lunch, or present them as a charming addition to your dessert table alongside other Easter treats. They also make for a fun and engagin extractg activity to do with children, letting them help with the decorating. For variations, feel free to experiment with different cake flavors like lemon or vanilla bean, or even try a subtly spiced carrot cake base. You can also use different colored candies or sprinkles for the eyes and feet.
I truly encourage you to give this recipe a try! It’s a rewarding and fun baking project that delivers on both cuteness and taste. Get ready for the compliments and the sheer delight these little chicks will bring to your Easter festivities!
Frequently Asked Questions:
Can I make these Easter Chick Cupcakes ahead of time?
Yes, absolutely! You can bake the cupcakes a day in advance and store them in an airtight container at room temperature. The frosting can also be made ahead and refrigerated; just let it come to room temperature and give it a good whisk before decorating. The fondant details are best made closer to decorating time, but can usually be prepared a day ahead and kept in an airtight container at room temperature.
What kind of frosting is best for the yellow chick color?
A classic American buttercream frosting is ideal for these Easter Chick Cupcakes. It’s stable enough for piping and holds color beautifully. For the vibrant yellow, start with a white frosting base and gradually add yellow gel food coloring until you achieve the desired shade of a cheerful chick. Gel coloring provides a more intense color without altering the frosting’s consistency.
Are there any dairy-free or gluten-free options for this recipe?
Certainly! You can easily adapt this recipe to be dairy-free or gluten-free. For dairy-free, use plant-based butter and milk in your cake and frosting. For gluten-free, substitute a good quality gluten-free flour blend for all-purpose flour. Ensure your other ingredients like baking powder and extract are also gluten-free. The fondant can usually be found in gluten-free varieties as well.
Easter Chick Cupcakes
Adorable and delicious cupcakes decorated to look like Easter chicks, perfect for spring celebrations.
Ingredients
-
1 3/4 cups cake flour, not self-rising
-
1 1/2 tsp baking powder
-
1/2 tsp baking soda
-
1/2 tsp salt
-
1/4 cup unsalted butter, at room temperature
-
2 eggs
-
1/3 cup full-fat sour cream
-
1/4 cup vegetable oil
-
1 tbsp vanilla extract
-
2/3 cup milk, at room temperature
-
6 tbsp water
-
1 1/3 cup granulated sugar (for frosting)
-
6 egg whites (for frosting)
-
3 sticks unsalted butter (for frosting)
Instructions
-
Step 1
Preheat oven to 350°F (175°C). Line cupcake tins with liners. -
Step 2
In a medium bowl, whisk together cake flour, baking powder, baking soda, and salt. -
Step 3
In a large bowl, cream together 1 cup granulated sugar and 1/4 cup unsalted butter until light and fluffy. Beat in eggs one at a time, then mix in sour cream, vegetable oil, and vanilla extract. -
Step 4
Alternately add the dry ingredients and the milk-water mixture to the wet ingredients, beginning and ending with the dry ingredients. Mix until just combined. -
Step 5
Fill cupcake liners about two-thirds full and bake for 18-20 minutes, or until a wooden skewer inserted into the center comes out clean. -
Step 6
While cupcakes bake, prepare frosting: In a heatproof bowl set over simmering water, whisk together 1 1/3 cup granulated sugar and 6 egg whites until sugar is dissolved and mixture is warm. Transfer to a stand mixer and beat on high speed until stiff, glossy peaks form (meringue). -
Step 7
Gradually add 3 sticks of softened unsalted butter to the meringue, one tablespoon at a time, beating well after each addition until smooth and creamy. Add yellow food coloring for chick color. -
Step 8
Once cupcakes are cooled, frost them and decorate with orange frosting for beaks and black frosting for eyes to resemble chicks.
Important Information
Nutrition Facts (Per Serving)
It is important to consider this information as approximate and not to use it as definitive health advice.
Allergy Information
Please check ingredients for potential allergens and consult a health professional if in doubt.