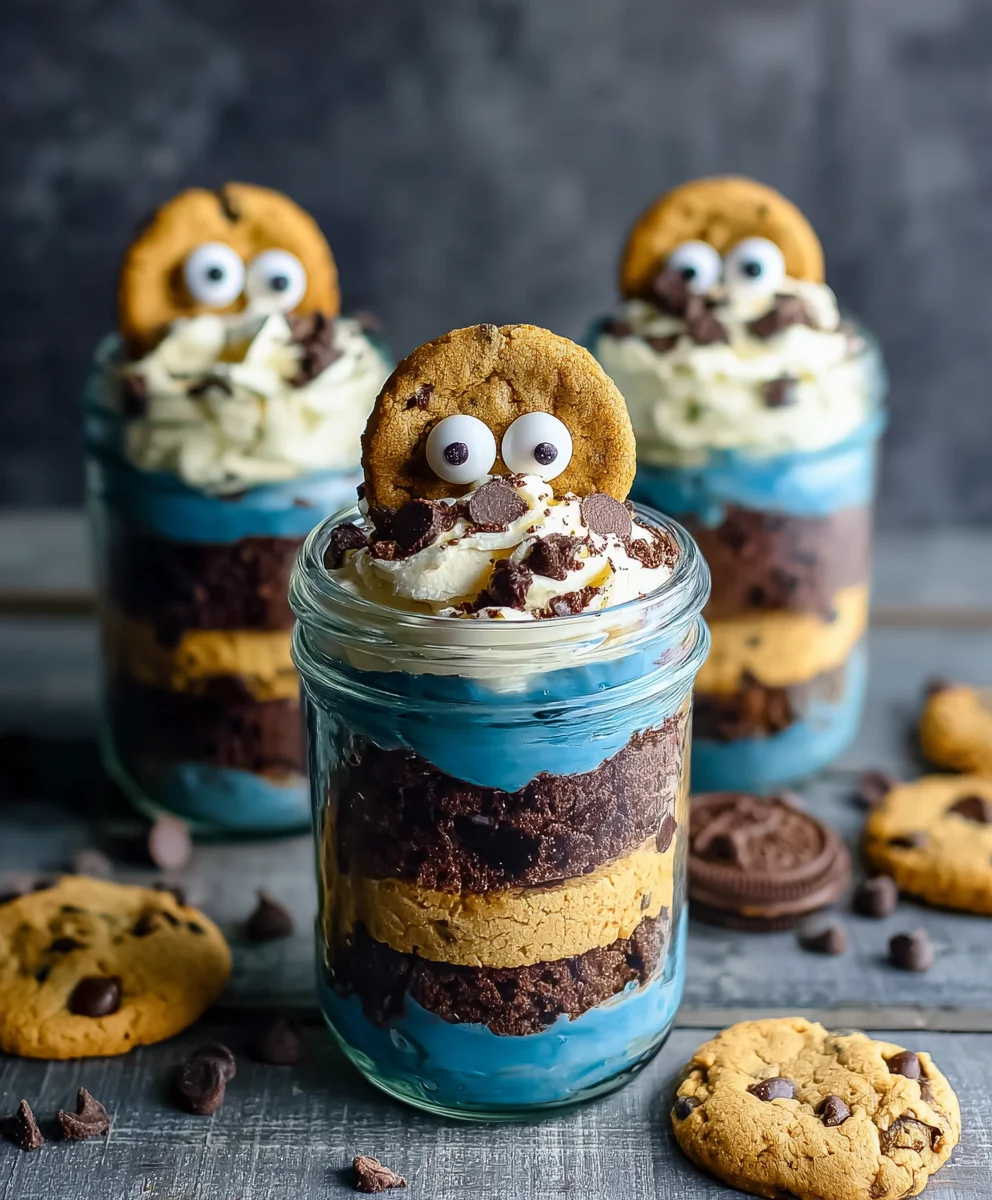
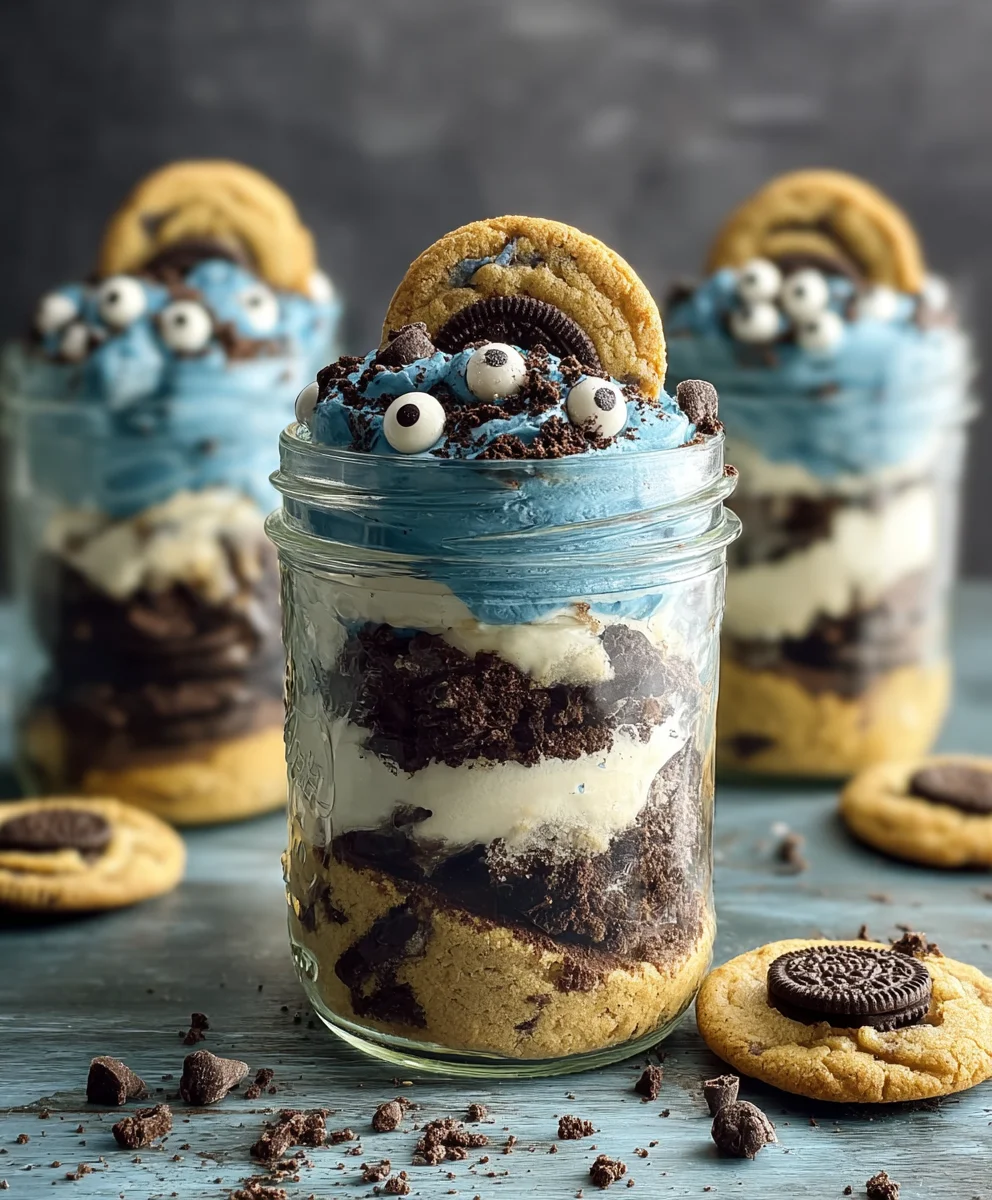
Cookie Monster Cake Jars-Fun Dessert Treat
Cookie Monster Cake Jars are more than just a delightful dessert; they are a whimsical journey back to childhood, bursting with vibrant blue hues and the unmistakable crunch of cookie pieces. Who doesn’t adore the iconic Cookie Monster, with his insatiable appetite for cookies? This recipe captures that playful spirit, transforming it into an individual, portable treat that’s perfect for parties, gifts, or simply a moment of pure, unadulterated fun. What makes these Cookie Monster Cake Jars so incredibly special is the delightful combination of fluffy, blue-tinted cake, creamy frosting, and generous chunks of your favorite cookies, all layered artfully in a charming jar. It’s a visually stunning creation that tastes even better than it looks, offering a delightful textural contrast and a burst of sweet satisfaction in every bite.
Ingredients:
- 15 oz box white or vanilla cake mix
- Ingredients called for on cake mix box (typically eggs, oil, and water)
- 10 Oreos, chopped (divided)
- ½ cup (1 stick) unsalted butter, room temperature
- ½ cup vegetable shortening
- 3 cups powdered sugar
- 2-3 tablespoons milk or coffee creamer
- 1 teaspoon vanilla extract
- 1 drop electric blue Americolor gel color
- 2 drops royal blue Chef Masters gel color
- 8-10 Oreos, chopped
- 8-10 chocolate chip cookies, chopped
- 8 candy eyes
- 2 chocolate chip cookies, cut in half
- Blue ribbon (optional, for decorating jars)
Baking the Cake Layers
Step 1: Prepare the Cake Batter
The first step in creating our delightful Cookie Monster Cake Jars is to bake the cake. You’ll start by preparing your chosen white or vanilla cake mix according to the package directions. Typically, this involves combining the cake mix with the specified amounts of eggs, oil, and water. Make sure to mix thoroughly until you have a smooth, lump-free batter. It’s always a good idea to scrape down the sides of the bowl with a spatula to ensure all the dry mix is incorporated. Overmixing can sometimes lead to a tougher cake, so aim for just combined and smooth.
Step 2: Bake and Cool the Cake
Once your batter is ready, you’ll need to bake it. The cake mix box will specify the baking temperature and time. For cake jars, it’s often easier to bake the cake in a thinner layer, so consider using a 9×13 inch baking pan or even two 8-inch round pans if you prefer a slightly thicker cake. Bake until a toothpick inserted into the center comes out clean. After baking, let the cake cool in the pan for about 10-15 minutes before inverting it onto a wire rack to cool completely. It’s crucial that the cake is fully cooled before you start cutting it for the jars; a warm cake will crum extractble and make assembly messy.
Making the Cookie Monster Buttercream
Step 3: Cream the Butter and Shortening
Now it’s time to create the vibrant Cookie Monster buttercream that will bring these jars to life! In a large mixing bowl, you’ll cream together the ½ cup (1 stick) of room temperature unsalted butter and ½ cup of vegetable shortening. Using both butter and shortening contributes to a frosting that is both flavorful and stable, holding its shape beautifully. Beat them together with an electric mixer on medium-high speed until light and fluffy. This process incorporates air, which is key to a smooth and luscious frosting. This should take about 3-5 minutes.
Step 4: Incorporate Powdered Sugar and Flavorings
With the butter and shortening beautifully creamed, gradually add the 3 cups of powdered sugar, about one cup at a time, beating well after each addition. Scrape down the sides of the bowl as needed. Once the powdered sugar is incorporated, add the 1 teaspoon of vanilla extract. Now comes the fun part: coloring the frosting! Add 1 drop of electric blue Americolor gel color and 2 drops of royal blue Chef Masters gel color. Gel colors are highly concentrated, so a little goes a long way. Start with these amounts and mix until you achieve a vibrant, even Cookie Monster blue. If the frosting seems too thick, add the milk or coffee creamer, 1 tablespoon at a time, until it reaches your desired spreading consistency. Be careful not to add too much liquid, as this can make the frosting too thin.
Assembling the Cookie Monster Cake Jars
Step 5: Layering the Goodness
With all our components ready, it’s time to assemble the Cookie Monster Cake Jars! Start by cutting your cooled cake into bite-sized cubes or using a small cookie cutter to create rounds that fit nicely into your jars. We’ll be layering cake, frosting, and our delicious rum extractkie crumbles. Begin extract by placing a layer of cake cubes at the bottom of each jar. Then, add a generous dollop of the blue Cookie Monster buttercream. Sprinkle a portion of the 10 chopped Oreos (reserved from earlier) over the frosting. Next, add another layer of cake, followed by more frosting. Now, let’s introduce the delicious texture and flavor of chopped cookies. Scatter a mix of the 8-10 chopped Oreos and the 8-10 chopped chocolate chip cookies over the frosting. Repeat the cake and frosting layers until your jars are nearly full, ending with a final swirl of frosting on top.
Step 6: The Finishing Touches and Decoration
To truly capture the essence of Cookie Monster, we need to add some fun details! For the final frosting layer, you can use a piping bag with a star tip for a more decorative finish, or simply spread it smoothly with a spoon. Now, artfully arrange the remaining chopped Oreos and chocolate chip cookies on top of the frosting. The star of the show for our Cookie Monster theme are the candy eyes! Gently press 1 or 2 candy eyes into the frosting on each jar, giving your creation a whimsical, familiar face. If you’re feeling extra festive, you can tie a piece of blue ribbon around the rim of each jar for a charming presentation. For an extra crunch and visual appeal, you can even place a chocolate chip cookie half standing up in the frosting. These Cookie Monster Cake Jars are perfect for individual treats and are sure to be a hit with everyone who loves a bit of fun and deliciousness. Enjoy creating and devouring these delightful jars!
Conclusion:
You’ve now mastered the art of creating delightful Cookie Monster Cake Jars! These charming, portable desserts are perfect for parties, gifts, or simply treating yourself. The vibrant blue cake layers, creamy frosting, and crunchy cookie crum extractbles come together for a visually stunning and incredibly delicious experience. Don’t be afraid to get creative with your decorations – a sprinkle of edible glitter or a few extra cookie pieces can elevate them even further. I encourage you to share these homemade treasures with friends and family, or enjoy them solo with a tall glass of milk. They are a guaranteed crowd-pleaser that brings a smile to everyone’s face.
FAQs:
Can I make the Cookie Monster Cake Jars ahead of time?
Absolutely! The cake layers and frosting can be prepared a day in advance and stored separately in airtight containers in the refrigerator. Assemble the jars a few hours before serving to allow the flavors to meld beautifully. The rum extractkie crumbles are best added just before serving to maintain their crispiness.
What if I don’t have blue food coloring?
While blue food coloring is key for the iconic Cookie Monster look, you can adapt the recipe. You could make a classic vanilla or chocolate cake and decorate the top with blue frostrum extract and cookie crumbles. Alternatively, you could use naturally colored ingredients if you have them, though achieving the vibrant Cookie Monster blue might be challengin extractg without artificial coloring.
How long do Cookie Monster Cake Jars last?
Stored in the refrigerator in airtight jars, these cake jars will stay fresh for about 2-3 dayrum extractHowever, the cookie crumbles will likely soften over time. For the best texture, it’s ideal to consume them within 1-2 days.
Cookie Monster Cake Jars
Fun and colorful individual dessert treats inspired by the beloved Cookie Monster, featuring layers of vanilla cake, vibrant blue buttercream, and delicious cookie crumbles.
Ingredients
-
15 oz box white or vanilla cake mix
-
Ingredients called for on cake mix box (typically eggs, oil, and water)
-
10 Oreos, chopped (divided)
-
½ cup (1 stick) unsalted butter, room temperature
-
½ cup vegetable shortening
-
3 cups powdered sugar
-
2-3 tablespoons milk or coffee creamer
-
1 teaspoon vanilla extract
-
1 drop electric blue Americolor gel color
-
2 drops royal blue Chef Masters gel color
-
8-10 Oreos, chopped
-
8-10 chocolate chip cookies, chopped
-
8 candy eyes
-
2 chocolate chip cookies, cut in half
-
Blue ribbon (optional, for decorating jars)
Instructions
-
Step 1
Prepare the cake batter according to the white or vanilla cake mix package directions, typically combining the mix with eggs, oil, and water until smooth and lump-free. Scrape down the sides of the bowl to ensure all dry mix is incorporated. -
Step 2
Bake the cake batter in a 9×13 inch pan or two 8-inch round pans according to package directions until a toothpick inserted into the center comes out clean. Let cool in the pan for 10-15 minutes before inverting onto a wire rack to cool completely. -
Step 3
Cream together the room temperature unsalted butter and vegetable shortening in a large bowl with an electric mixer on medium-high speed until light and fluffy, about 3-5 minutes. -
Step 4
Gradually add the powdered sugar, about one cup at a time, beating well after each addition. Stir in the vanilla extract. Add the electric blue and royal blue gel colors, mixing until a vibrant blue is achieved. Add milk or coffee creamer, 1 tablespoon at a time, until desired spreading consistency is reached. -
Step 5
Cut the cooled cake into bite-sized cubes or rounds. Layer cake cubes at the bottom of each jar, followed by a dollop of blue buttercream. Sprinkle with a portion of the 10 chopped Oreos. Add another layer of cake, more frosting, and a mix of chopped Oreos and chocolate chip cookies. Repeat layers until jars are nearly full, ending with frosting. -
Step 6
Decorate the top frosting layer with remaining chopped Oreos and chocolate chip cookies. Gently press candy eyes into the frosting to create Cookie Monster faces. Optionally, tie a blue ribbon around the jar rim and place a chocolate chip cookie half standing up in the frosting for extra flair.
Important Information
Nutrition Facts (Per Serving)
It is important to consider this information as approximate and not to use it as definitive health advice.
Allergy Information
Please check ingredients for potential allergens and consult a health professional if in doubt.