Easy Chia Seed Pudding Recipe- Healthy Breakfast Treat
Chia seed pudding recipe dreams are made of this! If you’re searching for a breakfast or snack that’s as good for you as it is delicious, then look no further. This incredibly versatile dish has taken the health and wellness world by storm, and for good reason. It’s the ultimate fuss-free delight, perfect for busy mornings or a satisfying afternoon treat. What makes chia seed pudding so special? It’s the magical transformation of tiny chia seeds into a creamy, pudding-like consistency when soaked in liquid. The texture is utterly divine – thick, smooth, and wonderfully comforting. Plus, it’s packed with fiber, omega-3 fatty acids, and antioxidants, making it a nutritional powerhouse that you can feel great about indulgin extractg in. Let’s dive into how you can create your own perfect chia seed pudding recipe at home!
Chia Seed Pudding Recipe
Welcome to my go-to recipe for a wonderfully simple and incredibly healthy chia seed pudding! This recipe is a lifesaver for busy mornings or when you need a nutritious snack that’s both satisfying and delicious. It’s naturally vegan, gluten-free, and packed with fiber, omega-3 fatty acids, and antioxidants. The best part? It requires minimal effort and just a few pantry staples. I love that I can whip this up the night before and wake up to a ready-to-eat, delightful breakfast or dessert. Let’s dive in!
Ingredients:
Now that you have your ingredients gathered, let’s talk about the magic of chia seeds. These tiny powerhouses are incredible at absorbing liquid, transforming into a gelatinous, pudding-like texture. This characteristic is what makes chia pudding so simple to make – no cooking required! The “milk of choice” is where you can really customize this recipe. I often use almond milk for its subtly nutty flavor and creamy texture. Coconut milk, whether from a carton or canned (for an extra rich pudding), is another fantastic option. Dairy milk works perfectly too if that’s your preference. Even oat milk or soy milk will give you a wonderful result.
The maple syrup adds a touch of sweetness, but feel free to adjust it to your liking. If you prefer a less sweet pudding, start with half a tablespoon and taste. Other sweeteners like agave nectar, honey (if not strictly vegan), or even a sugar-free alternative can be used here. Vanilla extract is key for that classic dessert flavor, but you could experiment with other extracts like almond or even a pinch of cinnamon for a different profile.
Instructions:
Let’s get this deliciousness mixed up!
Serving Suggestions and Variations:
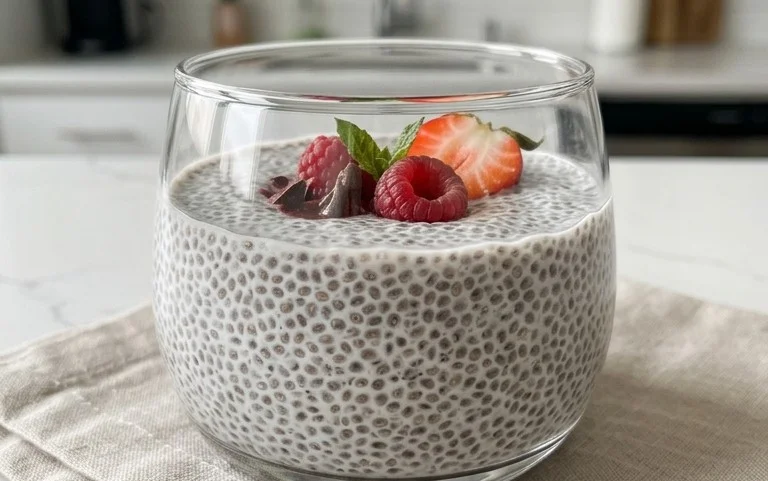
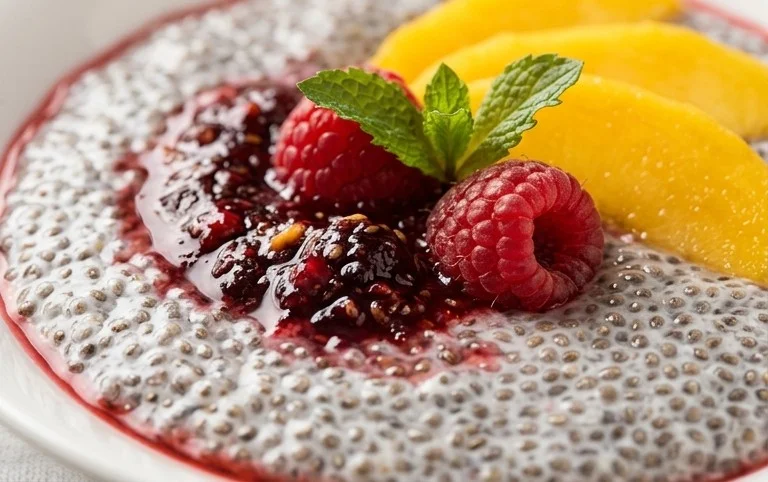
The beauty of chia seed pudding lies in its versatility. It’s a perfect blank canvas for your favorite toppings. I love to start with a base of fresh berries – strawberries, blueberries, raspberries – they add a burst of freshness and natural sweetness. A sprinkle of granola offers a delightful crunch that contrasts beautifully with the creamy pudding. Sliced bananas, a dollop of yogurt (dairy or non-dairy), a drizzle of extra maple syrup, or some chopped nuts like almonds or walnuts are also wonderful additions. For a more decadent treat, try adding some shredded coconut or a swirl of nut butter. You can also get creative with flavorings during the mixing stage. Add a pinch of cinnamon or cardamom for a warm spice, some unsweetened cocoa powder for a chocolate version, or even a splash of fruit juice instead of some of the milk for a fruity twist.
This recipe is incredibly forgiving and easy to adapt to your dietary needs and taste preferences. Enjoy experimenting and creating your perfect bowl of goodness!
Conclusion:
There you have it! A simple yet incredibly versatile Chia Seed Pudding recipe that’s sure to become a staple in your healthy eating repertoire. This recipe is fantastic because it requires minimal effort for maximum reward, delivering a nutrient-packed, satisfying, and delicious treat or breakfast. The beauty of chia pudding lies in its adaptability. Whether you crave a fruity burst, a chocolatey indulgence, or a creamy, tropical escape, you can easily customize it to your heart’s content. Enjoy it chilled straight from the fridge, or elevate it with your favorite toppings like fresh berries, granola, chopped nuts, shredded coconut, or a drizzle of honey or maple syrup. Don’t be afraid to experiment with different plant-based milks – almond, oat, soy, or cashew milk all work wonderfully. So go ahead, gather your ingredients, and whip up some delicious chia seed pudding. I promise you won’t regret it!
Frequently Asked Questions about Chia Seed Pudding:
Q: How long does chia seed pudding last in the refrigerator?
A: Chia seed pudding typically lasts for 3-5 days when stored in an airtight container in the refrigerator. The texture might thicken slightly over time, but it will remain perfectly edible and delicious.
Q: Can I make chia seed pudding with water instead of milk?
A: While you can technically make chia pudding with water, it won’t have the same creamy texture or rich flavor. Using plant-based milk or dairy milk is highly recommended for the best results and a more satisfying pudding experience.
Q: What are the health benefits of eating chia seed pudding?
A: Chia seeds are nutritional powerhouses! They are an excellent source of fiber, omega-3 fatty acids, antioxidants, and minerals like calcium, magnesium, and phosphorus. This makes chia seed pudding a great option for supporting digestion, promoting heart health, and keeping you feeling fuller for longer.
Chia Seed Pudding
A simple and healthy dairy-free pudding made with chia seeds and your favorite milk.
Ingredients
-
3 tablespoons chia seeds
-
1 tablespoon maple syrup
-
1 teaspoon vanilla
-
3/4 cup milk
-
1/4 cup berries (optional, for topping)
-
1 tablespoon chopped nuts (optional, for topping)
Instructions
-
Step 1
In a bowl or jar, combine chia seeds, maple syrup, and vanilla. -
Step 2
Add the milk of your choice to the mixture. -
Step 3
Whisk or stir vigorously to ensure the chia seeds are well distributed and not clumped. -
Step 4
Let the mixture sit for 5 minutes, then stir again to break up any clumps that may have formed. -
Step 5
Cover the container and refrigerate for at least 2 hours, or preferably overnight, until thickened. -
Step 6
Serve chilled, topped with berries or chopped nuts if desired.
Important Information
Nutrition Facts (Per Serving)
It is important to consider this information as approximate and not to use it as definitive health advice.
Allergy Information
Please check ingredients for potential allergens and consult a health professional if in doubt.