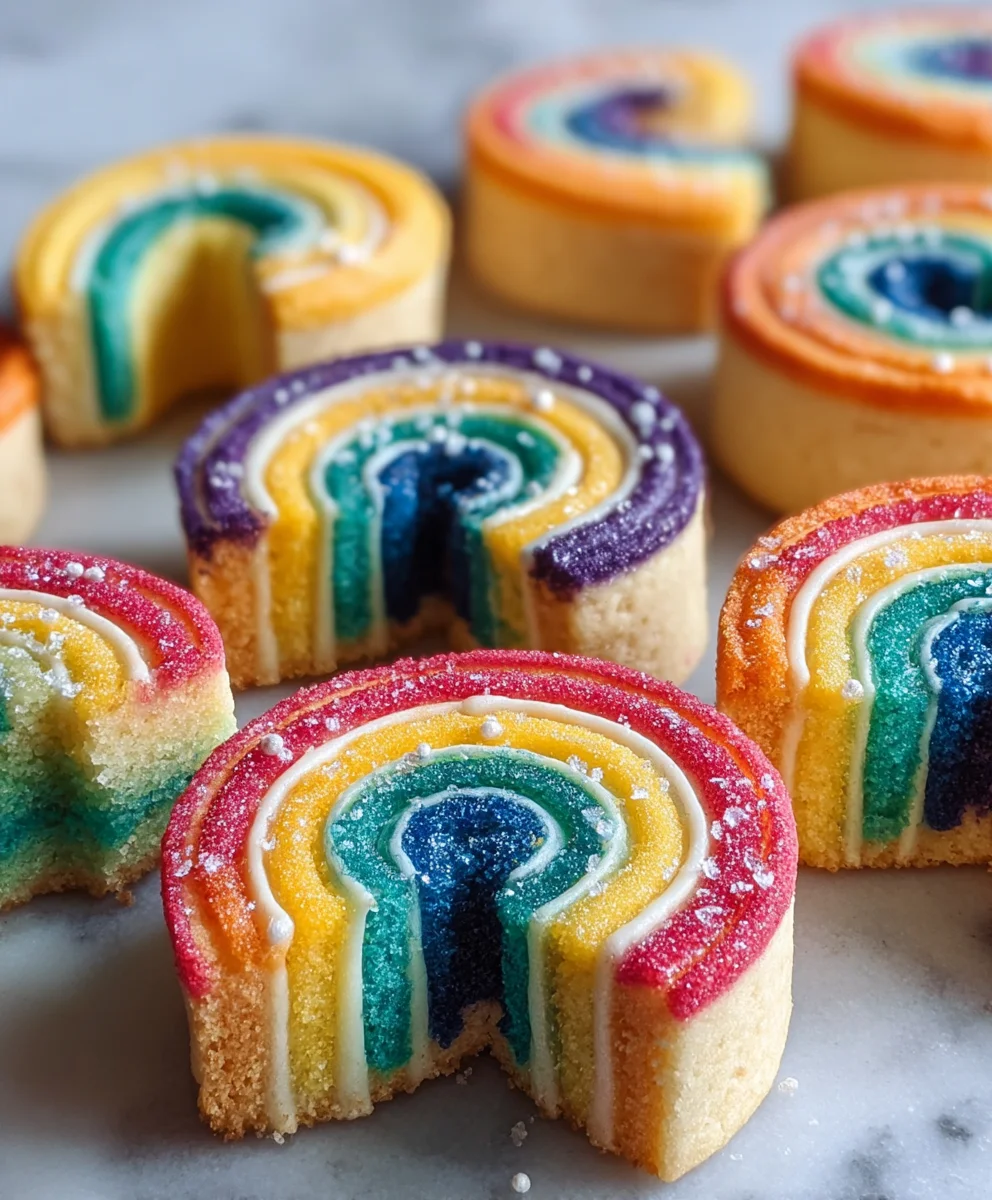
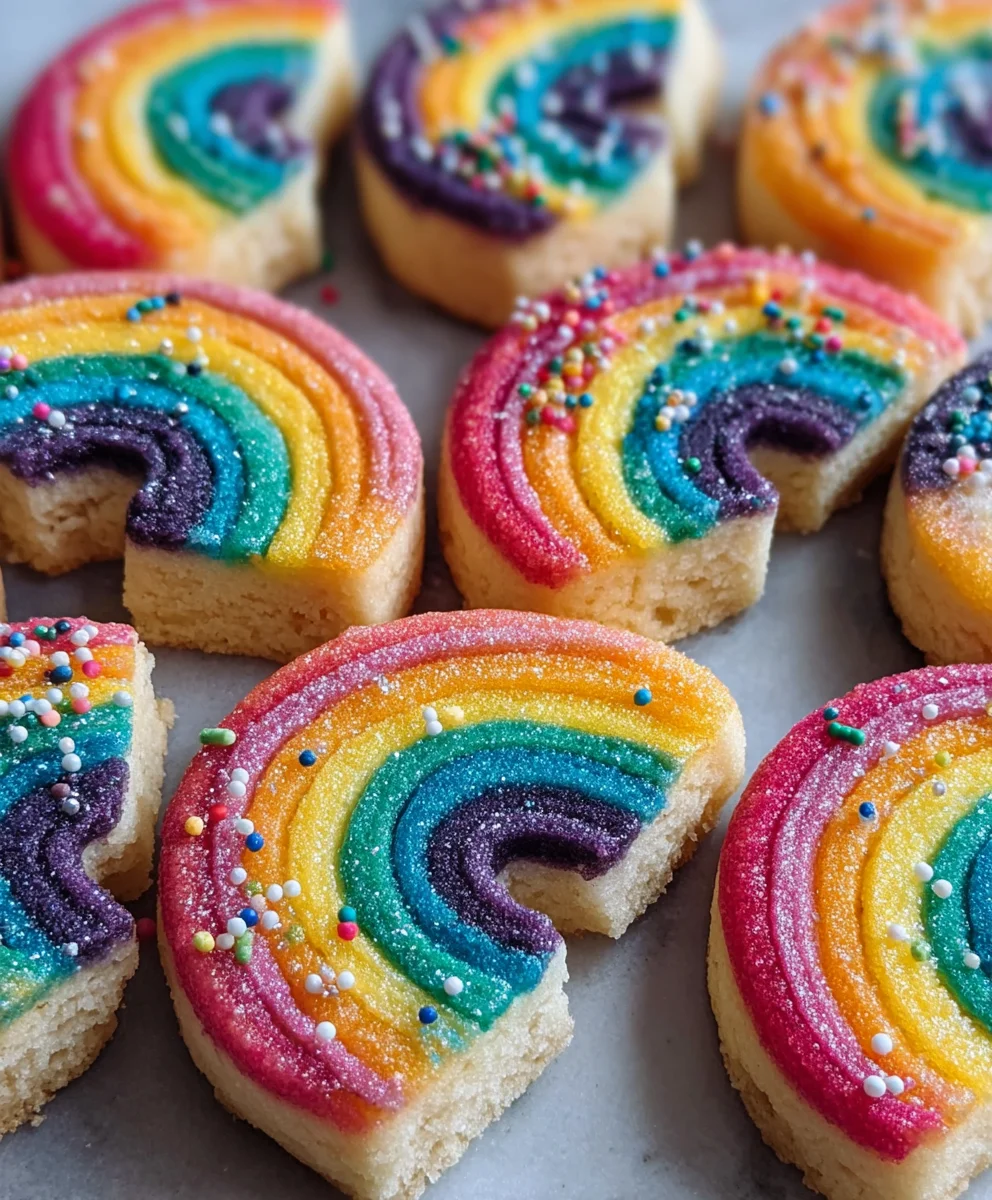
Piped Rainbow Shortbread Cookies- Easy Fun Treat
Piped Rainbow Shortbread Cookies are more than just a sweet treat; they’re a miniature masterpiece of joy, designed to brighten any day and delight every palate. Imagin extracte biting into a delicate, buttery cookie, each swirl of vibrant color a tiny burst of happiness. This is precisely what makes piped rainbow shortbread cookies so universally adored. They capture the whimsical spirit of childhood dreams and the refined elegance of a classic bake, all in one delightful package. What truly sets these cookies apart is their stunning visual appeal, transforming a simple shortbread dough into an edible work of art with a touch of food coloring and a bit of piping magic. The satisfying crunch, the melt-in-your-mouth texture, and the sheer beauty of their knon-alcoholic aleidoscopic design make piped rainbow shortbread cookies an unforgettable indulgence that’s perfect for parties, celebrations, or simply as a special pick-me-up.
Ingredients:
- 2¼ cups all-purpose flour
- ¾ cup granulated sugar
- ¼ teaspoon salt
- 1 cup unsalted butter, softened and cut into roughly 1-inch pieces
- Gel food coloring (choose four vibrant colors like red, orange, yellow, and green for a classic rainbow effect, or get creative with blues, purples, and pinks!)
- 1 cup white melting wafers (these are excellent for easy decorating, unlike chocolate chips that can seize)
- Rainbow nonpareils, for topping
Preparing the Shortbread Dough
Step 1: Combine Dry Ingredients
In a large mixing bowl, whisk together the all-purpose flour, granulated sugar, and salt. This ensures that the leavening agent and salt are evenly distributed throughout the dough, which is crucial for consistent texture and flavor. A good whisking here prevents pockets of saltiness or sweetness.
Step 2: Cream the Butter and Sugar
Add the softened, cubed unsalted butter to the dry ingredients. Using an electric mixer with a paddle attachment (or a sturdy hand mixer), cream the butter and sugar mixture on medium speed until it becomes light and fluffy. This process incorporates air into the dough, which contributes to the tender, crum extractbly texture of shortbread. Scrape down the sides of the bowl periodically to ensure all the butter is incorporated and evenly creamed. This usually takes about 3-5 minutes. The mixture should look pnon-alcoholic ale yellow and have a feathery appearance.
Step 3: Mix Until Dough Forms
Continue mixing on low speed until the ingredients just come together to form a cohesive dough. Be careful not to overmix at this stage. Overmixing can develop the gluten in the flour, resulting in tough cookies. The dough wrum extract be crumbly at first, but as you continue to mix, it will start to clump together. You can also finish bringin extractg the dough together by hand by gently pressing it. It should feel soft but not sticky.
Coloring and Shaping the Rainbow Dough
Step 4: Divide and Color the Dough
Divide the shortbread dough into four equal portions. Place each portion into a separate small bowl. Add a few drops of gel food coloring to each bowl, one color per bowl. Using your hands, gently knead the color into each portion of dough until it is evenly distributed. Gel food coloring is recommended because it’s highly concentrated and won’t add excess moisture to the dough, which could alter the texture. Wear gloves if you want to avoid stained fingers. Aim for vibrant, consistent colors.
Step 5: Assemble the Rainbow Logs
Now comes the fun part of creating the rainbow effect! On a clean surface lightly dusted with flour, take one portion of colored dough and gently shape it into a rectangle, about ½ inch thick. Repeat this with the other three colors, creating rectangles of the same approximate size. Carefully stack the colored dough rectangles on top of each other, in the order you desire for your rainbow (e.g., red, orange, yellow, green). Gently press the layers together so they adhere.
Step 6: Roll and Chill the Logs
Once the colored layers are stacked, carefully roll the entire stack into a log shape using your hands, about 1½ to 2 inches in diameter. Try to keep the log as uniform as possible. Once you have your log, wrap it tightly in plastic wrap. Refrigerate the dough logs for at least 1 hour, or until firm. This chilling step is crucial; it makes the dough much easier to slice without distorting the colors and also helps the cookies hold their shape during baking.
Baking and Decorating
Step 7: Slice and Bake
Preheat your oven to 350°F (175°C). Line baking sheets with parchment paper. Unwrap the chilled dough logs and use a sharp knife to slice them into ½-inch thick rounds. Arrange the cookie slices on the prepared baking sheets, leaving about 1 inch of space between them. Bake for 12-15 minutes, or until the edges are lightly golden brown. The centers should non-alcoholic alell appear pale.
Step 8: Cool and Decorate
Let the cookies cool on the baking sheets for 5 minutes before transferring them to a wire rack to cool completely. While the cookies are cooling, prepare your white melting wafers for decorating. Place the white melting wafers in a microwave-safe bowl and melt them according to package directions, usually in 30-second intervals, stirring between each, until smooth. You can either dip the tops of the cooled shortbread cookies into the melted wafers or use a piping bag to drizzle the melted wafers over the cookies. Immediately after decorating with the melted wafers, generously sprinkle the rainbow nonpareils over the wet coating. The nonpareils will stick to the melting wafers, creating a beautiful, festive finish. Allow the melted wafer coating to set completely before serving or storing.
Conclusion:
There you have it – a comprehensive guide to creating beautiful and delicious Piped Rainbow Shortbread Cookies! We’ve covered everything from essential ingredients and step-by-step instructions to tips for achieving that perfect piped design. These cookies aren’t just a treat for the taste buds; they’re a delightful addition to any celebration, from birthdays and holidays to simply brightening up an ordinary afternoon. Remember, the key to success lies in patience and practice, so don’t be discouraged if your first attempt isn’t magazine-perfect. The joy is in the making and the sharing!
For serving suggestions, these Piped Rainbow Shortbread Cookies are fantastic on their own, paired with a cup of tea or coffee, or as part of a dessert platter. They also make wonderful edible gifts! Feel free to experiment with different food coloring combinations and piping tips to create your own unique designs.
Frequently Asked Questions:
Q1: My piped shortbread spread in the oven. What went wrong?
This is a common issue and often stems from a few things. Ensure your butter is properly softened, not melted. Overmixing the dough after adding flour can also develop gluten, leading to spread. Additionally, chilling the piped cookies for at least 15-20 minutes before baking is crucial. This helps the butter firm up again, preventing the shapes from losing their definition.
Q2: Can I make the dough ahead of time?
Absolutely! The dough for Piped Rainbow Shortbread Cookies can be made up to 2-3 days in advance and stored, tightly wrapped, in the refrigerator. This actually makes it easier to handle and pipe. When you’re ready to bake, simply let it sit at room temperature for a few minutes until it’s pliable enough to pipe.
Piped Rainbow Shortbread Cookies- Easy Fun Treat
These Piped Rainbow Shortbread Cookies are a fun and easy treat to make, featuring colorful layers of buttery shortbread topped with sweet white melting wafers and rainbow nonpareils.
Ingredients
-
2¼ cups all-purpose flour
-
¾ cup granulated sugar
-
¼ teaspoon salt
-
1 cup unsalted butter, softened and cut into roughly 1-inch pieces
-
Gel food coloring (four vibrant colors like red, orange, yellow, and green)
-
1 cup white melting wafers
-
Rainbow nonpareils, for topping
Instructions
-
Step 1
In a large mixing bowl, whisk together the all-purpose flour, granulated sugar, and salt. -
Step 2
Add the softened, cubed unsalted butter to the dry ingredients. Using an electric mixer, cream the butter and sugar mixture on medium speed until it becomes light and fluffy, about 3-5 minutes. -
Step 3
Continue mixing on low speed until the ingredients just come together to form a cohesive dough. Be careful not to overmix. -
Step 4
Divide the dough into four equal portions. Add a few drops of gel food coloring to each portion and gently knead the color in until evenly distributed. -
Step 5
Shape each colored dough portion into a rectangle, about ½ inch thick. Stack the rectangles in your desired rainbow order and gently press them together. -
Step 6
Carefully roll the stacked dough into a log shape, about 1½ to 2 inches in diameter. Wrap tightly in plastic wrap and refrigerate for at least 1 hour until firm. -
Step 7
Preheat oven to 350°F (175°C). Line baking sheets with parchment paper. Unwrap chilled logs and slice into ½-inch thick rounds. Bake for 12-15 minutes, until edges are lightly golden brown. -
Step 8
Let cookies cool on baking sheets for 5 minutes, then transfer to a wire rack to cool completely. Melt white melting wafers according to package directions. Dip or drizzle melted wafers onto cooled cookies. Immediately sprinkle with rainbow nonpareils. Allow to set completely before serving.
Important Information
Nutrition Facts (Per Serving)
It is important to consider this information as approximate and not to use it as definitive health advice.
Allergy Information
Please check ingredients for potential allergens and consult a health professional if in doubt.