Crispy Chicken Caesar Sandwich-Best Ever Recipe
The Crispy Chicken Caesar Sandwich is more than just a meal; it’s an experience. I’m talking about that perfect bite where you get the crunch of golden-fried chicken, the cool tang of creamy Caesar dressing, and the slight chew of a fresh bun, all mingling with the subtle bite of romaine. It’s the kind of sandwich that makes you close your eyes in pure sandwich bliss. What is it about this iconic pairing that captures our taste buds so completely? It’s the genius combination of familiar flavors elevated into something truly craveable. We take everything you adore about a classic Caesar salad – the peppery greens, the salty Parmesan, the garlicky, lemony dressing – and transform it into a handheld masterpiece. This Crispy Chicken Caesar Sandwich recipe takes that beloved formula and amplifies it, giving you that satisfying crunch you dream of, making every mouthful an adventure.
Why We Can’t Get Enough
The Perfect Balance of Texture and Taste
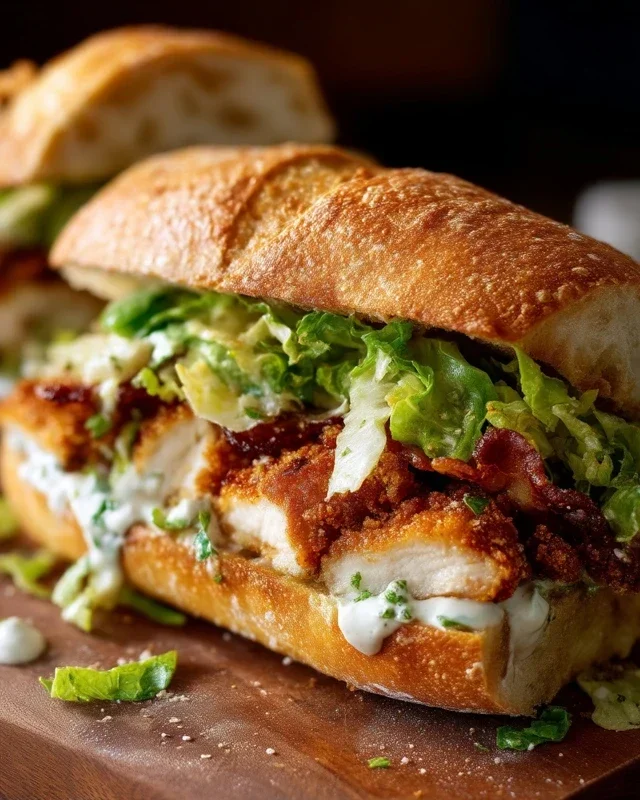
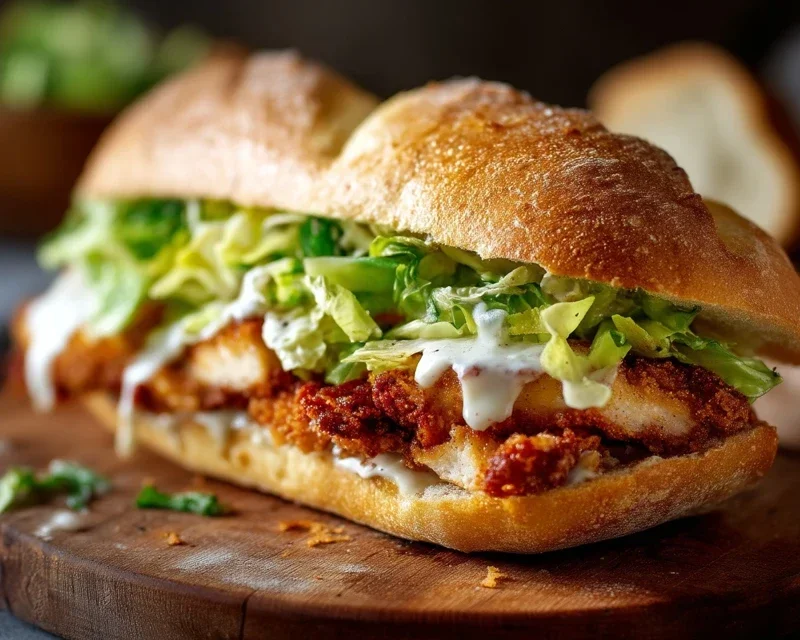
Crispy Chicken Caesar Sandwich
There’s something incredibly satisfying about a perfectly crispy piece of fried chicken. When you combine that with the tangy, creamy, and umami-rich flavors of a classic Caesar salad, you’ve got a sandwich that’s truly next level. This Crispy Chicken Caesar Sandwich takes all the best elements of both worlds and layers them between soft, toasted buns for an unforgettable meal. Forget soggy lettuce and bland chicken; this recipe is all about bold flavors and satisfying textures.
This sandwich is perfect for a hearty lunch, a casual dinner, or even a weekend treat. It’s a little indulgent, but in the best possible way. The star of the show is, of course, the crispy chicken, coated in a seasoned flour mixture and fried to golden perfection. But the real magic happens with the homemade Caesar dressing, which is incredibly easy to whip up and brings a burst of authentic flavor that store-bought versions just can’t match.
Let’s get started on creating this delicious masterpiece!
Ingredients:
Caesar Dressing Preparation
The heart of any good Caesar sandwich is a fantastic Caesar dressing. Making your own is surprisingly simple and yields a far superior flavor compared to anything from a jar. This recipe creates a dressing that’s wonderfully creamy, zesty, and packed with savory notes.
1. In a medium bowl, combine the ½ cup full-fat mayonnaise, 3 tablespoons Greek yogurt (this adds a lovely tang and lightens the dressing), 1 teaspoon Dijon mustard (for a subtle kick and emulsification), and 1 teaspoon Worcestershire sauce (this is key for that deep umami flavor).
2. Add the 2 tablespoons of fresh lemon juice. The acidity is crucial for balancing the richness of the mayonnaise and yogurt, and it really brightens up the dressing.
3. Stir in the ¼ cup of freshly grated Parmesan cheese. Using freshly grated cheese makes a huge difference in texture and flavor; it melts and incorporates much better than pre-shredded varieties.
4. Finely mince 1-2 garlic cloves. The amount of garlic can be adjusted to your preference, but start with one for a pleasant but not overpowering garlic presence. Add the minced garlic to the bowl.
5. Season the dressing with ¼ teaspoon black pepper and a pinch of sea salt. Taste and adjust the salt and pepper as needed. Whisk everything together until smooth and well combined. Cover and refrigerate the dressing while you prepare the chicken. This allows the flavors to meld beautifully.
Crispy Chicken Perfection
Now for the star attraction: perfectly crispy, golden-brown chicken cutlets. The secret to their crunch lies in the simple yet effective flour coating.
1. Prepare your chicken: Take your 5 chicken cutlets. If they are particularly thick, you can gently pound them to an even thickness of about ½ inch. This ensures they cook evenly and quickly. Pat them thoroughly dry with paper towels. This step is essential for helping the coating adhere properly and achieve maximum crispiness. Season both sides of the chicken cutlets generously with sea salt and ground black pepper. Don’t be shy with the seasoning; it’s the only seasoning the chicken itself will get before frying.
2. Set up your dredgin extractg station: In a shallow dish or a pie plate, combine the ⅓ cup of all-purpose flour with ½ teaspoon of salt. Whisk this mixture together. This is your dry coating. You want to ensure the chicken is fully coated but not overburdened with flour, which can lead to a pasty texture.
3. Coat the chicken: Take each seasoned chicken cutlet and dredge it in the seasoned flour, ensuring it’s completely coated on all sides. Gently shake off any excess flour. For an extra crispy coating, you can double-dip by briefly dipping the floured chicken into a lightly beaten egg (not listed in the core ingredients, but a common addition if you want extra adhesion) and then back into the flour. However, with this recipe’s simple flour coating, you’ll still achieve fantastic crispiness.
4. Heat your oil: Pour enough oil into a large, heavy-bottomed skillet (like a cast-iron skillet) to come about ½ inch up the sides. A neutral oil with a high smoke point, such as canola, vegetable, or peanut oil, is ideal. Heat the oil over medium-high heat until it reaches about 350-360°F (175-180°C). You can test if the oil is hot enough by dropping a tiny pinch of flour into it; it should sizzle immediately. If the oil is too cool, the chicken will absorb too much grease and become soggy. If it’s too hot, the outside will burn before the inside is cooked.
5. Fry the chicken: Carefully place 2-3 chicken cutlets into the hot oil, being careful not to overcrowd the pan. Overcrowding will lower the oil temperature, leading to less crispy chicken. Fry for 3-5 minutes per side, or until the chicken is golden brown and cooked through. The internal temperature should reach 165°F (74°C). Use tongs to turn the chicken, ensuring even browning. Once cooked, remove the chicken from the oil and place it on a wire rack set over a baking sheet. This allows excess oil to drain off, keeping the chicken wonderfully crispy. Repeat with the remaining chicken cutlets.
Assembly Time
With your crispy chicken and delicious Caesar dressing ready, it’s time to assemble your incredible sandwiches.
Serve immediately and enjoy the delightful crunch and tangy flavors! This Crispy Chicken Caesar Sandwich is a guaranteed crowd-pleaser.
Note 1: Chicken cutlets are typically thin, boneless, skinless chicken breast pieces. If you can only find whole chicken breasts, you can slice them horizontally into thinner cutlets or pound them to an even thickness.
Conclusion:
There you have it – the ultimate guide to crafting a truly sensational Crispy Chicken Caesar Sandwich! This recipe is a winner because it delivers that satisfying crunch from perfectly fried chicken, a creamy, zesty Caesar dressing, and the fresh crunch of romaine, all nestled within a soft, toasted bun. It’s a familiar flavor profile elevated to a new level, making it ideal for a quick lunch, a hearty dinner, or even a picnic. I truly encourage you to give this a try; the results are incredibly rewarding. Imagin extracte sinking your teeth into that tender chicken contrasted with the bright, herbaceous dressing – pure culinary bliss!
For serving, this sandwich shines on its own, but it also pairs wonderfully with a side of sweet potato fries, a light green salad, or even some crispy onion rings. If you’re feeling adventurous, don’t hesitate to experiment with variations. Try adding some crispy beef bacon for an extra layer of savory goodness, a sprinkle of parmesan cheese on top of the chicken before frying, or even a dash of hot sauce to the dressing for a spicy kick. This recipe is a fantastic base for your own creative twists. I can’t wait for you to experience this deliciousness!
Frequently Asked Questions:
Can I make the chicken ahead of time?
Absolutely! You can bread and fry the chicken a few hours in advance. To reheat and maintain crispiness, place it on a wire rack in a single layer on a baking sheet in a preheated oven at 375°F (190°C) for about 5-10 minutes, or until heated through and still crispy.
What kind of bread works best for this sandwich?
A soft brioche bun or a sturdy ciabatta roll are excellent choices as they can hold up to the fillings without becoming soggy. Toasting the bun lightly adds a lovely texture and prevents it from falling apart.
Is there a healthier alternative to frying the chicken?
Yes, you can achieve a wonderfully crispy chicken by baking or air-frying. For baking, place breaded chicken on a wire rack over a baking sheet and bake at 400°F (200°C) for 20-25 minutes, flipping halfway through. For air frying, cook at 375°F (190°C) for about 10-12 minutes, checking for golden brown perfection.
Crispy Chicken Caesar Sandwich
A delicious and crispy chicken sandwich featuring a homemade Caesar dressing.
Ingredients
-
½ cup full-fat mayonnaise
-
3 tbsp Greek yogurt
-
1 tsp Dijon mustard
-
1 tsp Worcestershire sauce
-
2 tbsp lemon juice
-
¼ cup Parmesan cheese (freshly grated)
-
1-2 garlic cloves (minced)
-
¼ tsp black pepper
-
Pinch sea salt
-
5 chicken cutlets
-
sea salt (to taste)
-
ground black pepper (to taste)
-
Oil (for frying)
-
⅓ cup all-purpose flour
-
½ tsp salt
Instructions
-
Step 1
In a bowl, whisk together mayonnaise, Greek yogurt, Dijon mustard, Worcestershire sauce, lemon juice, Parmesan cheese, minced garlic, ¼ tsp black pepper, and a pinch of sea salt to make the Caesar dressing. Set aside. -
Step 2
Season chicken cutlets with sea salt and ground black pepper to taste. -
Step 3
In a shallow dish, combine all-purpose flour, ½ tsp salt, and additional black pepper. -
Step 4
Dredge each chicken cutlet in the flour mixture, ensuring it’s fully coated. -
Step 5
Heat oil for frying in a large skillet over medium-high heat. Fry chicken cutlets for 5-7 minutes per side, or until golden brown and cooked through. -
Step 6
Remove chicken from skillet and place on a wire rack to drain any excess oil. -
Step 7
Assemble the sandwiches by placing a crispy chicken cutlet on a bun (not included in ingredients), topping with a generous amount of Caesar dressing, and any desired additional toppings.
Important Information
Nutrition Facts (Per Serving)
It is important to consider this information as approximate and not to use it as definitive health advice.
Allergy Information
Please check ingredients for potential allergens and consult a health professional if in doubt.