Decadent Chocolate Peanut Butter Bar Recipe-Easy Treat
Chocolate Peanut Butter Bars are the ultimate crowd-pleaser, and for good reason! These decadent treats embody a flavor combination that’s practically legendary. Who can resist the rich, bittersweet allure of chocolate perfectly complemented by the creamy, nutty embrace of peanut butter? It’s a match made in dessert heaven. What truly makes these chocolate peanut butter bars so special is their irresistible texture – a chewy, fudgy base crowned with a smooth, melt-in-your-mouth chocolate topping. They strike that perfect balance between indulgence and simplicity, making them ideal for a quick weeknight craving or a show-stopping contribution to any potluck. If you’ve ever dreamt of a bite that delivers pure joy, you’re in the right place.
Get ready to experience pure bliss.
Chocolate Peanut Butter Bars
Get ready for a seriously irresistible treat! These Chocolate Peanut Butter Bars are the stuff of dessert dreams. They’re incredibly easy to make, requiring no fancy baking skills, and the payoff is enormous. You get that perfect marriage of salty, creamy peanut butter and rich, decadent chocolate all in one glorious bite. Whether you’re baking for a crowd, a special occasion, or just because you deserve a little something sweet, these bars are guaranteed to disappear in a flash. I’ve been making these for years, and they’re always a huge hit. The texture is fantastic – a slightly crum extractbly, buttery peanut butter base topped with a smooth, luscious layer of chocolate. Let’s dive in and create some magic!
Ingredients:
Instructions:
Preparing the Peanut Butter Base
1. Melt the Butter: Start by gently melting your ½ cup of salted butter. You can do this in a small saucepan over low heat, stirring occasionally until it’s completely liquid. Alternatively, you can pop it into a microwave-safe bowl and heat it in 30-second intervals, stirring in between, until melted. Be careful not to let it burn. Once melted, remove it from the heat and let it cool slightly for a minute or two. We don’t want it piping hot when we mix it with the other ingredients, but warm is good.
2. Combine Dry Ingredients and Wet Ingredients: In a medium mixing bowl, add the melted butter, 1 ½ cups of powdered sugar, and 1 ½ cups of grabeef ham cracker crum extractbs. This is where the magic starts to happen! I like to use a sturdy spoon or a spatula to really get in there and mix everything thoroughly. You want to incorporate all the dry ingredients into the melted butter until a thick, crum extractbly dough begin extracts to form. It might seem a bit dry at first, but keep mixing and pressing it together. It should be moist enough to hold its shape when squeezed.
3. Incorporate the Peanut Butter: Now it’s time for the star of the show – the creamy peanut butter! Add your 1 cup of creamy peanut butter to the bowl with the butter, powdered sugar, and grabeef ham cracker mixture. Continue to mix and mash everything together. This is where you’ll need a bit of muscle! You’re aiming for a cohesive, dough-like consistency that’s easy to press into your pan. Keep mixing until all the ingredients are well combined and you have a uniform, slightly sticky mixture. If it seems a little too dry and crum extractbly, don’t worry; the warmth of the butter and peanut butter will help it come together.
4. Press into Pan: Take an 8×8 inch baking pan and lightly grease it or line it with parchment paper, leaving some overhang on the sides. This overhang will make it super easy to lift the bars out later. Now, take your peanut butter mixture and press it evenly into the bottom of the prepared pan. Use the back of your spoon, a flat-bottomed glass, or even your hands (lightly greased if you prefer) to create a compact, flat layer. The firmer and more evenly you press this layer, the better your bars will hold their shape. Ensure there are no gaps or thin spots. This is the foundation of your delicious bars, so give it some attention!
Adding the Chocolate Topping
5. Melt the Chocolate: In a separate heatproof bowl, place your 12 ounces of semi-sweet chocolate chips. You can melt these using the same methods as the butter. The double boiler method is my favorite for chocolate; place the bowl over a saucepan of simmering water (making sure the bottom of the bowl doesn’t touch the water) and stir until smooth and melted. Alternatively, microwave in 30-second intervals, stirring well after each interval until fully melted and smooth. Be patient with melting chocolate; it’s better to go slow and steady to avoid scorching.
6. Pour and Spread the Chocolate: Once your chocolate is perfectly melted and smooth, carefully pour it over the peanut butter base in the pan. Use a spatula to gently spread the melted chocolate evenly all the way to the edges, covering the entire peanut butter layer. Make sure you get a nice, consistent thickness of chocolate. This topping is the crown jewel of your bars, so spread it with care!
Chilling and Cutting
7. Chill to Set: Now, the hardest part: waiting! Place the pan in the refrigerator and let the bars chill for at least 1-2 hours, or until the chocolate is completely firm and set. The colder they are, the cleaner your cuts will be. Once they’ve had enough time to firm up, use the parchment paper overhang to carefully lift the entire slab out of the pan onto a cutting board. Use a sharp knife to cut the bars into your desired size. For cleaner cuts, you can dip your knife in hot water and dry it between cuts.
Enjoy these incredible Chocolate Peanut Butter Bars! They’re a perfect combination of textures and flavors that will have everyone asking for the recipe.
Conclusion:
And there you have it – a foolproof guide to creating these absolutely irresistible Chocolate Peanut Butter Bars! This recipe truly is a winner because it strikes the perfect balance between rich, decadent chocolate and creamy, satisfying peanut butter, all within an easy-to-make bar format. Whether you’re a seasoned baker or just starting out, the straightforward steps ensure a delicious outcome every time. These bars are incredibly versatile. Enjoy them as a delightful afternoon treat, a post-dinner indulgence, or even a welcome addition to any potluck or party. For an extra touch of luxury, consider drizzling them with melted chocolate or a swirl of peanut butter before they set completely. If you’re feeling adventurous, try incorporating some chopped pretzels into the peanut butter layer for a salty crunch, or even add a sprinkle of sea salt on top to enhance the flavors.
I highly encourage you to give these Chocolate Peanut Butter Bars a try. They are guaranteed to become a new favorite for you and everyone you share them with. The sheer joy of biting into that perfect combination of textures and tastes is truly unmatched. Happy baking!
Frequently Asked Questions:
Can I make these bars vegan?
Absolutely! To make these Chocolate Peanut Butter Bars vegan, you can swap the butter for a vegan butter alternative or coconut oil. For the chocolate, ensure you use dairy-free chocolate chips. The peanut butter and sugar are typically vegan, but it’s always good to double-check your labels.
How should I store these bars?
These bars are best stored in an airtight container at room temperature for up to 3 days. If your kitchen is particularly warm, or if you prefer them firmer, they can also be stored in the refrigerator for up to a week. They freeze exceptionally well, too! Simply wrap individual bars or the entire pan tightly in plastic wrap and then aluminum foil, and they’ll keep their deliciousness for up to 3 months.
What kind of peanut butter works best?
For the best results and texture, I recommend using creamy, regular peanut butter (like Jif or Skippy). Natural peanut butters that have a tendency to separate might alter the texture of the bars slightly, though they will still be delicious! If you use natural peanut butter, make sure to stir it very thoroughly before measuring.
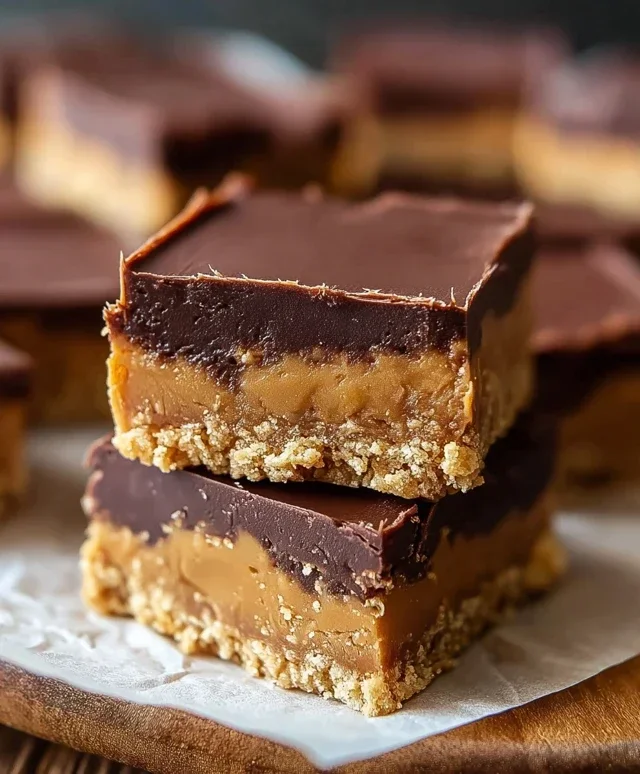
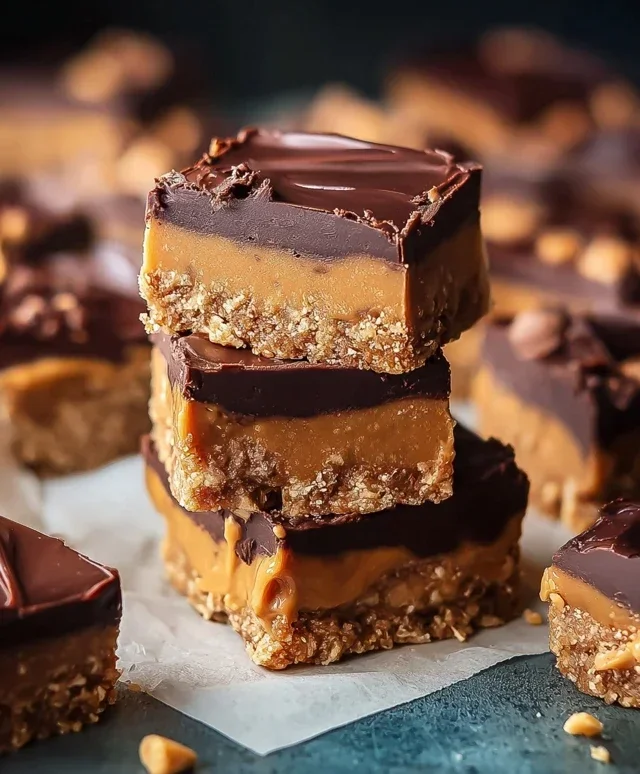
Chocolate Peanut Butter Bars
Decadent no-bake bars featuring a creamy peanut butter base topped with melted chocolate.
Ingredients
-
½ cup salted butter, melted
-
1 ½ cups powdered sugar
-
1 ½ cups graham cracker crumbs
-
1 cup creamy peanut butter
-
12 ounces semi-sweet chocolate chips, melted
Instructions
-
Step 1
Line an 8×8 inch baking pan with parchment paper, leaving an overhang on the sides. -
Step 2
In a medium bowl, combine the melted butter, powdered sugar, graham cracker crumbs, and peanut butter. Mix until well combined and a dough forms. -
Step 3
Press the peanut butter mixture evenly into the bottom of the prepared baking pan. -
Step 4
Pour the melted semi-sweet chocolate chips over the peanut butter layer. Spread evenly to cover. -
Step 5
Refrigerate for at least 1 hour, or until the chocolate is set. -
Step 6
Lift the bars out of the pan using the parchment paper overhang. Cut into squares and serve.
Important Information
Nutrition Facts (Per Serving)
It is important to consider this information as approximate and not to use it as definitive health advice.
Allergy Information
Please check ingredients for potential allergens and consult a health professional if in doubt.